Sign in with Microsoft
Sign in or create an account.
Hello,
Select a different account.
You have multiple accounts
Choose the account you want to sign in with.

You can publish a workbook to a Microsoft SharePoint library so that people can view or edit it in a web browser without needing Excel installed on their computers. Publishing is essentially the same as saving, but with some built-in options that let you control what people can see when they open the workbook in a browser.

Adopting an organization-wide practice of saving or publishing a workbook to a central SharePoint site can help you ensure that slightly different versions of the same workbook don't start popping up all over your organization when it's sent around in email.

By setting some publish options, you can emphasize specific parts of your workbook, such as charts, or exclude other parts from being viewed in the browser. For example, you can show a chart but not its underlying data. Or, you can show only certain worksheets to those people who need to see them and hide the other worksheets.

This article shows you how to publish a workbook from Excel for Windows and does not cover connecting a workbook or workbook data to an Excel Web Access Web Part on a SharePoint page.

When you publish a workbook to a SharePoint site, the entire workbook is saved to SharePoint. A user with the needed SharePoint permissions can view and work with the entire workbook either in the browser or in the Excel desktop program.

If Office for the web is deployed on SharePoint, viewing and working with your data in the browser can be very much like working with your data in the Excel desktop program. In fact, unlike the Excel desktop program, multiple users can simultaneously edit a workbook in the browser grid. When you view a workbook in the browser, if the Edit in Excel Online button is visible, you'll know that Office for the web is ready to use.

Prepare the workbook

Before you publish the workbook, you can choose to select only the worksheets or items that you want visible in the browser. Just remember that although you can limit what is viewable in this mode, the entire contents of the workbook are still saved to the SharePoint server.

If you want to include entire worksheets as an item in addition to other items, such as charts or PivotTables, define the entire worksheet as a named range. Select the entire worksheet, and then define a named range. This named range will then appear as an available item in the Publish Options dialog box when you are ready to publish.

To let users enter a value in a cell to work with a formula in another cell, set that cell as a defined name in Excel before you publish the workbook. You can then add that defined name as a parameter on the Parameters tab in the Browser View Options dialog box.

For example, the following shows a cell D2, that has the defined name "Rate." In the browser, a user enters a value of 5.625 in the Rate box in the Parameters pane, and then clicks Apply. That value then appears in cell D2, and the formula in A2 uses the value in D2. The result of the formula is recalculated, and shown in A2: $1,151.31.
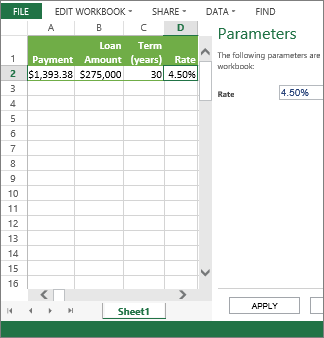
Entering a parameter in the pane uses it in cell D2

Note: If you create slicers for an Excel table and define a name for the range of cells containing the table and slicers, you won't be able to use the slicers to filter the table in the browser if you publish the defined range. If you publish the table or the entire worksheet or its workbook, the slicers will work as expected in the browser.

Publish the workbook

  1. Click the File tab, click Save As, and then click SharePoint.

  2. If you see your SharePoint folder under Current, Recent, or Older, click the folder you want.

    The Save As dialog box appears.


    Otherwise, click Browse, enter the web address for the SharePoint site, and then browse to the folder where you want to publish the workbook.
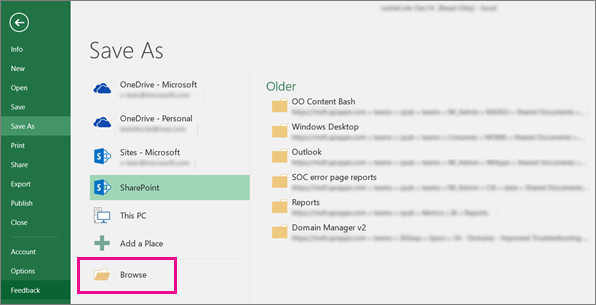
    Click a SharePoint folder or click Browse
  3. To select individual worksheets or items to publish from the workbook, click Browser View Options.
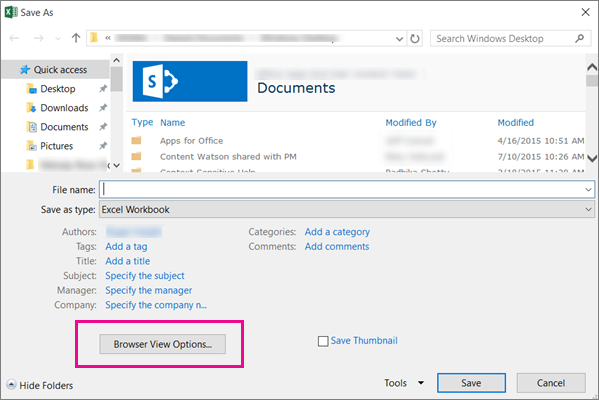
    In the Save As dialog box, click Browser View Options

    You'll see the Show tab and the Parameters tab.

  4. If you just want to publish the entire workbook, click Save. Otherwise, do one of the following:

    • To show the entire workbook in the browser, on the Show tab, select Entire Workbook in the list box.

    • To show only specific worksheets in the browser, on the Show tab, select Sheets in the list box, and then clear the check boxes for the sheets you don't want hidden in the browser.

      By default, all sheets are selected. To quickly make all sheets viewable after you unselected some of the check boxes, select the All Sheets check box.

    • To show only specific items in the browser (such as named ranges, charts, tables, or PivotTables), on the Show tab, select Items in the Workbook in the list box, and then select the check boxes for the items that you want to show.

    • On the Parameters tab, add any defined names you want to use to specify cells that are editable when users view the workbook in the browser, and then click OK.

  5. Save the workbook.

Notes: 

  • If you select items that have the same name (such as a chart and its underlying table of data), only one of these items will be available in the browser. To show all the items, make sure that each item in the workbook has a unique name.

  • You can rename tables on the Design tab in the Properties group, rename PivotTables on the Options tab in the PivotTable group, and rename charts or PivotCharts on the Layout tab in the Properties group. Rename other duplicate items, such as named ranges on the Formulas tab in the Defined Names group.

If Office for the web is deployed on SharePoint, viewing and working with your data in the browser can be very much like working with your data in the Excel desktop program. In fact, unlike the Excel desktop program, multiple users can simultaneously edit a workbook in the browser grid. When you view a workbook in the browser, if the Edit in Excel Online button is visible, you'll know that Office for the web is ready to use.

Edit in Excel Online on the Edit Workbook menu

For more information, see the article Differences between using a workbook in Excel and Excel Services.

Prepare the workbook

Before you publish the workbook, you can choose to select only the worksheets or items that you want visible in the browser. Just remember that although you can limit what is viewable in this mode, the entire contents of the workbook are still saved to the SharePoint server.

If you want to include entire worksheets as an item in addition to other items, such as charts or PivotTables, define the entire worksheet as a named range. Select the entire worksheet, and then define a named range. This named range will then appear as an available item in the Publish Options dialog box when you are ready to publish.

To let users enter a value in a cell to work with a formula in another cell, set that cell as a defined name in Excel before you publish the workbook. You can then add that defined name as a parameter on the Parameters tab in the Browser View Options dialog box.

For example, the following shows a cell D2, that has the defined name "Rate." In the browser, a user enters a value, 5.625, in the box in the Parameters pane and clicks Apply. That value then appears in cell D2, and the formula in A2 uses the value in D2. The result of the formula is recalculated, and shown in A2: $1,151.31.

See Excel Help for information about how to define ranges.

Entering a parameter in the pane uses it in cell D2

Note: If you create slicers for an Excel table and define a name for the range of cells containing the table and slicers, you won't be able to use the slicers to filter the table in the browser if you publish the defined range. If you publish the table or the entire worksheet or its workbook, the slicers will work as expected in the browser.

Publish the workbook

  1. Click File > Save As >SharePoint.

  2. If you see your SharePoint folder underCurrent Folder or Recent Folders, click the folder you want. Otherwise, click Browse and enter the web address for the SharePoint site. Then, browse to the folder where you want to publish the workbook. The Save As dialog box appears.

  3. To select individual worksheets or items to publish from the workbook, click Browser View Options. You'll see a Show tab and a Parameters tab. If you just want to publish the entire workbook, click Save. Otherwise, do one of the following:

    • To show the entire workbook in the browser, on the Show tab, select Entire Workbook in the list box.

    • To show only specific worksheets in the browser, on the Show tab, select Sheets in the list box, and then uncheck the boxes for the sheets you don't want hidden in the browser.

      By default, all sheets are selected. To quickly make all sheets viewable again after you uncheck some of the boxes, select the All Sheets check box.

    • To show only specific items in the browser (such as named ranges, charts, tables, or PivotTables), on the Show tab, select Items in the Workbook in the list box, and then check the boxes for the items that you want to show.

    • On the Parameters tab, add any defined names you want to use to specify cells that are editable when users view the workbook in the browser. Then click OK to close the dialog box.

  4. Save the workbook.

Notes: 

  • If you select items that have the same name (such as a chart and its underlying table of data), only one of these items will be available in the browser. To show all the items, make sure that each item in the workbook has a unique name.

  • If you select items that have the same name (such as a chart and its underlying table of data), only one of these items will be available in the browser. To show all the items, make sure that each item in the workbook has a unique name.

  • You can rename tables on the Design tab in the Properties group, rename PivotTables on the Options tab in the PivotTable group, and rename charts or PivotCharts on the Layout tab in the Properties group. Rename other duplicate items, such as named ranges on the Formulas tab in the Defined Names group.

  • You can rename tables on the Design tab in the Properties group, rename PivotTables on the Options tab in the PivotTable group, and rename charts or PivotCharts on the Layout tab in the Properties group. Rename other duplicate items, such as named ranges on the Formulas tab in the Defined Names group.

Need more help?

Want more options?

Explore subscription benefits, browse training courses, learn how to secure your device, and more.

Communities help you ask and answer questions, give feedback, and hear from experts with rich knowledge.

Was this information helpful?

What affected your experience?
By pressing submit, your feedback will be used to improve Microsoft products and services. Your IT admin will be able to collect this data. Privacy Statement.

Thank you for your feedback!

×