
People is where your personal contacts are stored and where you can view any address books that have been set up for your organization.
|
This article is for Outlook Web App, which is used by organizations that manage email servers running Exchange Server 2013 or 2010. If you're using Microsoft 365, or Exchange Server 2016 or 2019, your email program is Outlook on the web. For help with Outlook on the web, see Get help with Outlook on the web. |
To view the People page in Outlook Web App, do the following:
-
In a web browser, sign in to Outlook Web App using the URL provided by the person who manages email for your organization. Enter your user name and password, and then select Sign in.
-
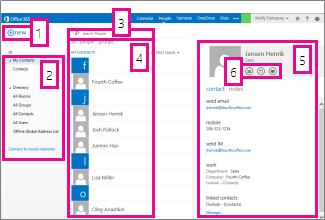
At the top of the page, select People.
-
Create a contact by selecting New.
-
All the places you can find contact information.
-
Search. Type a person’s name here to search for them in your contacts and in your organization’s address book. For more information, see Search in People.
-
List of all contacts in the current folder.
-
The contact card for the selected person.
-
Actions you can take directly from the contact card. Select the icons to send a message or create a meeting request.
To create a contact, select the folder under My Contacts that you want to create the contact in, select New, and then select Create contact.

This will open a blank contact form. Fill in any details that you want. Select the 
When you’re done, select 

Note: If you want to create a new Lync contact, open Lync on the computer or device you installed it on, and then add a contact from there. For more information, see Adding people to your contacts list.
You can create two types of groups in Outlook Web App. The first is a contact group, which is a group that is stored in your Contacts folder and contains entries from your personal contacts and from your organization’s address book.
To create a contact group, select the folder under My Contacts that you want to create the group in, select New, and then select Create group.

This will open a blank group form. Enter the group name that you want and any notes. To add members, type the name of the person you want to add in Members. Outlook Web App will search for a match in your Contacts and in your organization’s address book. If a match isn’t found, you can search for that person. You can also type an email address directly in Members. Press Enter to add your selection to the group.
When you’re done, select
Depending on the settings on your account, you might be able to create groups that will appear in your organization’s address book. To learn how to create and manage shared groups, see Distribution groups.
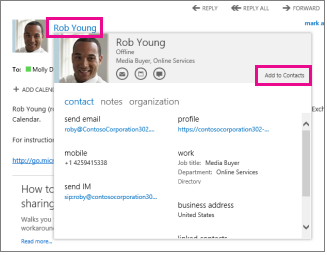
You can add any contact that you see in a message to your Contacts. To add a contact from a message:
-
Select the name, right-click, and then select View details to see the contact card.
-
Select Add to Contacts.
-
Add any additional information you want.
-
Select
Find and select the contact that you want to edit. You can only edit contacts in the folders under My Contacts. When you select a contact, you’ll see their details in the reading pane. To edit their information, select Edit. Make any changes that you want, and then select
Outlook Web App detects contacts that have the same or similar display names and will link them into a single view. To see which contacts have been linked, choose a contact card and then, in the reading pane under Linked contacts, select Manage. You can also choose the contacts that you want to link.
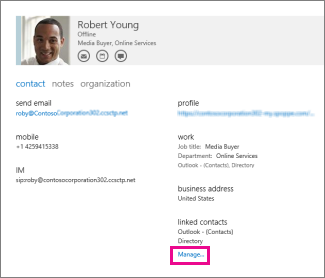
This will display the linked contacts, if any, for that card.

-
View all the contacts linked to this contact card. If a link has been added that you want to remove, select it to view it or unlink it.
-
Links that might match this person are shown in Suggested links.
-
You can find additional contacts to link by searching.
Any changes you make will be saved automatically as you make them. When you’re done, select


