
Note: This article has done its job, and will be retiring soon. To prevent "Page not found" woes, we're removing links we know about. If you've created links to this page, please remove them, and together we'll keep the web connected.
If you create templates for others to use, you can overwrite the text in the default placeholders by adding custom placeholder text, which describes or specifies the types of information that you want the users of your template to enter.
The sample template below contains instructional text that prompts the user of the template to enter specific types of information, such as the date, visions, targets, etc.

Notes:
-
It's important to note that there's a difference between how you use a text placeholder versus a text box in Slide Master View. Here's the difference:
-
If you add a text box in Normal view, the text is editable by anyone.
-
Add a text placeholder from Slide Master View when you want to prompt users of your template to replace the prompt text with text that is pertinent to their own project. Normal behavior of custom prompt text in a text placeholder is that it disappears when you begin typing.
-
Add a text box in Slide Master View when you want it to contain permanent, un-editable text.
Add text that provides instructions on how to use your template
-
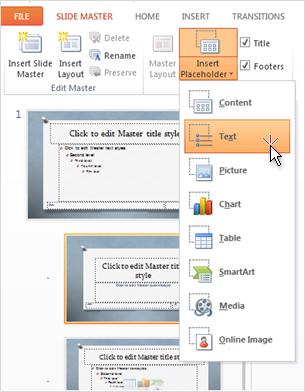
Click View > Slide Master.
-
In the pane that contains the slide master and layouts, click the layout that you want to add a text placeholder to.
-
Click Slide Master > Insert Placeholder >Text.
-
Drag the mouse pointer to draw the text placeholder on the slide layout.
-
Select the default text in the placeholder and replace it with your own instructional text.
Note: If an unwanted bullet appears before your instructional text, click the Home tab, and in the Paragraph group, click the down arrow next to Bullets, and then click None.
-
Click Slide Master > Close Master View.
Apply your changes to existing slides
If you do the above steps in a presentation that is already in progress, you must reapply the layout to the slides in your presentation when you return to Normal view. This ensures that the slides in your presentation will contain your most recent updates to the layout. For instructions, see "Apply the updates so that they appear on your slides" in Edit and re-apply a slide layout.


