
In this article
Introduction to layout tables
You can use layout tables to design a more organized, professional-looking form template. A layout table is a framework that includes rows and columns for organizing and arranging the form template's content, including controls, sections of a form template, and logos or other pictures.
In the following example, a layout table is used to organize text boxes inside a section on a form template.
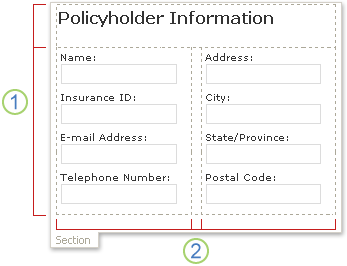
1. This layout table has two rows.
2. There are three columns in the second row. The center column is used only for spacing purposes.
The borders of a layout table appear as dashed gridlines in design mode. When users fill out a form that is based on your form template, these gridlines are not visible.
Tip: To hide the gridlines in design mode, click Hide Gridlines on the Table menu.
In the Layout task pane, you will find a collection of predesigned layout tables. You can insert these tables onto your form template and modify them to suit your needs. For example, you can click Three-Column Table to quickly insert an empty table with one row and three columns into your form template. If you want to add an extra row to that table, click in a table cell on the form template, and then click Add Table Row in the Layout task pane.
If you prefer to create your own layout table, you can insert a custom layout table that has a specific number of rows and columns. Alternatively, you can draw a custom layout table, which can be helpful if you want to create a more complex design. For example, you can create a layout table that contains cells of different heights or a varying number of columns per row.
Insert a predefined layout table
-
On the form template, place the cursor where you want to insert the layout table.
-
On the Format menu, click Layout.
-
In the Insert layout tables list in the Layout task pane, click the type of layout table that you want.
-
To add extra rows and columns to the table, click in a table cell on the form template, and then click the options that you want in the Merge and split cells list.
Tip: To delete rows, columns, or the table itself, right-click anywhere in the table, point to Delete, and then click the option that you want.
Insert a custom layout table with specific dimensions
-
On the form template, place the cursor where you want to insert the layout table.
-
On the Tables toolbar, click Insert, and then click Layout Table.
-
In the Insert Table dialog box, enter the number of columns and rows that you want to include in the table.
Draw a custom layout table
-
On the form template, place the cursor where you want to draw the layout table.
-
On the Tables toolbar, click Draw Table.
The pointer changes to a pencil.
-
To define the outer boundaries of the table, draw a rectangle on the form template, and then draw the column and row boundaries inside that rectangle.
-
To erase a line or block of lines, click Eraser

Automatically format the controls inside a layout table
You can use the Controls task pane or the Data Source task pane to insert controls on your form template. If you use the Data Source task pane to insert controls, you can use a shortcut that allows you to instantly insert controls and their corresponding labels inside a layout table in a section. This shortcut works best when you are designing a form template that is based on a database, Web service, or other external data source, and you want to insert a nonrepeating group from the data source. Controls such as sections and optional sections are bound to nonrepeating groups.
The following picture shows an employee group selected in the Data Source task pane, and the Controls in Layout Table command being chosen on the shortcut menu.
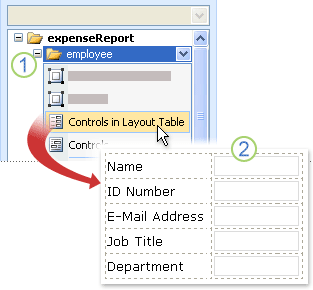
1. When you click the arrow next to the employee group, a menu offers options for inserting controls. To insert controls inside a layout table, click Controls in Layout Table on the menu.
2. Each field in the employee group is now neatly represented by a control and corresponding label on the form template. The control labels are derived from field or group names in the data source.
-
If the Data Source task pane is not visible, click Data Source on the View menu.
-
In the Data Source task pane, select a nonrepeating group that contains one or more fields.
Note: If you select a repeating group by mistake, you get a different set of commands on the shortcut menu.
-
Right-click the group, and then click Controls in Layout Table on the shortcut menu.
Microsoft Office InfoPath instantly adds a layout table to the form template that contains the controls and labels for each field in the selected group. InfoPath determines the type of control to add, based on the data type for the field or group. For example, if the individual fields in a group use a Text (string) data type, InfoPath adds text box controls in the table cells.


