
A digital ID enables you to send digitally signed messages using Microsoft Outlook. A digital ID—also known as a digital certificate—helps prove your identity and helps prevent message tampering to protect the authenticity of an email message. You also can encrypt messages for greater privacy.
Note: A digital signature isn’t the same as a message signature, which is a customizable salutation. A digital signature adds unique code to a message that only comes from the digital ID held by the true sender.
What would you like to do?
You will need to obtain a digital ID issued by an independent certification authority.
Your organization, however, may have policies that require a different procedure. See your network administrator for more information.
You might choose to have more than one digital ID—one for your digital signature, which in many areas can have legal significance, and another for encryption.
-
On the File tab, click Options > Trust Center.
-
Under Microsoft Outlook Trust Center, click Trust Center Settings.
-
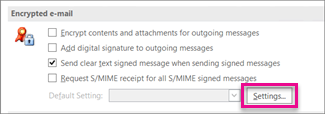
On the E-mail Security tab, under Encrypted e-mail, click Settings.
Note: If you have a digital ID, the settings to use the digital ID are automatically configured for you. If you want to use a different digital ID, follow the remaining steps in this procedure.
-
Under Security Setting Preferences, click New.
-
In the Security Settings Name box, enter a name.
-
In the Cryptography Format list, click S/MIME. Depending on your certificate type, you can choose Exchange Security instead.
-
Next to the Signing Certificate box, click Choose, and then select a certificate that is valid for digital signing.
Note: To learn if the certificate is intended for digital signing and encryption, in the Select Certificate dialog box, click View Certificate. An appropriate certificate for cryptographic messaging (such as digital signing) might state, for example, "Protects email messages."
-
Select the Send these certificates with signed messages check box unless you'll be sending and receiving signed messages only within your organization.
Note: The settings that you choose become the default when you send cryptographic messages. If you don’t want these settings to be used by default for all cryptographic messages, clear the Default Security Setting for this cryptographic message format check box.
To send and receive encrypted email messages, both the sender and the receiver must share their digital ID certificates with each other.
-
Open a message that is digitally signed as indicated in the message list by a Signature icon.
-
Right-click the name in the From box, and then click Add to Outlook Contacts.
-
If you already have an entry for this person, in the Duplicate Contact Detected dialog box, select Update information of selected Contact.
Notes:
-
A backup copy is saved in the Deleted Items folder.
-
The certificate is now stored with your contact entry for this recipient. You can now send encrypted messages to this person.
-
To view the certificate for a contact, double-click the person's name, and then click the Certificates tab.
-
View a certificate for a contact
-
On the Navigation bar, click People.
-
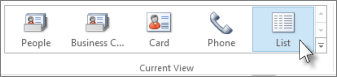
On the Home tab, click List.
-
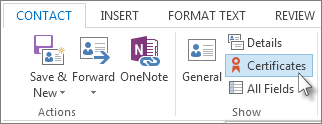
Double-click the person’s name, and then on the Contact tab, click Certificates.
Note: This feature requires a Microsoft Exchange Server account.
To get an Exchange Server digital ID—for example, through Key Management Service—the administrator of your Exchange account must have security running on the server and give you a special password, which is known as a token. For more information, see your Exchange administrator.
-
On the File tab, > Options > Trust Center
-
Under Microsoft Outlook Trust Center, click Trust Center Settings.
-
On the E-mail Security tab, under Digital IDs (Certificates), click Get a Digital ID.
-
Click Set up Security for me on the Exchange > OK
-
In the Digital ID Name box, type your name.
-
In the Token box, type the special password that your Exchange administrator assigned to you.
-
In the Microsoft Office Outlook Security Password dialog box, type a different password for the digital ID, and then type the password again in the Confirm box.
Note: You'll receive a message in your Inbox from the Exchange administrator which requires you to enter the password created in this step.
-
In the dialog box that appears, enter your password, select the Remember password for check box, and then enter the number of minutes that you want Outlook to remember your password.
-
In the Root Certificate Store message that appears, click Yes.


