
Most customers appreciate being remembered in shops and restaurants that they frequent — not just to be called by name, but to be known by their preferences. For example, they might be greeted with one of the following:
"Remember how you asked us to let you know when the new samples arrive? They're here, and we have them in your favorite color!"
"I've saved your favorite table for you, and the salmon that you enjoyed so much last time is on the specials menu today."
Why personalize?
Customers usually like to be remembered and helped — if for no other reason, because they get what they want more quickly that way. This kind of personal attention builds customer loyalty. When shops and restaurants keep close track of customers' interests, customers usually respond by returning and spending more time and money there.
Mailings can work the same way. When you include content in a mailing that addresses your customers' specific interests, the customers are much more likely to pay attention and respond.
Collect the customer information that you need
Clearly, tracking individual customers' interests and characteristics can be a complex task. You must collect the information, store it in a form that you can easily retrieve, and filter it for characteristics that make sense for your business and that will help you to make the most of your mailing investment. The more accurately you can identify customers who share common interests, the larger the likely return on your investment.
Microsoft Office Publisher can help. You can enter the customer data into a database that you create directly in Microsoft Publisher or in other programs, such as Excel, Outlook, Outlook with Business Contact Manager, and Access. You can also use lists that you purchase, such as those from Microsoft List Builder.
After you have collected the information, you can analyze it to figure out what your best customers have in common, group customers by their affinities, and personalize your mailings to draw attention to their specific interests.
Setting up the data file
The addresses and personal information that you add to publications have to come from somewhere. That's why the first step in preparing for a mass mailing is to set up a data file that contains contact information about your customers. For your data file, you can use a Microsoft Office Excel worksheet, a Microsoft Office Word table, a Microsoft Office Access database, or even a Microsoft Office Outlook Contacts folder. Your mailing list will be built from this data file.
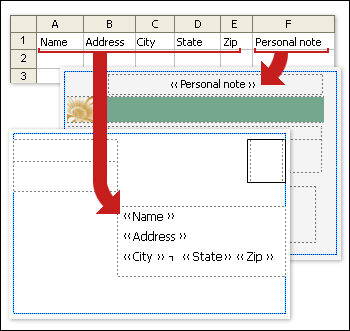
When you set up the data file, keep the following points in mind (as you read through the list, refer to the following picture, which shows columns in an Excel worksheet and the merge fields on two sides of a postcard):
-
Types of information in columns Each column in the data file corresponds to one piece of information that you want to add to a publication. If, for example, you want to add a customer's address and a personal note to each copy of a postcard that you print, you must have columns in the data file for the name, street address, city, state, postal code, and a personal note.
-
One entry per row Each row in the data file contains information that goes onto one copy of the publication. For example, all of the information in row 2 of the Excel worksheet goes onto the postcard that you are sending to customer 1, all of the information in row 3 goes onto the postcard that you are sending to customer 2, and so on.
-
Add fields in your publication To use the information that is in your data file, you place fields in your publication — one field for each piece of information that you want to appear. For example, if you want to print the name, street address, city, state, postal code, and a personal note on each copy of a postcard, the postcard publication must contain a field for each of those pieces of information.
Tip: If you want to merge pictures into the publications that you intend to mail, your data file must include a column that contains picture file name data. Each row in that column should contain the file name of a specific picture, for example: Firstphoto.jpg. If the pictures are not located in the same folder that the data source is, include the path to each picture.
Adding an address block and a greeting
Both an imprinted address block on a newsletter (rather than an adhered mailing label) and a greeting that includes the customer's name are simple personalization techniques that indicate that your mailing is meant specifically for each recipient.
Add an address block that has name, address, and other information
-
On the Mailings tab, in the Write & Insert Fields group, click Address Block.
-
In the Insert Address Block dialog box, click the address elements that you want to include, and then click OK.
Note: If the names of the data fields in your data source do not match the names of the fields that Publisher uses for the address block, you may need to click Match Fields in the Insert Address Block dialog box. In the Match Fields dialog box, use the drop-down lists to select the fields from your data source that correspond to the Publisher fields.
Add a greeting line
-
On the Mailings tab, in the Write & Insert Fields group, click Greeting line.
-
In the Insert Greeting Line dialog box, select the greeting line format, which includes the salutation, the name format, and following punctuation. Or type a new entry in each text box.
-
Enter the text that you want to appear in cases in which Publisher cannot interpret the recipient's name — for example, when the data source contains no first or last name for a recipient, but only a company name.
-
Click OK.
Note: If the names of the data fields in your data source do not match the names of the fields that Publisher uses for the greeting line, you may need to click Match Fields in the Greeting Line dialog box. In the Match Fields dialog box, use the drop-down lists to select the fields from your data source that correspond to the Publisher fields.
Add a picture to an address
You can add a picture or photo to an address block, as well as to any area of your publication. Which picture is shown can be varied to suit the customer's brand interest, age, gender, or other data fields that you track.
-
In your publication, click where you want to insert the merge field for a picture (for example, next to the address block).
-
On the Mailings tab, in the Write & Insert Fields group, click Picture > Insert Picture field.
-
In the Insert Picture Field dialog box, select the field that corresponds to the photo information in your data file, and then click OK.
Publisher inserts a merge field within a picture frame into your publication at the selected insertion point. You can resize or move the picture frame.
Adding notes and hyperlinks
If you have set up your data file to store relevant personal information about your customers, as described in Tips for mailing lists, you can use the collected information to deliver content that is targeted specifically at your customers' interests. Delivering content that matches customer interests is a powerful form of personalization. For example, you might:
-
Tailor separate mailings by gender Announce a new product line to only men or only women by including each customer's gender ("male" or "female") in your mailing list, and then filter on each gender, or simply filter the list on the different entries in the Title field ("Mr." and "Ms."). You can include a URL (in print) or link directly to a Web page (in e-mail) for each gender that describes their options. To do this, add the appropriate URL to each record in a column designated for this purpose.
-
Focus on recipients of a certain age Notify customers of products or services that are appropriate for those customers' stage of life (such as planning for retirement in their twenties versus planning for retirement in their fifties) by collecting the birth dates of your customers as birth year (such as "1945").
If you want to offer a promotional gift to all customers whose birthday falls in the current month, you could collect their birth dates as month, day, year (such as "January 1, 2008").
-
Use purchase history Send special announcements to those who have made recent major purchases, or notify customers when you have new models of their favorite brands. If you track their specific purchases, you can sort your data file to identify brand purchase history when you get a new shipment of the product line, or to inform them about related products that other customers have purchased ("Customers who bought your item also found this item useful").
Add a personal note
You can send a customized text message to each customer segment that shares a common interest. To do so, add a field (or column) to your data file to contain these messages, and then add the appropriate message to each record (or row). You might associate a particular message with customers who have the same gender, who have the same age or birth date, or who made purchases in the past six months. For more information about preparing your mailing list, see Tips for mailing lists.
-
Click a text box in your publication where you want personalized information to appear. Alternatively, click Draw Text Box on the Home tab, and then drag a rectangle the size that you want.
-
If there is already text in the text box, and you want to replace that text, select it, too.
-
If there is already text in the text box, and you want to keep that text, position the cursor where you want to insert the personalized message.
-
-
In the Mail Merge task pane, click the appropriate merge field in the list box in the task pane.
Add a personalized hyperlink
You can include a hyperlink that points your customers to a Web page that addresses their particular interests or attributes. You can add customers' names or other data fields to the text of the hyperlink to make it truly personal.
-
On the Mailings tab, in the Write & Insert Fields group, click click Insert personalized hyperlink.
-
In the Insert Personalized Hyperlink dialog box, type the text that you want displayed and the address of the Web site that you want recipients to go to when they click the hyperlink.
-
If you want to use a data field in the display text, click the display text, and then, in the list box on the right, click the data field that you want to insert.
Note: If you insert a data field, you can specify a substitute display text and Web address for any blank entries that correspond with the inserted data field. Select the Use default text for blank entries and Use default hyperlink for blank entries check boxes, as needed, and then type the substitute text and Web address.


