
Customize a slide master
Use a slide master to add consistency to your colors, fonts, headings, logos, and other styles, and to help unify the form of your presentation.
You can change a slide master's colors, fonts, or effects. You can move, hide, or show placeholders. You can also change the orientation of the page from portrait to landscape, or vice versa.

Create and customize one or more slide masters
-
On the View tab, select Slide Master.

-
When you open Slide Master view, a slide master is shown in the thumbnail pane with the default, associated layouts below it. If you want to add another slide master, do the following:
-
Click a location in the slide thumbnail pane where you want the new slide master to appear.
-
On the Slide Master tab, select Insert Slide Master.
Note: In the slide thumbnail pane, the slide master is the larger slide image at the top, and the associated layouts are positioned below the slide master.
-
-
Do any of the following:
-
To create one or more custom layouts or to modify existing layouts, see Apply or change a slide layout.
-
To remove any of the built-in slide layouts that accompany the default slide master, in the slide thumbnail pane, click each slide layout that you want to delete, and then on the Slide Master tab, click Delete.
-
To apply a design or theme-based colors, fonts, effects and backgrounds, see Create your own theme in PowerPoint.
-
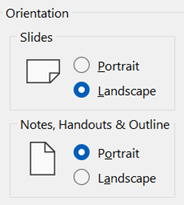
To set the page orientation for all of the slides in your presentation, on the Slide Master tab, select Slide Size > Custom Slide Size. Under Orientation, select the orientation you want.
-
To control whether footers (the slide number, date, and footer-text placeholders) are visible on a particular type of slide: In the thumbnail pane, select a slide layout, then on the Slide Master tab, select or clear Footers. To assign specific text to any of the footers, on the ribbon, select Insert > Headers, then select the options you want. See Insert or change the slide numbers, date, or footer for on-screen slides for more details.
-
-
After you make your changes, on the Slide Master tab, select Close Master View.
-
If you want to save this as a template to reuse again, select File > Save as (or Save a Copy), change the file type to template, enter a file name, and select Save.
See Also
Create and customize one or more slide masters
-
On the View tab, click Slide Master.

-
When you open Slide Master view, a blank slide-master with the default, associated layouts appears. If you want to add another slide master, do the following:
-
Click a location in the slide thumbnail pane where you want the new slide master to appear.
-
On the Slide Master tab, click Insert Slide Master.
Note: In the slide thumbnail pane, the slide master is the larger slide image, and the associated layouts are positioned beneath the slide master.
-
-
Do any of the following:
-
To create one or more custom layouts or to modify existing layouts, see Apply or change a slide layout.
-
To remove any of the built-in slide layouts that accompany the default slide master, in the slide thumbnail pane, click each slide layout that you want to delete, and then on the Slide Master tab, click Delete.
-
To apply a design or theme-based colors, fonts, effects and backgrounds, see Create your own theme in PowerPoint.
-
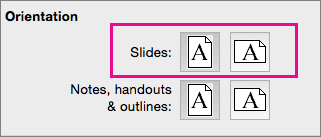
To set the page orientation for all of the slides in your presentation, on the Slide Master tab, click Slide Size > Page Setup. Under Orientation, click the orientation you want.
-
To add text that will appear as a footer at the bottom of all of the pages in your presentation, on the Slide Master tab, click Slide Size >Page Setup > Header/Footer.
-
-
After you make your changes, on the Slide Master tab, click Close Master.
-
If you want to save this as a template to reuse again, click File > Save as Template, type a file name, and click Save.
Background information
See Also
Create or change slide layouts in PowerPoint for Mac
Add a transparent picture (watermark) to your slides in PowerPoint for Mac
Add a logo, company name, or header or footer text to handouts
Add page numbers, the date and time, or footer text to all slides in PowerPoint for Mac
Change footer formatting on all slides in PowerPoint for Mac


Need more help?
Want more options?
Explore subscription benefits, browse training courses, learn how to secure your device, and more.


Communities help you ask and answer questions, give feedback, and hear from experts with rich knowledge.


