
My Site settings for Microsoft SharePoint Administrators lets you update general settings like search scopes and languages options. My Site websites are personal sites that provide users in your organization with a rich set of social networking and document management features. These features include a Newsfeed site where site users can interact, a OneDrive for work or school site for storing and sharing business documents, photos, and other media files. You can allow or prevent newsfeed user activity, and manage links of confidential information. It also includes a Sites page for saving useful websites, and a profile page where users can introduce themselves to others in their organization.
Note: You must have Microsoft 365 administrator permissions for using the SharePoint Administration Center to perform the tasks in this article.
The My Site settings are configured during initial creation of your SharePoint site so that individual users can create personal sites and use all of admin center to change the settings, based on the needs of your organization. You can then review or update them. The order of options listed here might be different than what is in your Setup My Sites dialog.
To verify or update My Site settings:
-
Sign in to Microsoft 365 as a global admin or SharePoint admin.
-
Select the app launcher icon

-
In the left pane, choose Admin centers > SharePoint.
-
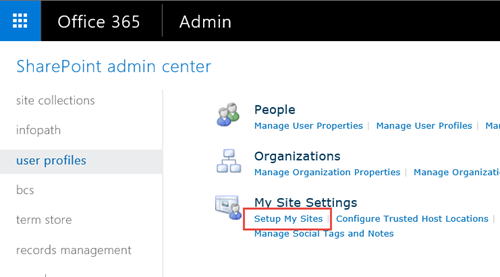
Click user profiles.
-
Under My Site Settings, click Setup My Sites.
-
Do one or more of the following, based on the needs of your organization:
-
To redefine the Search Center that is used when a user searches from the My Site profile page, in the Preferred Search Center section, in the Preferred Search Center box, enter the URL of the Search Center. For example, http://sitename/SearchCenter/Pages/.
-
To change the default search scope for finding people and for finding documents, in the Preferred Search Settings section, select a search scope for finding people and for finding documents.
-
To change which users can read personal sites, in the Read Permission Level section, enter the accounts for which you want to grant Read permission on personal sites.
Note: By default, this setting includes all authenticated users, but you can select a more focused group of users if that’s required.
-
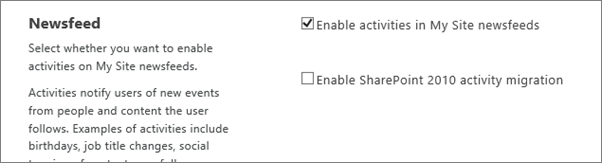
To enable or disable Newsfeed activities, in the Newsfeed section, select or clear the Enable activities in My Site newsfeeds check box. For more information about this setting, see Disable or enable Newsfeed activities.
-
To define the email address that will appear in notifications sent from My Site, in the Email notifications section, enter a sender’s email address in the String to be used as sender’s email address box, for example jsmith@contoso.com, and then click OK.
-
To assign a secondary My Site owner, in the My Site Cleanup section, enter the user account for the person you would like to assign as the secondary My Site owner. When a primary My Site owner is removed from the directory service, the site will be flagged for deletion after thirty days. The secondary My Site owner is used when a user is removed from the directory service to give a chance to recover data that might otherwise be lost.
Ordinarily, the user’s My Site owner would be that person’s manager. If the user has no manager, the secondary My Site owner becomes the owner of the My Site. The secondary My Site owner could be you or another administrator to whom you want to delegate this responsibility. This setting is most useful for organizations that do not have managers, such as schools. We recommend defining a secondary My Site owner for all sites, as a backup to the manager.
Note: To delete the My Site owner, make sure the Enable access delegation setting is selected.
-
To make My Site information public, in the Privacy Settings section, click Make My Sites Public. For security, My Site information is private by default, with options that allow individual site owners to select what information they want to share. For example, a site owner might not want to share personal contact information but may want to share social activities, such as whom they’re following. Privacy Settings affect people’s profile information and Newsfeed activities.
-
Note: The My Site Host, Personal Site Location, and Site Naming Format sections are disabled because these settings are pre-configured for you in SharePoint and can't be changed.
My Site activities, are enabled in the Newsfeed by default in SharePoint so that people in your organization can share their activities and use social features, such as following people and documents, that support collaboration. Newsfeed activities include when someone posts a message to the feed, or when someone starts following another person, document, or site. These activities appear in the person’s Newsfeed and in the Newsfeed of anyone who follows that person. However, you can disable Newsfeed activities if your organization chooses not to promote these capabilities. If someone has disabled Newsfeed activities and your organization later decides to enable them, you can reverse the setting by selecting a single check box.
To disable or enable Newsfeed activities:
-
Sign in to Microsoft 365 as a global admin or SharePoint admin.
-
Select the app launcher icon
-
In the left pane, choose Admin centers > SharePoint.
-
Select user profiles.
-
Under My Site Settings, click Setup My Sites.
-
In the Newsfeed section, select or clear the Enable activities in My Site newsfeeds check box.
-
Click OK.
For more information on social and tagging settings, see Manage personal and social features.
SharePoint administrators can add links to trusted My Site host locations when they want to give users My Site access on multiple User Profile Service applications. In most cases, links to trusted My Site host locations are targeted to individual users or groups of users based on an identified business need. The links can be maintained and changed over time as business and user needs change. For example, you might need to create links to trusted My Site host locations if you have some users on SharePoint and other users on an on-premises deployment of SharePoint Server (also known as a hybrid environment).
A SharePoint administrator can delete a link to a trusted My Site host location when the users targeted by the link no longer require access to My Site websites in multiple locations.
To add a trusted My Site host location:
-
Sign in to Microsoft 365 as a global admin or SharePoint admin.
-
Select the app launcher icon
-
In the left pane, choose Admin centers > SharePoint.
-
Select user profiles.
-
Under My Site Settings, click Configure Trusted Host Locations.

-
Click New Link to add a trusted My Site host location.
-
Enter the URL of the trusted personal site location in the URL box.
-
In the Description box, enter a description for the trusted personal site location.
-
In the Target Audiences box, either type the user names or group names in the corresponding box or click Browse to select audiences by browsing and then click OK.
Note: If you do not specify target audiences, all users will be redirected to the trusted My Site host location.
To delete a trusted My Site host location.
-
Sign in to Microsoft 365 as a global admin or SharePoint admin.
-
Select the app launcher icon
-
In the left pane, choose Admin centers > SharePoint.
-
Select user profiles.
-
Under My Site Settings, click Configure Trusted Host Locations.
-
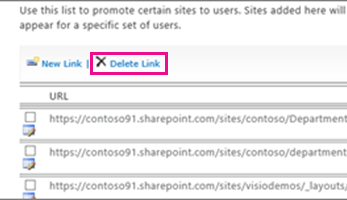
Select the box next to the trusted My Site host location that you want to delete and then click Delete Link to delete that trusted My Site host location.
When a user saves a document from an Office client application, such as Microsoft Word, for the first time, the Save As dialog box appears. The Save As dialog box has Favorite Links, which displays shortcuts to locations where a user might want to save a file. You can add a link to the list of favorite links by publishing a link to Office client applications. When you add a link, you also specify a target audience of users who will see the link. Use this procedure to publish a link to Office client applications. For example, you might want to add a link to a SharePoint document repository so that certain users can easily save Office client files in the document repository.
Note: These favorite links will be visible only within Microsoft Office 2010 client applications.
To add a favorite link in Office client applications:
-
Sign in to Microsoft 365 as a global admin or SharePoint admin.
-
Select the app launcher icon
-
In the left pane, choose Admin centers > SharePoint.
-
Select user profiles.
-
Under My Site Settings, click Publish Links to Office Client Applications.
-
Click New Link.
-
In the URL box, type the URL of the location where users will be able to publish links.
-
In the Description box, type a brief name for this location. This is the name that will appear in the Favorite Links section of the Save As dialog box.
-
In the Type box, select the type of location that this link represents. For example, if the target location is a SharePoint document library, select Document Library.
-
Optionally, in the Target Audiences box, either type the name of the user or group to add, or use the address book to find a user or group to add. Separate multiple user names or group names with a semicolon (;). You may also type All site users to select all users.
-
Click OK. The new link is displayed in the list of links on the Published links to Office client applications page.
To delete a favorite link in Office client applications:
Tip: Use this procedure to delete a link to Office client applications. For example, you might want to delete a link to a SharePoint document repository when it is no longer needed.
-
Sign in to Microsoft 365 as a global admin or SharePoint admin.
-
Select the app launcher icon
-
In the left pane, choose Admin centers > SharePoint.
-
Select user profiles.
-
Under My Site Settings, click Publish Links to Office Client Applications.
-
Select the check box to next to the link that you want to delete, and then click Delete Link.
The Microsoft 365 admin center includes a link to Sites for all users with a SharePoint subscription. This page lists sites that users are following, as well as suggested sites. It also lists promoted sites—a good way to bring attention to a site. By default, the Public site and Team site are promoted sites. As the Microsoft 365 global admin, you can choose to add and delete these promoted sites.
To add or delete promoted links in Microsoft 365 user profile pages:
-
Sign in to Microsoft 365 as a global admin or SharePoint admin.
-
Select the app launcher icon
-
In the left pane, choose Admin centers > SharePoint.
-
Select user profiles.
-
Under My Site Settings, click Manage promoted sites.
-
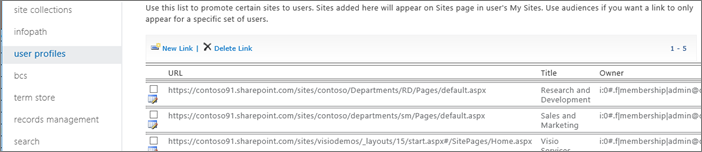
To add a link to the list, click New Link. Under Properties, enter the URL, Title, and optional information, such as description or image, and then click OK.
-
To edit an existing link, click the Edit icon

Tip: Public site and team site are the default promoted sites for all users.
-
To delete a link from the list on user profile pages, select the URL that you want to delete and then click Delete Link.
-


