
When Office app closes unexpectedly before you save your most recent changes, Document Recovery automatically opens the next time you open the Office app to help you get your file back.
Tip: If you are a Microsoft 365 subscriber the safest way to work is to store your files on OneDrive or SharePoint and use AutoSave.
How do I decide which files to save?
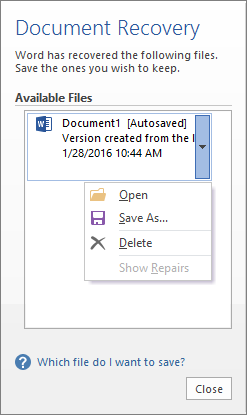
If you see multiple files in the Available Files list on the Document Recovery pane and aren't sure which ones to save, the date and creation time of any automatically saved document appears under the document name and may give you a clue about which file you want to recover.
If you see multiple versions of the same file, you'll probably want to open the one with the most recent time because it will have the most recent changes. You can also select each file to open and review the document.
After opening any file in the list, you can continue working in it, and you can close the Document Recovery pane when you've recovered all documents that you want to save.
Delete unwanted recovered files
-
Select the arrow next to the file name in the recovery pane.
-
Select Delete.
-
Confirm deletion by selecting Yes.
Closing recovered files
If you click Close without reviewing all recovered files, you'll see an option to view them again later. The next time you open the application you'll have the option to save or remove those autorecover files.
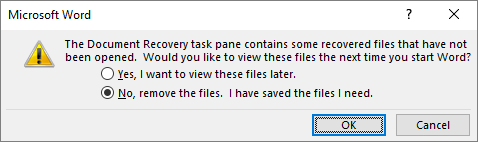
Yes, I want to view these files later (safest option) - Select this option if you are not sure whether you need the data in the recovered versions of the files.
No, remove the files. I have saved the files I need- Select this option if you are sure you don't need the data in the recovered versions of the files.
Recover a file saved by AutoRecover
Normally, the application will automatically recover your work the next time that you open the app following a power failure or other unexpected shutdown by detecting that an AutoRecover file exists and automatically opening it. If you want to keep the recovered file, you should immediately save it before closing or editing it.
If you want to find any AutoRecovered files on your computer, switch to Finder,then click Go > Go To Folder (or press SHIFT + COMMAND + G) and enter the appropriate folder path as shown below. Replace <username> with your username:
Latest versions
/Users/<username>/Library/Containers/com.Microsoft/Data/Library/Preferences/AutoRecovery
Notes:
-
The AutoRecovery folder is a hidden folder, so you probably won't see it if you just try to navigate to it in Finder. Use the Go To Folder tool and enter the full path to get around this.
-
If you close a file and click Don't Save, the AutoRecover file will be deleted because Office assumes that everything is ok and the AutoRecover file isn't needed.
Recover text from a damaged file in Word
-
Go to Word > Preferences.
-
Under Authoring and Proofing Tools, select General .
-
Ensure Confirm file format conversion at Open selected, and then close the General dialog box.
-
Go to File > Open.
-
On the Open menu select Recover Text.
-
Open the document.


