To comply with business standards and industry regulations, organizations need to protect sensitive information and prevent its inadvertent disclosure. Examples of sensitive information that you might want to prevent from leaking outside your organization include financial data or personally identifiable information (PII) such as credit card numbers, social security numbers, or national ID numbers. With a data loss prevention (DLP) policy in SharePoint Server 2016, you can identify, monitor, and automatically protect sensitive information across your site collections.
With DLP, you can:
-
Create a DLP query to identify what sensitive information now exists in your site collections. Before you create DLP policies, it’s often helpful to see what types of sensitive information people in your organization are working with, and which site collections contain this sensitive information. With a DLP query, you can find sensitive information that’s subject to common industry regulations, better understand your risks, and determine what and where is the sensitive information that your DLP policies need to protect.
-
Create a DLP policy to monitor and automatically protect sensitive information in your site collections. For example, you can set up a policy that displays a policy tip to users if they save documents that contain personally identifiable information. Further, the policy can automatically block access to those documents for everyone but the site owner, content owner, and whoever last modified the document. And lastly, because you don’t want your DLP policies to prevent people from getting their work done, the policy tip has an option to override the blocking action, so that people can continue to work with documents if they have a business justification.
DLP templates
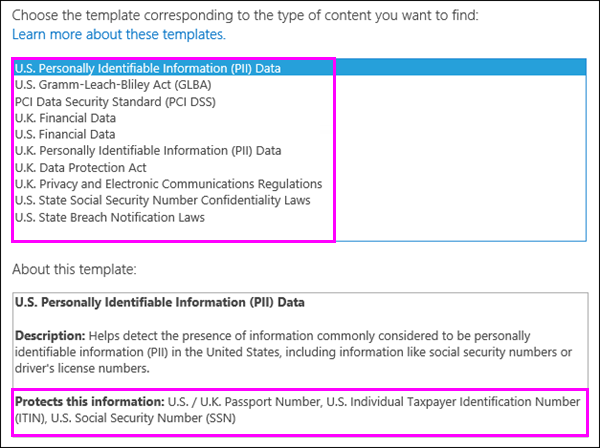
When you create a DLP query or a DLP policy, you can choose from a list of DLP templates that correspond to common regulatory requirements. Each DLP template identifies specific types of sensitive information – for example, the template named U.S. Personally Identifiable Information (PII) Data identifies content that contains U.S. and U.K. passport numbers, U.S. Individual Taxpayer Identification Numbers (ITIN), or U.S. Social Security Numbers (SSN).
Sensitive information types
A DLP policy helps protect sensitive information, which is defined as a sensitive information type. SharePoint Server 2016 includes definitions for many common sensitive information types that are ready for you to use, such as a credit card number, bank account numbers, national ID numbers, and passport numbers.
When a DLP policy looks for a sensitive information type such as a credit card number, it does not simply look for a 16-digit number. Each sensitive information type is defined and detected by using a combination of:
-
Keywords
-
Internal functions to validate checksums or composition
-
Evaluation of regular expressions to find pattern matches
-
Other content examination
This helps DLP detection achieve a high degree of accuracy while reducing the number of false positives that can interrupt peoples’ work.
Each DLP template looks for one or more types of sensitive information. For more information on how each sensitive information type works, see What the sensitive information types in SharePoint Server 2016 look for.
|
This DLP template… |
Looks for these sensitive information types… |
|---|---|
|
U.S. Personally Identifiable Information (PII) Data |
U.S. / U.K. Passport Number U.S. Individual Taxpayer Identification Number (ITIN) U.S. Social Security Number (SSN) |
|
U.S. Gramm-Leach-Bliley Act (GLBA) |
Credit Card Number U.S. Bank Account Number U.S. Individual Taxpayer Identification Number (ITIN) U.S. Social Security Number (SSN) |
|
PCI Data Security Standard (PCI DSS) |
Credit Card Number |
|
U.K. Financial Data |
Credit Card Number EU Debit Card Number SWIFT Code |
|
U.S. Financial Data |
ABA Routing Number Credit Card Number U.S. Bank Account Number |
|
U.K. Personally Identifiable Information (PII) Data |
U.K. National Insurance Number (NINO) U.S. / U.K. Passport Number |
|
U.K. Data Protection Act |
SWIFT Code U.K. National Insurance Number (NINO) U.S. / U.K. Passport Number |
|
U.K. Privacy and Electronic Communications Regulations |
SWIFT Code |
|
U.S. State Social Security Number Confidentiality Laws |
U.S. Social Security Number (SSN) |
|
U.S. State Breach Notification Laws |
Credit Card Number U.S. Bank Account Number U.S. Driver's License Number U.S. Social Security Number (SSN) |
DLP queries
Before you create your DLP policies, you might want to see what sensitive information already exists across your site collections. To do this, you create and run DLP queries in the eDiscovery Center.
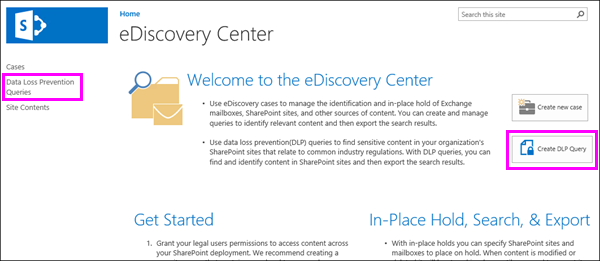
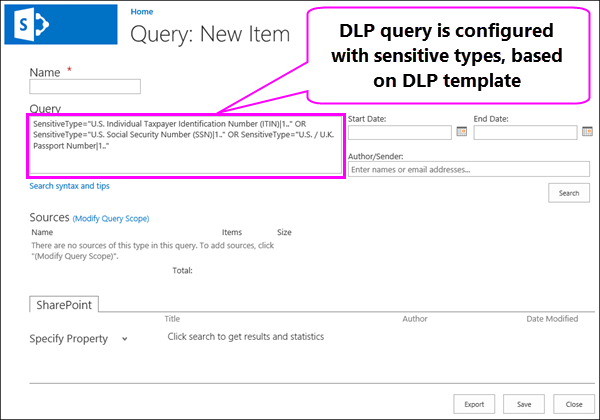
A DLP query works the same as an eDiscovery query. Based on which DLP template you choose, the DLP query is configured to search for specific types of sensitive information. First choose the locations you want to search, and then you can fine tune the query because it supports Keyword Query Language (KQL). In addition, you can narrow down the query by selecting a date range, specific authors, SharePoint property values, or locations. And just like an eDiscovery query, you can preview, export, and download the query results.
DLP policies
A DLP policy helps you identify, monitor, and automatically protect sensitive information that’s subject to common industry regulations. You choose what types of sensitive information to protect, and what actions to take when content containing such sensitive information is detected. A DLP policy can notify the compliance officer by sending an incident report, notify the user with a policy tip on the site, and optionally block access to the document for everyone but the site owner, content owner, and whoever last modified the document. Finally, the policy tip has an option to override the blocking action, so that people can continue to work with documents if they have a business justification or need to report a false positive.
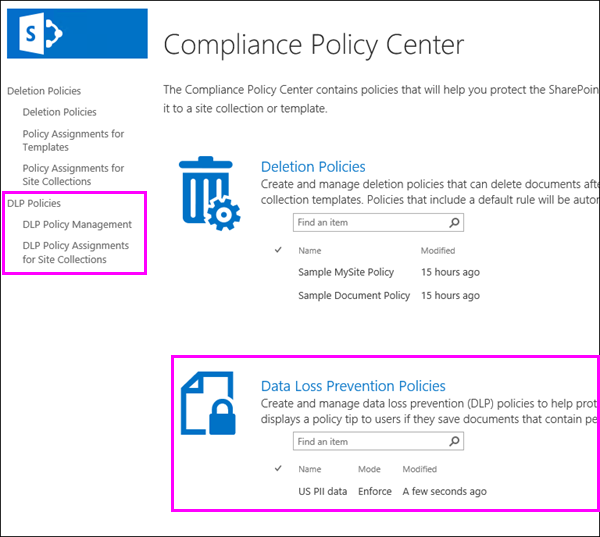
You create and manage DLP policies in the Compliance Policy Center. Creating a DLP policy is a two-step process: first you create the DLP policy, and then you assign the policy to a site collection.
Step 1: Creating a DLP policy
When you create a DLP policy, you choose a DLP template that looks for the types of sensitive information that you need to identify, monitor, and automatically protect.
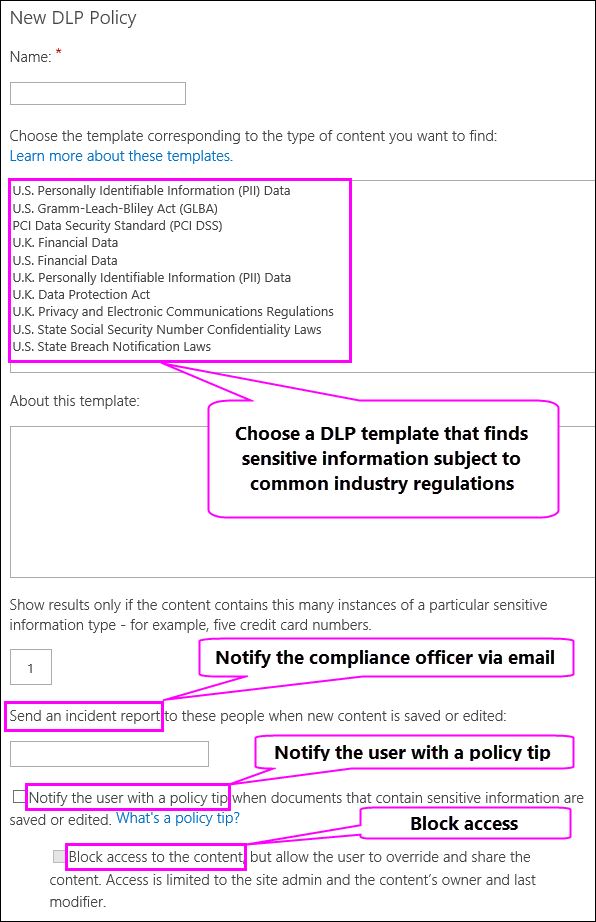
When a DLP policy finds content that includes the minimum number of instances of a specific type of sensitive information that you choose – for example, five credit card numbers, or a single social security number – then the DLP policy can automatically protect the sensitive information by taking the following actions:
-
Sending an incident report to the people you choose (such as your compliance officer) with details of the event. This report includes details about the detected content such as the title, document owner, and what sensitive information was detected. To send incident reports, you need to configure outgoing e-mail settings in Central Administration.
-
Notifying the user with a policy tip when documents that contain sensitive information are saved or edited. The policy tip explains why that document conflicts with a DLP policy, so that people can take remedial action, such as removing the sensitive information from the document. When the document is in compliance, the policy tip disappears.
-
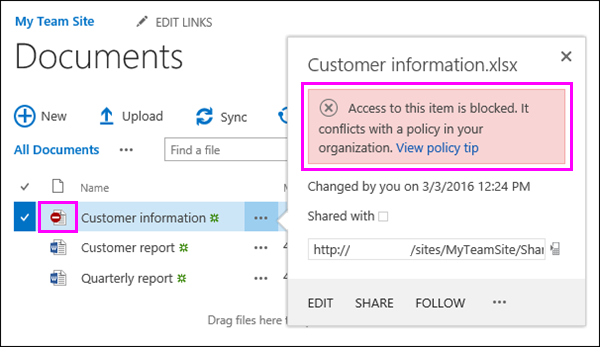
Blocking access to the content for everyone except the site owner, document owner, and person who last modified the document. These people can remove the sensitive information from the document or take other remedial action. When the document is in compliance, the original permissions will be automatically restored. It’s important to understand that the policy tip gives people the option to override the blocking action. Policy tips can thus help educate users about your DLP policies and enforce them without preventing people from doing their work.
Step 2: Assigning a DLP policy
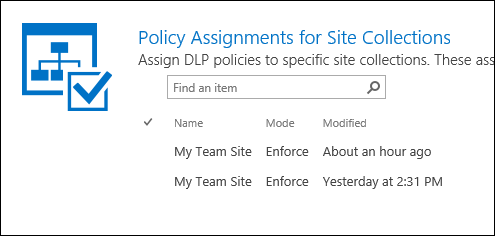
After you create a DLP policy, you need to assign it to one or more site collections, where it can begin to help protect sensitive information in those locations. A single policy can be assigned to many site collections, but each assignment needs to be created one at a time.
Policy tips
You want people in your organization who work with sensitive information to stay compliant with your DLP policies, but you don’t want to block them unnecessarily from getting their work done. This is where policy tips can help.
A policy tip is a notification or warning that appears when someone is working with content that conflicts with a DLP policy — for example, content like an Excel workbook that contains personally identifiable information (PII) and that’s saved to a site.
You can use policy tips to increase awareness and help educate people about your organization’s policies. Policy tips also give people the option to override the policy, so that they’re not blocked if they have a valid business need or if the policy is detecting a false positive.
Viewing or overriding a policy tip
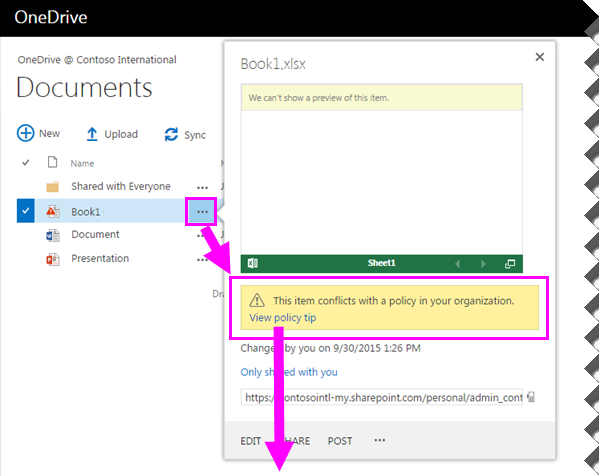
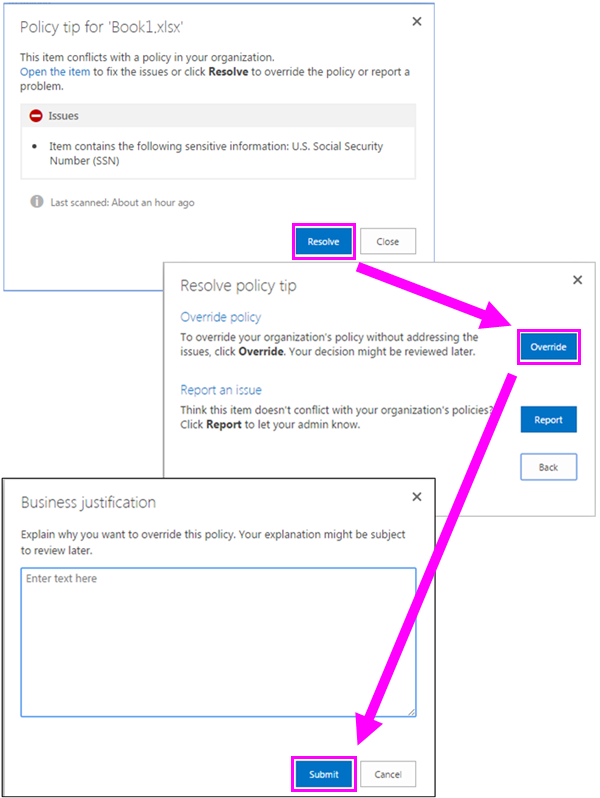
To take action on a document, such as overriding the DLP policy or reporting a false positive, you can select the Open ... menu for the item > View policy tip.
The policy tip lists the issues with the content, and you can choose Resolve, and then Override the policy tip or Report a false positive.
Details about how policy tips work
Note that it’s possible for content to match more than one DLP policy, but only the policy tip from the most restrictive, highest-priority policy will be shown. For example, a policy tip from a DLP policy that blocks access to content will be shown over a policy tip from a rule that simply notifies the user. This prevents people from seeing a cascade of policy tips. Also, if the policy tips in the most restrictive policy allow people to override the policy, then overriding this policy also overrides any other policies that the content matched.
DLP policies are synced to sites and contented is evaluated against them periodically and asynchronously (see the next section), so there may be a short delay between the time you create the DLP policy and the time you begin to see policy tips.
How DLP policies work
DLP detects sensitive information by using deep content analysis (not just a simple text scan). This deep content analysis uses keyword matches, the evaluation of regular expressions, internal functions, and other methods to detect content that matches your DLP policies. Potentially only a small percentage of your data is considered sensitive. A DLP policy can identify, monitor, and automatically protect just that data, without impeding or affecting people who work with the rest of your content.
After you create a DLP policy in the Compliance Policy Center, it’s stored as a policy definition in that site. Then, as you assign the policy to different site collections, the policy is synced to those locations, where it starts to evaluate content and enforce actions like sending incident reports, showing policy tips, and blocking access.
Policy evaluation in sites
Across all of your site collections, documents are constantly changing — they’re continually being created, edited, shared, and so on. This means documents can conflict or become compliant with a DLP policy at any time. For example, a person can upload a document that contains no sensitive information to their team site, but later, a different person can edit the same document and add sensitive information to it.
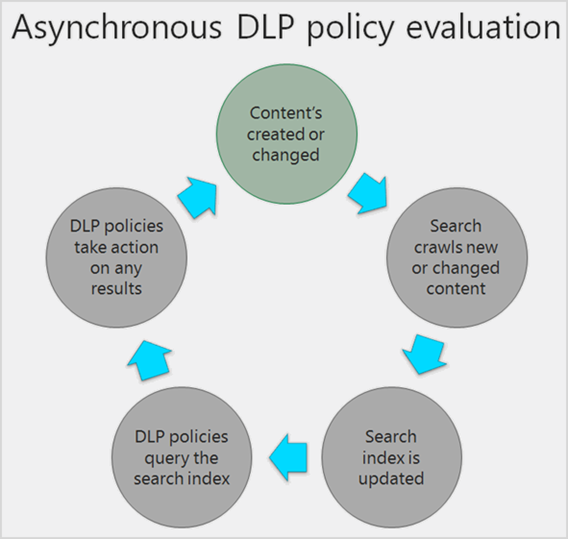
For this reason, DLP policies check documents for policy matches frequently in the background. You can think of this as asynchronous policy evaluation.
Here’s how it works. As people add or change documents in their sites, the search engine scans the content, so that you can search for it later. While this is happening, the content’s also scanned for sensitive information. Any sensitive information that’s found is stored securely in the search index, so that only the compliance team can access it, but not typical users. Each DLP policy that you’ve turned on runs in the background (asynchronously), checking search frequently for any content that matches a policy, and applying actions to protect it from inadvertent leaks.
Finally, documents can conflict with a DLP policy, but they can also become compliant with a DLP policy. For example, if a person adds credit card numbers to a document, it might cause a DLP policy to block access to the document automatically. But if the person later removes the sensitive information, the action (in this case, blocking) is automatically undone the next time the document is evaluated against the policy.
DLP evaluates any content that can be indexed. For more information on what file types are crawled by default, see Default crawled file name extensions and parsed file types.
View DLP events in the usage logs
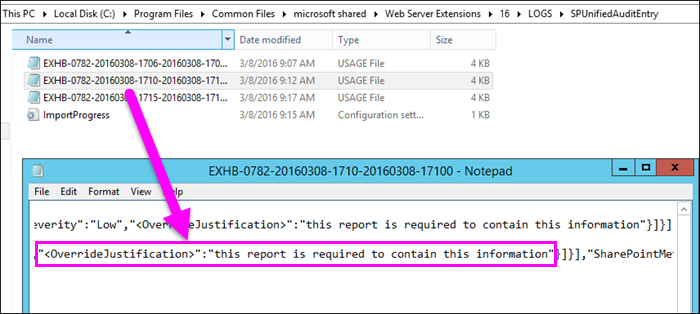
You can view DLP policy activity in the usage logs on the server running SharePoint Server 2016. For example, you can view the text entered by users when they override a policy tip or report a false positive.
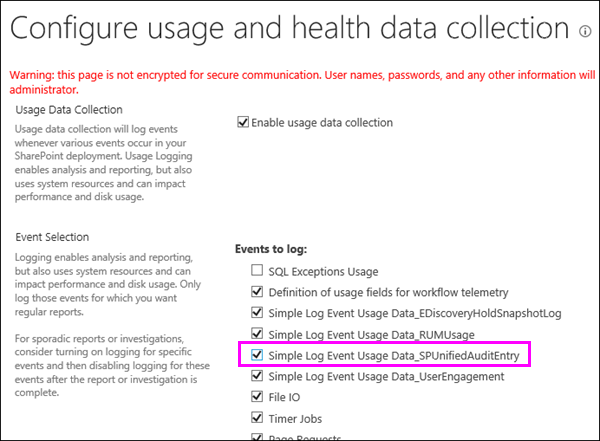
First you need to turn on the option in Central Administration (Monitoring > Configure usage and health data collection > Simple Log Event Usage Data_SPUnifiedAuditEntry). For more information about usage logging, see Configure usage and health data collection.
After you turn on this feature, you can open the usage reports on the server and view the justifications provided by users for overriding a DLP policy tip, along with other DLP events.
Before you get started with DLP
This topic outlines some of the features that DLP depends on. These include:
-
To detect and classify sensitive information in your site collections, start the search service and define a crawl schedule for your content.
-
Turn on out-going email.
-
To view user overrides and other DLP events, turn on the usage report.
-
Create the site collections:
-
For DLP queries, create the eDiscovery Center site collection.
-
For DLP policies, create the Compliance Policy Center site collection.
-
-
Create a security group for your compliance team, and then add security group to the Owners group in the eDiscovery Center or Compliance Policy Center.
-
To run DLP queries, view permissions are required for all content that the query will search – for more information, see Create a DLP query in SharePoint Server 2016.


