
Access and Outlook are both excellent programs for managing your personal and business contacts. As a result, you might want to import or link to contact data from Outlook into Access.
For more information about the reverse procedure (exporting contacts from Access to Outlook), see the article Export contacts to an Outlook address book.
What do you want to do?
Import or link to Outlook contacts by using the Exchange/Outlook Wizard
You can use the Exchange/Outlook Wizard to import or link to Outlook contact data. If you import the data, Access creates a copy of the Outlook data and puts it in an Access table. Changes made to the data in either program do not affect the data in the other program. By contrast, if you use the link option, Access maintains a link to the Outlook data. Changes made to the data in Access are reflected in Outlook, and vice versa.
-
The location of the import/link wizard differs slightly depending upon your version of Access. Choose the steps that match your Access version:
-
If you're using the latest version of the Microsoft 365 subscription version of Access or Access 2019, on the External Data tab, in the Import & Link group, click New Data Source > From Other Sources > Outlook Folder.
-
If you're using Access 2016, Access 2013, or Access 2010, on the External Data tab, in the Import & Link group, click the More button to drop down a list of options and then click Outlook Folder.
-
-
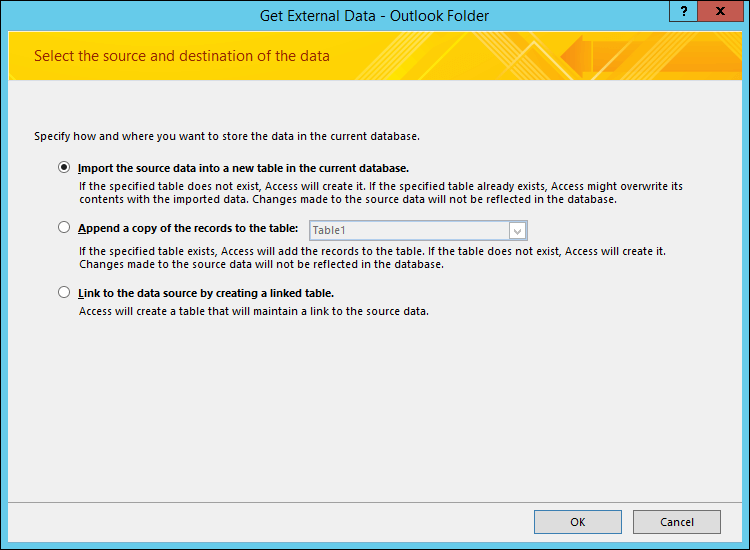
In the Get External Data - Outlook Folder dialog box, select the option that you want, and then click OK.
-
In the Exchange/Outlook Wizard dialog box, select the folder or address book that contains the contacts that you want, and then click Next.
1. Expand the top Mailbox folder.
2. Select the folder that contains the contacts that you want to import into Access.
Note: The look of the Link Exchange/Outlook Wizard differs slightly depending upon your version of Access and Outlook. As such, the screenshot above might not match exactly what you see in your application.
-
Follow the instructions on the remaining pages of the wizard.
After you complete the wizard, Access imports or links to the contact data that you specified.
Import contacts by using a text file
If you have trouble using the wizard (for example, if the wizard does not import a field that you need), you can try exporting the contacts from Outlook as a text file and then importing that text file into Access.
Step 1: Export the Outlook contacts to a text file
Perform the following steps in Outlook:
-
The location of the export wizard differs slightly depending upon your version of Outlook. Choose the steps that match your Outlook version:
-
If you're using the subscription version of Outlook, Outlook 2019, Outlook 2016 or Outlook 2013, on the File tab click Open & Export and then click Import/Export.
-
If you're using Outlook 2010, click File > Options. In the Outlook Options dialog box, click Advanced and then under the Export section, click Export.
Note: For a full discussion on exporting Outlook data, see Export or backup email, contacts, and calendar to an Outlook .pst file.
-
-
Outlook opens the Import and Export Wizard.
-
On the Import and Export Wizard, select Export to a file, and then click Next.
-
Select Tab Separated Values (Windows), and then click Next.
-
Select the Contacts folder that you want to export to Access, and then click Next.
-
Type a name for the file, using the file name extension .txt.
Note: By default, Outlook saves the file to your default documents folder. If you want to save the file to a different location, click Browse, and then browse to the folder in which you want to save the file.
-
On the next page of the wizard, click Finish.
Outlook exports the contents of the selected folder to a text file.
Step 2: Import the contact data into Access
-
Open the Access database into which you want to import the data.
-
The location of the import/link text wizard differs slightly depending upon your version of Access. Choose the steps that match your Access version:
-
If you're using the latest version of the Microsoft 365 subscription version of Access or Access 2019, on the External Data tab, in the Import & Link group, click New Data Source > From File > Text File.
-
If you're using Access 2016, Access 2013, or Access 2010, on the External Data tab, in the Import & Link group, click Text File.
-
-
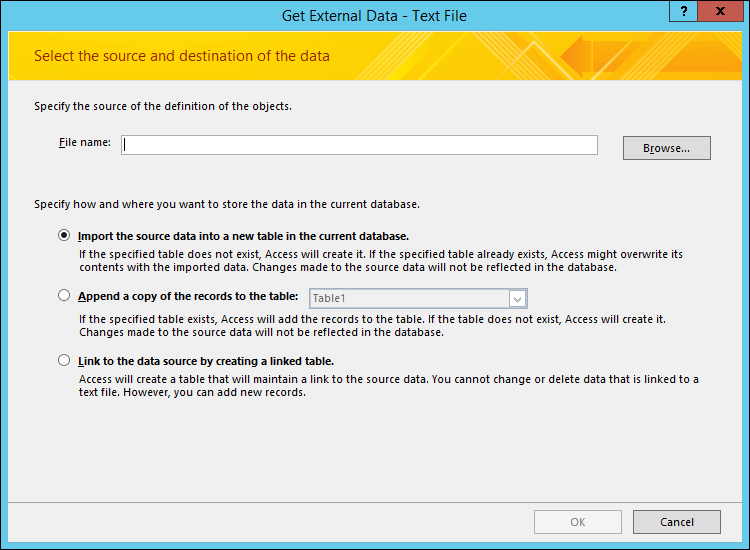
In the Get External Data – Text File dialog box, click Browse.
-
Select the file that you created in the previous procedure, and then click Open.
-
Select Import the source data into a new table in the current database, and then click OK.
-
In the Import Text Wizard, select Delimited, and then click Next.
-
On the next page of the wizard, make sure that the options are set, as shown in the following table:
Option
Value
Choose the delimiter that separates your fields
Tab
First Row Contains Field Names
Selected (checked)
Text Qualifier
" (double quotation marks)
-
Follow the instructions on the remaining pages of the wizard.
When the wizard finishes, Access imports the text file.
For more detailed instructions on how to import data into Access from text files, see Import or link to data in a text file.
What else should I know?
-
For information on how to save the details of your import into a specification that you can reuse later, see the article Save the details of an import or export operation as a specification.
-
For information on how to run saved import specifications, see the article Run a saved import or export operation.
-
For information on how to schedule specifications to run at specific times, see the article Schedule an import or export operation.
-
For information on how to change a specification name, delete specifications, or update the names of source files in specifications, see the article Manage Data Tasks.


