
Access and Outlook are both excellent programs for managing your personal and business contacts. As a result, you might find yourself wanting to export contact data from Access to Outlook. However, Access cannot directly export data to the Outlook file format, nor can Outlook directly import a table from an Access database. Fortunately, it is easy to export an Access table or query as a text file, and then import that file into Outlook.
For more information about the reverse procedure (importing contacts from Outlook into Access), see the article Import or link to contacts from an Outlook address book.
Step 1: Export Access contact information as a text file
-
In the Access Navigation Pane, right-click the table or query that contains the contact information you want to export, point to Export, and then click Text File. You can also launch the Export - Text File wizard by highlighting the table or query in the Navigation Pane and then on the External Data tab, in the Export group, click Text File.
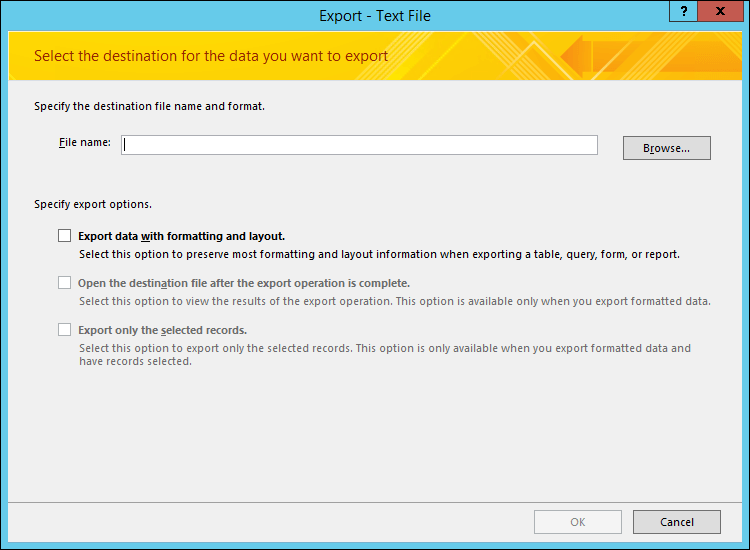
Access opens the Export - Text File dialog box.
-
In the Export - Text File dialog box, make a note of the file name and location suggested by Access. You can click OK to accept the default values, or you can click Browse to select a different file location, and then click OK. Do not select any of the check boxes under Specify export options.
-
In the Export Text Wizard dialog box, ensure that Delimited is selected, and then click Next.
-
On the next page of the wizard, select the Tab delimiter, and then select the Include Field Names on First Row check box.
-
On the next page of the wizard, click Finish.
-
Click Close without saving the export steps, and then close Access.
In the next procedure, you import the text file into Outlook. Before you proceed, we recommend that you decide which Outlook folder you want to import the contacts into. If you want to import the contacts into a new Outlook folder, you must create that folder before beginning this procedure.
Step 2: Import the text file into Outlook
-
The location of the Outlook Import and Export wizard differs slightly depending upon your version of Outlook. Choose the steps that match your Outlook version:
-
If you're using the subscription version of Outlook, Outlook 2019, Outlook 2016 or Outlook 2013, on the File tab click Open & Export and then click Import/Export.
-
If you're using Outlook 2010, click File > Options. In the Outlook Options dialog box, click Advanced and then under the Export section, click Export.
-
-
In the Import and Export Wizard dialog box, select Import from another program or file, and then click Next.
-
Select Tab Separated Values (Windows), and then click Next.
-
In the Import a File dialog box, click Browse, browse to the .txt file that you created in the previous procedure, and then double-click the file.
-
If the destination folder in Outlook already contains contacts, you might encounter a situation where some of the contacts that you are importing are duplicates of contacts that already exist in Outlook. Under Options, choose how you want Outlook to deal with duplicates.
-
If you believe the contacts that you are importing are more complete or more up-to-date than the contacts in the Outlook folder, click Replace duplicates with items imported.
-
If you're not sure which contacts are more complete or current, and you want to import all the contacts in the text file regardless of whether they are duplicates, click Allow duplicates to be created. After the import operation, you can examine the contacts in Outlook, and delete the ones that you do not want to keep.
-
If you believe the contacts in Outlook are more complete and current than the ones that you are importing, click Do not import duplicate items.
-
-
Click Next.
-
In the folder list, click the Contacts folder where you want the imported contact information to go, and then click Next.
-
To examine or change how the contact information will be saved in the Outlook folder, click Map Custom Fields. This is an optional step, but we recommend it if you want to make sure that the data that you are importing is put into the correct fields in Outlook.
Note: If the Map Custom Fields button is not available, under The following actions will be performed, select the check box next to the import operation.
Additional help about mapping custom fields
-
In the Map Custom Fields dialog box, examine the default mapping in the To list on the right.
Note: To display additional fields in the To list, click the plus sign (+) next to the field. For example, to display the First Name and Last Name fields, click the plus sign (+) next to Name.
-
If the field mapping looks correct, click Cancel to return to the Import a File Wizard. Otherwise, change the mapping by using the following steps:
-
To map a field in the text file to a field in the destination Outlook folder, drag it from the left (From) list to the appropriate field in the right (To) list.
-
To remove a field from the mapping, drag it from the right (To) list to the left (From) list.
-
To remove all mapping, click Clear Map.
-
To reset the original mapping, click Default Map.
To see additional records in the From list, click Previous or Next.
-
-
Click OK when you are finished mapping fields.
Note: If the text file that you are importing does not contain field names in the first row, the first row of data will be interpreted as field names and will not be imported as data. To make sure that all the data in the text file is imported, select the option to include field names in the first row of the text file when you export it from Access.
-
-
Click Finish.
What else should I know?
-
For information on how to save the details of your export into a specification that you can reuse later, see the article Save the details of an import or export operation as a specification.
-
For information on how to run saved export specifications, see the article Run a saved import or export operation.
-
For information on how to schedule specifications to run at specific times, see the article Schedule an import or export operation.
-
For information on how to change a specification name, delete specifications, or update the names of source files in specifications, see the article Manage Data Tasks.


