Note: This article has done its job, and will be retiring soon. To prevent "Page not found" woes, we're removing links we know about. If you've created links to this page, please remove them, and together we'll keep the web connected.
With Microsoft Office SharePoint Server 2007, you can easily create and publish Web pages directly in a Web browser. In addition, you can create Web pages directly from existing Microsoft Office InfoPath 2007 forms, which makes it easier to publish and share that content with others on your team, your company, or anyone on the Web.
In this article
Advantages of converting InfoPath forms to Web pages
There are a number of advantages to converting Office InfoPath 2007 forms into Web pages for your site:
-
Familiar authoring environment Office InfoPath 2007 is a familiar and comfortable environment in which to author forms. You don't have to learn HTML or use the Web page creation tools in Office SharePoint Server 2007.
-
Faster creation You can turn important Office InfoPath 2007 forms directly into Web pages without having to specially format them as separate Web pages for use on the Web.
-
Single-sourced content You can use just one form for multiple uses, instead of creating one version for your team in Office InfoPath 2007 and another version for the company in HTML. Here, the two are linked.
-
Share form results with others When you convert an Office InfoPath 2007 form to a Web page, the results of those forms can be easily viewed by others who may not have Office InfoPath 2007 installed or who are using a limited network connection that cannot support opening or downloading forms in a Web browser.
-
Storing data in a fixed format for archival purposes When you convert an Office InfoPath 2007 form to a Web page, you generate form data that is fixed and can no longer be modified in a form. This can be ideal for archiving company data.
-
Better display of form data If you have existing forms that display large amounts of data on multiple pages in Office InfoPath 2007, this information might be better suited for display on a Web page.
Considerations when converting InfoPath forms to Web pages
Keep the following in mind when you convert Office InfoPath 2007 forms into Web pages:
-
The document conversion feature supports only forms created in Office InfoPath 2007. For existing forms created in earlier versions of InfoPath, you may need to upgrade them to the Office InfoPath 2007 format to take advantage of the latest features. Find a link to more information about upgrading Office InfoPath 2007 forms and form templates in the See Also section.
-
The Web page that is generated from your form is a read-only version of the form’s contents. You can edit the Web page generated from the form (see the later section Update the InfoPath form and the Web page), but this should not be confused with a Web-based form made possible by InfoPath Forms Services, in which new form data is submitted by using the Web page.
-
Any controls that are used to fill out the form (for example, browsing to a file location or opening a calendar window) may not display properly on the Web page. This is because these controls are used for submitting content in Office InfoPath 2007 and, as stated previously, the converted Web page is simply a read-only version of the form. Contact your site owner for details.
-
Dynamic content, or content pulled into the form at run time, will not appear on the converted Web page. Only static content, or content selections made when the form was created, is included. This means, for example, that if you fill out a form that expands or collapses depending on content selections, that information will not be included in the converted Web page.
-
The formatting in your forms may not be preserved when the form is converted to a Web page. This includes the form’s borders, typeface, and layout of cells. Much of this depends on the conversion settings chosen by the site owner and the form template being used. Contact your site owner for details.
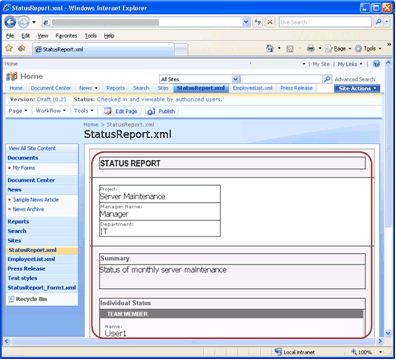
You can see how a form might appear before and after conversion in the following pictures. The red line highlights the contents of the form.


Upload an InfoPath form to a form library
To convert an Office InfoPath 2007 form into a Web page, the form must first reside in a form library (or document library) in Office SharePoint Server 2007. To add a form to a form library, browse to the library where you want to add the form, and then click Upload on the menu bar. For more information, see the article Add one or more files to a library.
Note: In addition to uploading your form, your site owner must upload a form template (.xsn file) and configure it for form conversions (see the article Configure document-to-page converters). This form template resides in a top-level site library, and it is different from the form template that is associated with a form library and upon which new forms created in that library are based.
Convert an InfoPath form to a Web page
-
Open the form library that contains the Office InfoPath 2007 form that you want to convert to a Web page.
-
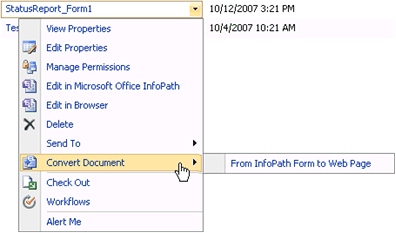
Point to the file name of the form that you want to convert, click the arrow that appears, and then point to Convert Document.

Note: If you don’t see this option, the conversion feature may be disabled, a form template may not be configured, or there may be problems with your form. Contact your site owner for assistance.
-
Click From InfoPath Form to Web Page.
Note: You may also see the option From XML to Web page. This option appears because Office InfoPath 2007 forms are written in XML. Unless instructed by your site owner, you should not use this option for Office InfoPath 2007 forms because they require different conversion settings from stand-alone XML files.
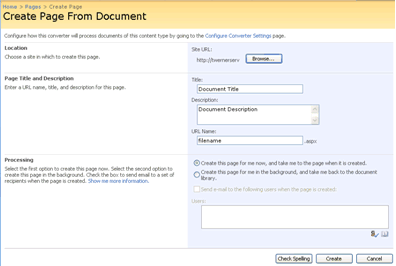
The Create Page From Document page opens. Depending on how your site was set up, you may see all of the options or just a portion of the options described below.

-
In the Location section, click Browse, and then select the site where the page is to be created.
The site that you select must have publishing turned on. If you receive a message that publishing is not enabled on your site, contact the site owner.
Note: If instead of the Location and Page Title and Description sections, you see Existing Page with the option to update an existing page, this means the form was already converted. For information on updating existing Web pages, see the later section Update the InfoPath form and the Web page. To ignore the existing page and create a new one, clear the Update existing page check box and continue with the following steps.
-
In the Page Title and Description section, enter a title, description, and URL (file name) for the Web page that you are creating.
The URL name must be unique and may not contain special characters (#,%,&, etc.). If you use spaces, they are removed automatically when the page is created.
Note: The title appears above the new Web page, in the Web browser title bar (the HTML title tag), and in the item's properties in the form library. The description appears only in the item's properties in the form library. The URL appears in the Web browser address bar (followed by the .aspx extension).
-
In the Processing section, you may have the option to create the page immediately or to create the page in the background.
Do one of the following:
-
To start the conversion process right away, click Create this page for me now, and take me to the page when it is created. You are taken to a long-running operations (LRO) page until the conversion is complete. This process usually takes under a minute but may take longer depending on the conversion queue and your conversion settings.
-
To start the conversion process in the background, click Create this page for me in the background, and take me back to the document library. You return to the form library where your form resides.
-
-
If you have the option to send the created page to others, select the Send e-mail to the following users when the page is created check box, and then enter the names of users whom you want to notify in the Users box.
-
Click Create to convert the form.
Options for the newly created Web page
If you choose to create the Web page right away, you are taken to the new page when the conversion is completed. On the toolbar at the top of that page, you see several options, as shown here.

From here, you can do one the following:
-
Check in or publish the page so that others can access it from the Pages library of your Web site. For more information, see the article Work with pages in a publishing site.
-
Start a workflow.
-
Edit the page, the form, or both. For more information, see the following section Update the InfoPath form and the Web page.
You may see even more options depending on how your site was set up by the site owner.
Update the InfoPath form and the Web page
When you convert an Office InfoPath 2007 form into a Web page, you end up with two files in Office SharePoint Server 2007: the form and the Web page. Each file has its own URL, versioning, history, workflow, and so on (assuming those features are enabled for that particular content type or form library).
At the same time, the two files remain linked. When you edit the form and save it to a form library, you can then re-generate the Web page from that form. This loose coupling allows you to focus on creating content in Office InfoPath 2007 while at the same time delivering a version that is formatted for the Web.
To allow the maximum flexibility, Office SharePoint Server 2007 provides a number of ways for you to update the form, the Web page, or both. These options are explained here.
Update the form but not the Web page
There are two ways to update the form after it has been converted to a Web page.
Update the form from the form library
-
Browse to the form library that contains your form.
-
To check out the form, point to the file name, click the arrow that appears, and then click Check Out. Checking out the form is not required, but it is a good practice to preserve versions of the form. It also prevents other users from making changes to the form while you edit it.
-
To edit the form, point to the file name, click the arrow that appears, and then click Edit in Microsoft Office InfoPath.
-
Edit the file, save the file, and then close Office InfoPath 2007. You are prompted to check in the file when you close it. If you do not want to check in the file at this time, you can check in the file later by using the drop-down menu of the file in the library.
Update the form by using the Web page toolbar
-
Browse to the Web page that was generated from the form. Typically, you find the Web page in the Pages library of the site where you chose to create the page.
-
Click Edit Page on the authoring toolbar. The page opens for editing.
-
In the Page Content field control, click Open Source Document. You are prompted to confirm that you want to check out and edit the form.
-
Click OK to open the form in Office InfoPath 2007.
-
Edit the file, save the file, and then close Office InfoPath 2007. You are prompted to check in the file when you close it. If you do not want to check in the file at this time, you can check in the file later by using the drop-down menu of the file in the library.
Update the Web page but not the form
Note: You should exercise caution when updating the Web page by itself because your changes will be lost if you choose to update the page from the form again in the future.
-
Browse to the Web page that was generated from the form. Typically, you find the Web page in the Pages library of the site where you chose to create the page.
-
Click Edit Page on the authoring toolbar. The page opens for editing.
-
In the Page Content field control, click Edit Content.
The HTML Editor appears directly above the page content. For more information about using the HTML Editor, see the article Use the HTML Editor.
Update the Web page with changes made to the form
There are two ways to update the Web page with changes made to the form.
Note: Before the Web page can be updated with changes made to the form, the Web page must be checked in. You may need to perform this step separately.
Re-convert the form
-
Follow the same steps that you performed earlier to convert your form to a Web page — see the earlier section Convert an InfoPath form to a Web page.
-
This time, on the Create Page From Document page, leave the Update existing page check box selected.
-
Click Create to update the Web page with changes made to the form.
Update the Web page by using the Web page toolbar
-
Browse to the Web page that was generated from the form. Typically, you find the Web page in the Pages library of the site where you chose to create the page.
-
Click Edit Page on the authoring toolbar. The page opens for editing.
-
In the Page Content field control, click Update Content from Source.
-
When prompted to confirm, click OK to update the Web page.


