
Note: This article has done its job, and will be retiring soon. To prevent "Page not found" woes, we're removing links we know about. If you've created links to this page, please remove them, and together we'll keep the web connected.
In PowerPoint, you can embellish your notes with text boxes, WordArt, pictures, and other objects. Objects that you add to your notes appear on your printed notes page, but not on your screen in Normal view.
If you're looking for information about adding objects to your standard PowerPoint slides, see the additional resources at the end of this article.
What do you want to do?
Learn about the notes master, placeholders, notes page, and notes pane
Add a text box or WordArt to your notes pages
Learn about the notes master, placeholders, notes page, and notes pane
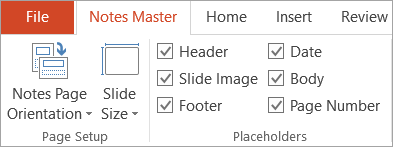
Use the Notes Master tab to choose the information that appears on all of your notes pages and arrange the layout of that information.
In addition to the placeholders for the headers and footers, date, and slide page number, the notes master includes a placeholder for the image of the slide and another placeholder for the notes text, called the Body placeholder. To distinguish between the placeholders, do the following:
-
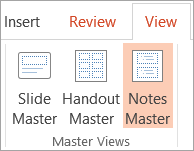
On the View tab, click Notes Master.
-
On the Notes Master tab, in the Placeholders group, clear any check box to see it disappear from the notes page. Select it to add it back.
Each notes page shows an image of a slide, along with the notes that go with that slide. When you print the notes page, you print one page for each slide, along with additional text or images.
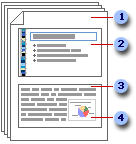
1 The notes pages include your notes and each slide in the presentation.
2 Each slide is included on its own notes page.
3 Your notes accompany the slide.
4 Data such as charts or pictures can be added to your notes pages.
In Normal view, use the notes pane to enter and format text while you edit the slide. On the notes page (View > Notes Page), you can see the full effect of any text formatting and control how the notes appear when they are printed with the slides.
Rearrange the placeholders
You can move the placeholders to a different location on the notes master or change from portrait to landscape orientation so that your notes page displays better. For example, if you have a SmartArt graphic on your slide, you might want to change the orientation of the Slide Image placeholder to better display the SmartArt graphic on your notes pages.
Move the placeholders
-
On the View tab, click Notes Master.
-
To move either the Body or Slide Image placeholder, point to one of the placeholder borders. When the pointer becomes a

Change the orientation of the notes page
-
On the View tab, click Notes Master.
-
On the Notes Master tab, in the Page Setup group, click Notes Page Orientation, and then click Portrait or Landscape.
-
When you finish changing the orientation, on the Notes Master tab, in the Close group, click Close Master View.
Add a text box or WordArt to your notes pages
You can use a text box or WordArt to indicate that your presentation is a draft or confidential.
Add a text box
-
On the View tab, click Notes Master.
Note: To apply this procedure to only one notes page, click Notes Page instead of Notes Master.
-
On the Insert tab, in the Text group, click Text Box, click in the Body placeholder at the bottom of the notes page, and then drag to draw the text box the size that you want.
-
Enter text in the text box that you want to appear in the notes pages.
-
To position the text box, click it, and then when the pointer becomes a
-
Format the text in the text box by using the formatting options in the Font group on the Home tab.
You can also use the options in the Shape Styles group to format the text box itself. For more information, see Add or delete a fill, outline, or effect for text or WordArt.
-
After you position and format the text and the text box, on the Notes Master tab, in the Close group, click Close Master View.
Add WordArt
-
On the View tab, click Notes Master.
Note: To apply this procedure to only one notes page, click Notes Page instead of Notes Master.
-
On the Insert tab, in the Text group, click WordArt, and then click the WordArt style that you want.

-
Enter the text in WordArt that you want to appear in the notes pages.
-
To reposition the WordArt, click it, and then when the pointer becomes a
-
To change the look of the WordArt, use the options in the WordArt Styles group, on the Drawing Tools Format tab.
-
When you are satisfied with the way the WordArt looks, on the Notes Master tab, in the Close group, click Close Master View.
Tip: You can make the text box or WordArt more transparent by changing the fill or outline.
Add a picture or shape to your notes pages
-
On the View tab, click Notes Master.
Note: To apply this procedure to only one notes page, click Notes Page instead of Notes Master.
-
On the Insert tab, click Pictures or Shapes to insert the item you want.
-
To adjust the size of or reposition the picture or shape, drag it to a new location, use the sizing handles to resize it, or right-click it and then click Size and Position on the shortcut menu.
-
When you are satisfied with the way the picture or clip art looks, on the Notes Master tab, in the Close group, click Close Master View.
Tip: You can change the brightness, contrast, or transparency of a picture, change the picture border, or add effects by using the options under Picture Tools, on the Format tab.
Change the theme font, theme colors, or theme effects
A document theme is a set of formatting choices that include a set of theme colors, a set of theme fonts (including heading and body text fonts), and a set of theme effects (including lines and fill effects). Every presentation you create by using PowerPoint has a theme inside it—even new, blank presentations.
Change the theme font
Theme fonts contain a heading font and a body text font. When you click the Theme Fonts button

-
On the View tab, click Notes Master.
-
On the Notes Master tab, in the Background group, click Fonts, and then click the fonts used in your slide or the option that you want.
-
On the Notes Master tab, in the Close group, click Close Master View.
Change the theme colors
Theme colors contain four text and background colors, six accent colors, and two hyperlink colors. The colors on the Theme Colors button 
-
On the View tab, click Notes Master.
-
On the Notes Master tab, in the Background group, click Colors, and then click the colors used in your slide or the option that you want.
-
On the Notes Master tab, in the Close group, click Close Master View.
Change the theme effects
Theme effects are sets of lines and fill effects. When you click the Theme Effects button

-
On the View tab, click Notes Master.
-
On the Notes Master tab, in the Background group, click Effects.
-
Select the effect that you want to use.
-
On the Notes Master tab, in the Close group, click Close Master View.
Change the theme font
Theme fonts contain a heading font and a body text font. When you click the Theme Fonts button
-
On the View tab, click Notes Master.
-
On the Notes Master tab, in the Edit Theme group, click Fonts, and then click the fonts used in your slide or the option that you want.
-
When you finish, on the Notes Master tab, in the Close group, click Close Master View.

Change the theme colors
Theme colors contain four text and background colors, six accent colors, and two hyperlink colors. The colors on the Theme Colors button
-
On the View tab, click Notes Master.
-
On the Notes Master tab, in the Edit Theme group, click Colors, and then click the colors used in your slide or the option that you want.
-
When you finish, on the Notes Master tab, in the Close group, click Close Master View.
Change the theme effects
Theme effects are sets of lines and fill effects. When you click the Theme Effects button
-
On the View tab, click Notes Master.
-
On the Notes Master tab, in the Edit Theme group, click Effects.
-
Select the effect that you want to use.
-
When you finish, on the Notes Master tab, in the Close group, click Close Master View.


