
Filtering reduces the number of items displayed in a view to just the data your want to see. A filter selects items that match specific criteria, such as location, type of item, or a range of prices. A filter can return data by itself or be grouped or sorted for better formatting.
Indexes work with filters to increase their performance. If the number of items in your list or library exceeds the List View Threshold, you can add indexes to existing columns. You can then apply filters to get the displayed data under the List view Threshold of 5000 items.
Filters reduce the amount of data returned by selecting items based on operations (such as greater than or less than) and matching data. When you create a filtered view, your first indexed column in the filter expression should reduce the data set the greatest amount. For example, filtering on a state or date field can often reduce a data set considerably. If you've got 15,000 items, you'll want to have the first index return less than 5000 items. If your data set doesn't have over 5000 items, it's still a good practice.
SharePoint selects the first indexed column in a query, and then uses the rest of the columns to select your data. Other columns you specify in the view filter may or may not be indexed. The view does not use those indexes, even if the result of the filtered view returns less than the List View Threshold.
For example, you have a query: size = large AND color = red. In the list, size is not indexed, but color is. As long as there are fewer than 5000 "red" items in the list, the query succeeds in a large list. However, if you have a query size = large OR color = red, though database may find all the red items, it must scan the complete list to find all the large items. If there are more than 5000 items returned, the query is throttled.
If you use two or more columns in the filter expression, the determining index or indexes should use an AND operator. For example, if you want to return Dogs from a large list of animals. You have an unindexed column called Species where you have Dog as a value. If you just query for Species = Dog, your query will be throttled. However, if you have an indexed column called Class, your query becomes Class = Mammals AND Species = Dog. You could also search for cats and dogs with the query Class = Mammals AND (Species = DOG OR Species = Cats). The second query selects all Mammals, and then filters to Dogs and Cats.
Note: If you move items into the Recycle Bin, those items will still be counted when determining whether the filter expression exceeds the List View Threshold. If you clear the recycle bin they are no longer counted. For more info, see Empty the recycle bin or restore your files.
If the columns that you'll be using to filter don't have indexes, you'll want to start by creating indexes. For more info, see Add an index to a SharePoint column.
After you index a column, you can add it when you create or modify a view, and then use it to filter the view. Before creating a view, you may want to add more columns to the list to enable more flexibility for sorting, grouping, and filtering. For sorting and filtering, you can choose columns that are in the data set, but not displayed.
Create a view
Open the List or Library where you want to create a view.
-
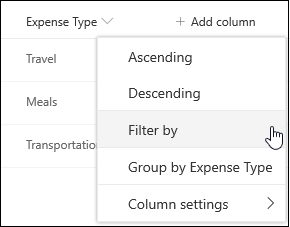
Click on the heading of the column you wish to filter by and choose Filter from the menu options.
-
In the filter pane which opens on the right side of the page, choose the column value(s) by which you wish to filter the list. When you are finished, click the Apply button.
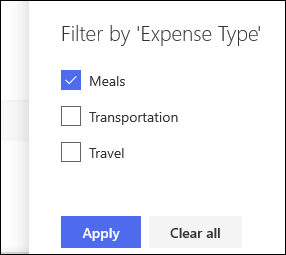
You should now notice that your column header has a filter icon next to it, to indicate that your list is being filtered by values in that column.
If you would like to learn more about the filters pane and how to filter by values stored in several different columns, read What is the list and library filters pane? -
Repeat steps 1 and 2 for any other columns you want to filter on.
-
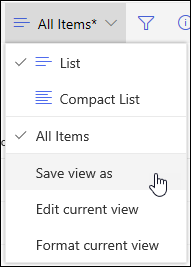
Look at the Views menu at the top right of your list or library. You should notice the name of the current view, with an asterisk (*) next to it—indicating that the view is unsaved. To create a new view, select the name of the current view, and then choose Save view as from the menu options.
-
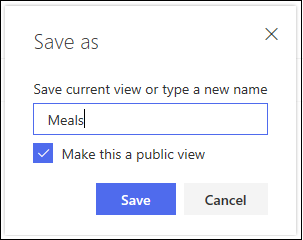
In the "Save As" box that appears, type in a new name for your view. (If you want everyone to be able to see the view, leave Make this a public view selected. Otherwise, clear that selection to make the view visible only to you.) Click the Save button to create your new view.
You should now see a filtered view of your list or library with the assigned name.Note: It is possible to filter your list or library without saving it as a view.
Modify a view
Open the List or Library where you want to create a view.
-
Make an additional change to your view, such as sorting, grouping, or adding additional filters.
-
Following the instructions in steps 3 and 4 above, but this time, don't change the name of the view. Click the Save button. This will update the existing view.
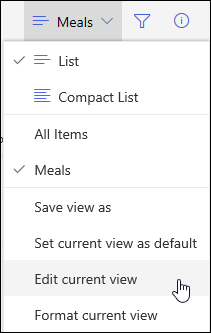
If you want to have more detailed control over your view, you can instead modify your view by using the classic view editor. To do so, select the name of your current view in the view menu, and choose Edit current view from the menu options, then follow the instructions below.
Modify a view in the classic view editor
-
Scroll down to the Filters section, and select Show items only when the following is true.
-
Add statements to define which column or columns you want to filter on.
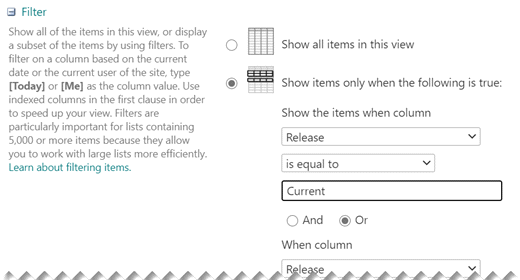
If you have Or statements, specify them first. Then add any needed And statements.
-
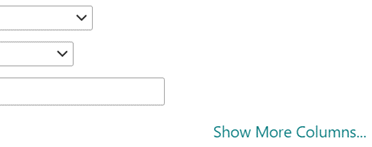
If you need to add another entry to your filter definition, select Show more columns at the lower right. You can have up to 10 statements in a filter definition.
-
When you're done, select OK at the top or bottom of the page to save the view.
The Edit View page closes and is replaced by the view you've defined.
For a view to quickly filter through many items, the first column in the filter must be indexed. Other columns you specify in the view filter may or may not be indexed, but the view does not use those indexes. The first column of the filter should return fewer items than the List View Threshold.
If the first column of the filter returns more items than the List View Threshold, you can use a filter with two or more columns. When you define a filtered view that uses two or more columns, use an AND operator to limit the total number of items returned. But even in this case, you still need to specify as the first column in the filter the column that most likely returns the lesser amount of data. Using an OR filter almost always increases the number of items returned and won't be effective under these circumstances.
For more info on views, see Create, change, or delete a view of a list or library.
Important: Although you can index a single lookup column to improve performance, using an indexed lookup column to prevent exceeding the List View Threshold does not work. Use another type of column as the primary or secondary index.
Important: If you're filtering a list by an indexed field, check the recycle bin for deleted items from the list or library. Items in the recycle bin count against the List View Threshold, and aren't deleted from the back-end database until they are removed from the recycle bin. If the total number of filtered items in the list and in the recycle bin is greater than the List Threshold limit, then you may get an incomplete set of results, or be blocked. For more info, see Empty the recycle bin or restore your files.
There are two key words that you can use to filter based on the current day [Today], or the current user [Me]. These are dynamic as they change with the user or the date.
Note: It is not possible to use the [Today] or [Me] filters when filtering using a column header. You must use the classic view editor to filter columns using these keywords.
Using [Me] can be helpful when you just want to see your documents in a large library. [Me] operates on people based columns such as Created by, or Modified by. For example, to see all documents you've created, set a filter with the Created by column equal to [Me]. If you're an editor and want to see the last files you were working on, set a filter on the Modified by column to is equal to [Me]. To see both, create two filters connected by Or.
![Filters using [Me]](https://support.content.office.net/en-us/media/7b829421-7e05-403d-9804-15b1153725e9.png)
The [Today] keyword works on date based columns. You can use math to get ranges that change with today's date. For example, to see all documents that were modified in the last 30 days, you can create a filter on the Date column that's greater than or equal to [Today] - 30. To leave out the current day, set a second filter on the Date column to is less than [Today] and connect them with And.
![Filter using [Today]](https://support.content.office.net/en-us/media/f41e58fc-8744-4f50-939d-3bff475c892d.png)
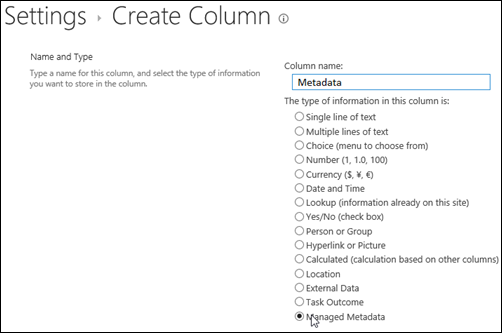
You can filter a SharePoint list that has a metadata column.
Add a metadata column to your list
Go to your list and select +Add column.
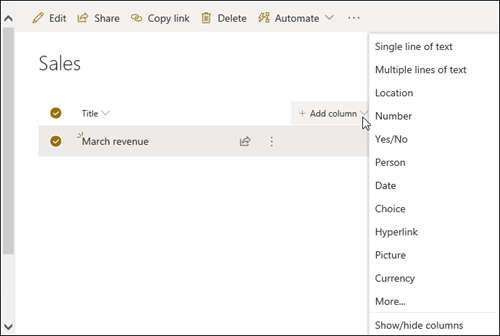
Select More... 
Alternatively, once you've created a Managed Metadata column and added items to your list, you can apply metadata tags by clicking the Tag icon 
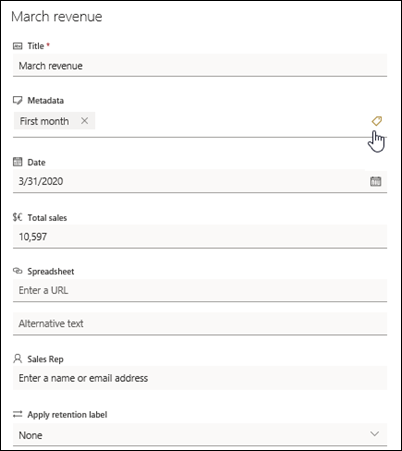
Apply metadata tags in the tree view pane.
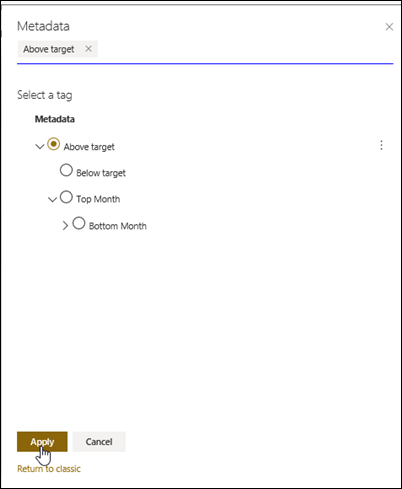
Filter on Managed Metadata tags
-
Select the filter icon


Note: You can select the Tree View option from the dropdown list at the top of the pane, which provides a hierarchical view of the terms associated with the selected column.
-
Select the metadata tag(s) that you want to filter on.

-
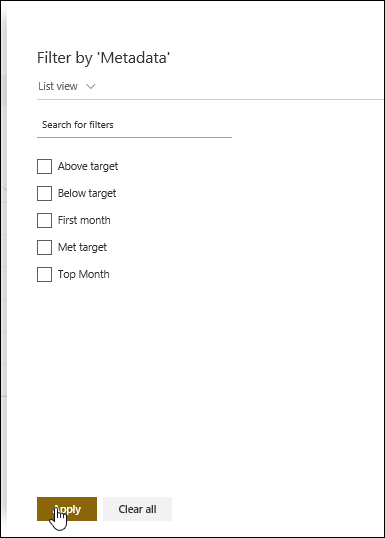
Alternatively, if you have at least 5 values defined in the Managed Metadata column, select the See All link to view the filter pane.
-
Check the metadata tag(s) that you want to filter on, and select Apply.
The following are some suggestions for typical views that would work well with indexed columns:
|
To filter by: |
Index the: |
For example: |
|---|---|---|
|
Recently changed items |
Modified column |
To view only items that have changed in the past week, apply the filter Modified is greater than[Today]-7. |
|
New items |
Created column |
To create a view of only those items that were added in the past week, apply the filter Created is greater than [Today]-7. |
|
My items |
Created By column |
To create a view of only those items that you added, apply the filter Created By is equal to [Me]. |
|
Items due today |
Due Date column (created by you in a list or library) |
To create a view of only those items with a due date of today, apply the filter Due Date is equal to [Today]. |
|
Discussion board updates |
Last Updated column |
To create a view of only the discussions that were updated in the past month, apply the filter Last Updated is greater than [Today]-30. |
|
Archive files in a document library |
Date Modified |
To create a view of documents not changed since the year 2016 (that you then want to archive), apply the filter Date Modified is less than December 31st, 2016. |
|
Find a subset of financial data |
Region, Year (as two simple indexes) |
To create a view of financial data for the Northeast region in 2015, apply the filter Region equals "NE" AND Year equals 2015 because the Region column is likely to have less values than the Year column. |
|
Metadata |
Managed Metadata column |
To create a view of managed metadata, apply a filter based on metadata tags that you define in the list and library filterspane. For information, see What is the list and library filters pane? |
Note: Even when you create a filtered view based on column indexes, if you're over the List View Threshold, certain additional operations might still be blocked because they require accessing the entire list or library. These operations include the following: adding or deleting an index, creating a sort in the view definition; displaying a column total; and adding, updating, or deleting calculated fields. If this happens, try to run the operation during the Daily Time Window, when limits are lifted.
|
Supported Column Types
|
Unsupported Column Types
|
We're listening
Was this article helpful? If so, please let us know at the bottom of this page. If it wasn't helpful, let us know what was confusing or missing. Please include your SharePoint, OS, and browser versions you're using. We'll use your feedback to double-check the facts, add info, and update this article.
See Also
Create, change, or delete a view
Use sorting to modify a SharePoint view
Filters reduce the amount of data returned by selecting items based on operations (such as greater than or less than) and matching data. When you create a filtered view, your first indexed column in the filter expression should reduce the data set the greatest amount. For example, filtering on a state or date field can often reduce a data set considerably. If you've got 15,000 items, you'll want to have the first index return less than 5000 items. If your data set doesn't have over 5000 items, it's still a good practice.
SharePoint selects the first indexed column in a query, and then uses the rest of the columns to select your data. Other columns you specify in the view filter may or may not be indexed. The view does not use those indexes, even if the result of the filtered view returns less than the List View Threshold.
For example, you have a query: size = large AND color = red. In the list, size is not indexed, but color is. As long as there are fewer than 5000 "red" items in the list, the query succeeds in a large list. However, if you have a query size = large OR color = red, though database may find all the red items, it must scan the complete list to find all the large items. If there are more than 5000 items returned, the query is throttled.
If you use two or more columns in the filter expression, the determining index or indexes should use an AND operator. For example, if you want to return Dogs from a large list of animals. You have an unindexed column called Species where you have Dog as a value. If you just query for Species = Dog, your query will be throttled. However, if you have an indexed column called Class, your query becomes Class = Mammals AND Species = Dog. You could also search for cats and dogs with the query Class = Mammals AND (Species = DOG OR Species = Cats). The second query selects all Mammals, and then filters to Dogs and Cats.
Note: If you move items into the Recycle Bin, those items will still be counted when determining whether the filter expression exceeds the List View Threshold. If you clear the recycle bin they are no longer counted. For more info, see Empty the recycle bin or restore your files.
If the columns that you'll be using to filter don't have indexes, you'll want to start by creating indexes. For more info, see Add an index to a SharePoint column.
After you index a column, you can add it when you create or modify a view, and then use it to filter the view. Before creating a view, you may want to add more columns to the list to enable more flexibility for sorting, grouping, and filtering. For sorting and filtering, you can choose columns that are in the data set, but not displayed.
Create a view
Open the List or Library where you want to create a view.
-
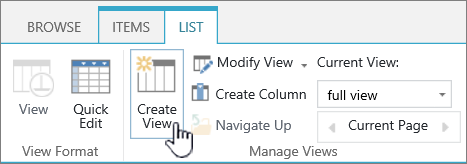
Click the List or Library tab, and then click Create View.
-
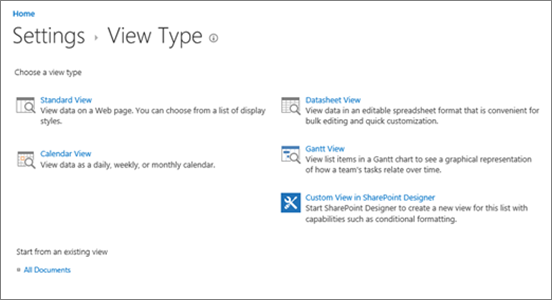
On the View Type page, click the view you want to use. If unsure, choose Standard View.
-
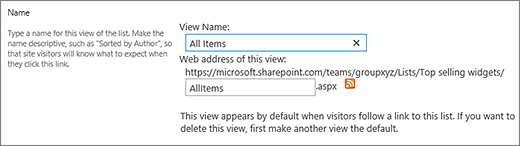
Type a View Name.
-
Edit the web address for the view, or accept the default. You can come back and change this later.
-
In the Filter section, click Show items only when the following is true, and then choose how you want to filter the items based on one of the columns that is indexed.
For example, to create a view of only items that changed today, choose the Modified (Indexed) column and the is equal to condition, and then type [Today].
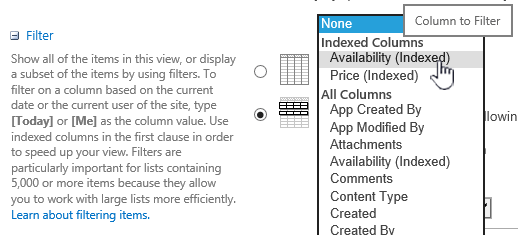
Note: If you do not see any columns that say (Indexed) after the name, you do not have any indexed columns available for that list or library. You must first Create a simple or compound index.
-
To limit the number of items displayed on each page, scroll down to Item Limit and set the Number of items to display value. When you create a view, the default number of items to be displayed is 30.

-
There are two options you can choose when setting an item limit on a page:
-
Display items in batches of the specified size which creates a page-by-page display of the data that is useful when you are browsing items in a non-interactive way.
When there are more items than your limit setting, the display will be paged.
-
Limit the total number of items returned to the specified amount creates a hard limit that may or may not return the entire results of your filter operation. This can be useful when testing your view, creating a prototype, or you only want to retrieve the top values in a view.
-
-
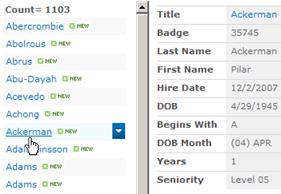
Under Style, you can choose Preview Pane to see all the information from items in your list in a vertical pane format. The preview pane is one of the View Styles you can choose under Style when editing or creating a view.

You can more quickly navigate the data by hovering over the item title in a scrolling region on the left side of the page, to see all the column values of the current item vertically listed on the right side of the page. Less initial data is displayed, and this helps display the view faster. This style is also very useful when your list is wide or has many columns and would require horizontal scrolling to see the data.
-
Click OK.
There are more steps you can do with a view, but this is enough to view data that has exceeded the List View Threshold if you're blocked. You can also sort, or group by, set totals, expand folders, and optimize the view viewing with a mobile device.
Modify a view
Open the List or Library where you want to create a view.
-
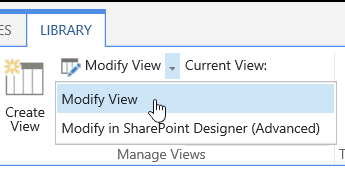
Click the List or Library tab, select the view under Current View, and then click Modify View.
-
Scroll down to the Views section, and then click a view.
-
You can then change settings as outlined in steps 5 through 9 in the Create a view procedure above.
-
Click OK.
For a view to quickly filter through many items, the first column in the filter must be indexed. Other columns you specify in the view filter may or may not be indexed, but the view does not use those indexes. The first column of the filter should return fewer items than the List View Threshold.
If the first column of the filter returns more items than the List View Threshold, you can use a filter with two or more columns. When you define a filtered view that uses two or more columns, use an AND operator to limit the total number of items returned. But even in this case, you still need to specify as the first column in the filter the column that most likely returns the lesser amount of data. Using an OR filter almost always increases the number of items returned and won't be effective under these circumstances.
For more info on views, see Create, change, or delete a view of a list or library.
Important: Although you can index a single lookup column to improve performance, using an indexed lookup column to prevent exceeding the List View Threshold does not work. Use another type of column as the primary or secondary index.
Important: If you're filtering a list by an indexed field, check the recycle bin for deleted items from the list or library. Items in the recycle bin count against the List View Threshold, and aren't deleted from the back-end database until they are removed from the recycle bin. If the total number of filtered items in the list and in the recycle bin is greater than the List Threshold limit, then you may get an incomplete set of results, or be blocked. For more info, see Empty the recycle bin or restore your files.
There are two key words that you can use to filter based on the current day [Today], or the current user [Me]. These are dynamic as they change with the user or the date.
Note: It is not possible to use the [Today] or [Me] filters when filtering using a column header. You must use the classic view editor to filter columns using these keywords.
Using [Me] can be helpful when you just want to see your documents in a large library. [Me] operates on people based columns such as Created by, or Modified by. For example, to see all documents you've created, set a filter with the Created by column equal to [Me]. If you're an editor and want to see the last files you were working on, set a filter on the Modified by column to is equal to [Me]. To see both, create two filters connected by Or.
The [Today] keyword works on date based columns. You can use math to get ranges that change with today's date. For example, to see all documents that were modified in the last 30 days, you can create a filter on the Date column that's greater than or equal to [Today] - 30. To leave out the current day, set a second filter on the Date column to is less than [Today] and connect them with And.
You can filter a SharePoint list that has a metadata column.
Add a metadata column to your list
Go to your list and select +Add column.
Select More...
Alternatively, once you've created a Managed Metadata column and added items to your list, you can apply metadata tags by clicking the Tag icon
Apply metadata tags in the tree view pane.
Filter on Managed Metadata tags
-
Select the filter icon
Note: You can select the Tree View option from the dropdown list at the top of the pane, which provides a hierarchical view of the terms associated with the selected column.
-
Select the metadata tag(s) that you want to filter on.
-
Alternatively, if you have at least 5 values defined in the Managed Metadata column, select the See All link to view the filter pane.
-
Check the metadata tag(s) that you want to filter on, and select Apply.
The following are some suggestions for typical views that would work well with indexed columns:
|
To filter by: |
Index the: |
For example: |
|---|---|---|
|
Recently changed items |
Modified column |
To view only items that have changed in the past week, apply the filter Modified is greater than[Today]-7. |
|
New items |
Created column |
To create a view of only those items that were added in the past week, apply the filter Created is greater than [Today]-7. |
|
My items |
Created By column |
To create a view of only those items that you added, apply the filter Created By is equal to [Me]. |
|
Items due today |
Due Date column (created by you in a list or library) |
To create a view of only those items with a due date of today, apply the filter Due Date is equal to [Today]. |
|
Discussion board updates |
Last Updated column |
To create a view of only the discussions that were updated in the past month, apply the filter Last Updated is greater than [Today]-30. |
|
Archive files in a document library |
Date Modified |
To create a view of documents not changed since the year 2016 (that you then want to archive), apply the filter Date Modified is less than December 31st, 2016. |
|
Find a subset of financial data |
Region, Year (as two simple indexes) |
To create a view of financial data for the Northeast region in 2015, apply the filter Region equals "NE" AND Year equals 2015 because the Region column is likely to have less values than the Year column. |
|
Metadata |
Managed Metadata column |
To create a view of managed metadata, apply a filter based on metadata tags that you define in the list and library filterspane. For information, see What is the list and library filters pane? |
Note: Even when you create a filtered view based on column indexes, if you're over the List View Threshold, certain additional operations might still be blocked because they require accessing the entire list or library. These operations include the following: adding or deleting an index, creating a sort in the view definition; displaying a column total; and adding, updating, or deleting calculated fields. If this happens, try to run the operation during the Daily Time Window, when limits are lifted.
|
Supported Column Types
|
Unsupported Column Types
|
We're listening
Was this article helpful? If so, please let us know at the bottom of this page. If it wasn't helpful, let us know what was confusing or missing. Please include your SharePoint, OS, and browser versions you're using. We'll use your feedback to double-check the facts, add info, and update this article.
See Also
Create, change, or delete a view
Use sorting to modify a SharePoint view


