
You can keep track of when records in an Access table are last modified, by using a form with a macro. When the form is used to modify a record, the macro stores the date and time in the table. Only the most recent modification date and time are stored.
Note: The procedures in this article are for use in desktop Access databases.
In this article
Overview
To record the date and time that the records in a table are modified, you must complete the following steps:
Step 1: Add fields to a table You need a place to store the date and time before you can record it. The first step is to create fields in the table that has the records that you want to track. To capture the date and the time, create one field for the date and one field for the time. If you only want to capture one or the other, you can create just the field that you require.
Step 2: Create a macro that records the date and time Depending on whether you want to record the date, the time, or both, the macro will have one or two actions. When you write the macro, specify only the fields that will store the date and time, not the table that contains those fields. That way, you can easily reuse the macro with other tables and forms.
Step 3: Add the macro to a data-entry form You add the macro to the Before Update form property of the form that you use to edit records in the table. If you use other forms to edit records in the table, you can add the macro to each of them as well. That way, you can capture the date and time regardless of which form you use to edit the record.
Tip: If you want to keep track of when records are created but do not care when they are modified, just create a field in the table to track and use the field's Default Value property to timestamp each record when it is created.
Before you begin
Before you begin, consider the following:
-
Users must enable macros in the database. If a user opens the database and does not enable macros, the macro will not time-stamp the records. If you store the database in a trusted location, macros are automatically enabled.
-
If a user edits records, but does not use a data-entry form that contains the macro that time-stamps records, the records that the user edits will not be time-stamped.
-
Because the date and time are stored in table fields, the values in those fields get overwritten every time that a record is modified. In other words, you can only store the date and time of the most recent modification.
-
If you only want to capture the date and time that a record is created, just add a field to the table and set that field's Default Value property to Now() or Date().
-
If your database file has an older file format and uses user-level security, you must have permissions to change the design of the table and the forms that are used to edit its records.
Step 1: Add timestamp fields to a table
Create fields to store the information.
-
Open the table in Design view.
-
Do one or both of the following:
-
Create a field to store the date. In the Field Name column of the design window, type Date Modified in a new row, and then select Date/Time in the Data Type column.
-
Create a field to store the time. In the Field Name column of the design window, type Time Modified in a new row, and then select Date/Time in the Data Type column.
-
-
Press CTRL+S to save your changes.
Step 2: Create a macro that records the date and time
After you create the fields, create a macro to time-stamp those fields. To make the macro reusable with other tables, refer only to the field names, not the table names.
Note: If you only want to record the date or the time, omit the macro action that you do not need.
-
On the Create tab, in the Other group, click Macro. If this command is unavailable, click the arrow beneath either the Module or the Class Module button, and then click Macro.
-
On the Design tab, in the Show/Hide group, click Show All Actions.
-
In the macro window, open the macro action list and select SetValue.
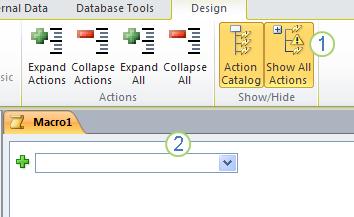
1. First, show all available macro actions. The SetValue action is considered potentially unsafe and is hidden by default, because it can change data.
2. Then, select the SetValue action from this list.
-
In the SetValue action box, in the Item box, type or paste [Date Modified].
-
In the Expression box, type Date().
-
Open the next macro action list and select SetValue.
-
In the SetValue action box, in the Item box, type or paste [Time Modified].
-
In the Expression box, type Time().
-
Press CTRL+S, and then in the Save As dialog box, type Last Modified.
Step 3: Add the fields and the macro to a data-entry form
After you create the macro, add it to each data-entry form that users will use to enter data in the relevant table.
-
Open the data-entry form in Design view.
-
On the Design tab, in the Tools group, click Add Existing Fields.
-
In the Field List, under Fields available for this view, drag the Date Modified and the Time Modified fields to the form. Adjust the size and placement of the fields on the form as needed.
-
If the property sheet is not already displayed, press F4 to display it.
-
On the property sheet, make sure that the Selection Type is set to Form.
Tip: To change the Selection Type, click the selection type you want in the drop-down list.
-
On the property sheet, click the Event tab.
-
On the Event tab, click the arrow in the Before Update box, and then click Last Modified.
-
If you use multiple forms to edit records, repeat this procedure for each such form.
-
To verify that the macro is working correctly, open the form in Form view, edit a record, and then press SHIFT+F9. The date and time that you edited the record should be displayed.


