
Note: This article only applies to SharePoint Server and does not apply to SharePoint Online. For information on the Recycle Bin for SharePoint Online please visit Restore deleted items from the site collection recycle bin.
The Recycle Bin provides a safety net when users delete files, versions of files, list items, libraries, lists, and folders from a site. When users delete any of these items from a site, the items are placed in the Recycle Bin. This article focuses on how a site collection administrator can manage the Recycle Bin for a site collection. For information about the tasks that a contributor to a site can accomplish, see Restore items in the Recycle Bin of a SharePoint site.
Important: This article discusses the Recycle Bin on a site, which is different from the Recycle Bin in Windows. For information about the Recycle Bin in Windows, see Put the Windows Recycle bin back on your desktop.
In this article
Overview
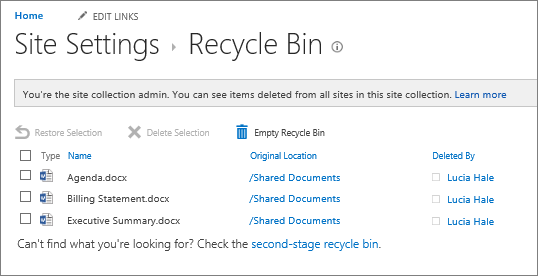
As a site collection administrator, you can view and manage deleted items across a site collection from the Site Collection Administration Recycle Bin page. From this page, you can view items that are currently in a user's Recycle Bin and items that a user has deleted from his or her Recycle Bin, sending the items to the second stage Recycle Bin also known as the Site Collection Recycle Bin.
Users who delete an item in the Recycle Bin can contact you to restore the item back to its original location as long as the item hasn't exceeded the original deleted date that the server administrator set. By default, items in the Recycle Bin are deleted automatically after 30 days. Regardless of whether or not an item is sent to the users' Recycle Bin or to Site Collection (Second-Stage) Recycle Bin, items are deleted automatically after the number of days that the server administrator specified in Central Administration.
Note: If you do not see the Recycle Bin on your site, the Recycle Bin could have been disabled by the server administrator.
1. A user deletes a document from a document library.
2. The document is moved to the Recycle Bin for the site, the user or a site collection administrator can restore it or delete it.
3. If the file is deleted from the site Recycle Bin, it is sent to the Site Collection or Second-Stage Recycle Bin, where a site collection administrator can restore it or delete it permanently.
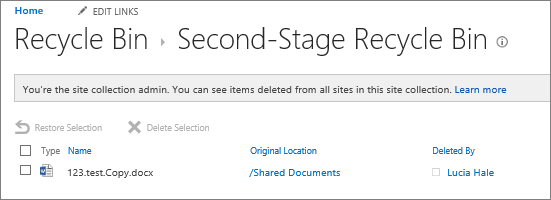
The Site Collection (Second-Stage) Recycle Bin gives the administrator of a site collection greater control over deleted items by providing a second stage safety net before an item is permanently deleted from a site. When you delete an item from your Recycle Bin, the item is sent to a second stage Recycle Bin (also known as the Site Collection (Second-Stage) Recycle Bin) that the administrator of the site collection manages.
The Recycle Bin is enabled in a site collection by default, and is configured in Central Administration at the site collection level. When enabled at this level, the server administrator can specify how long items remain in the Recycle Bin before the items are emptied. The server administrator can also disable the Site Collection (Second-Stage) Recycle Bin, or disable the Recycle Bin in a site collection altogether.
For more information about how to configure the Recycle Bin from the Central Administration site, see Configure Recycle Bin settings on TechNet.
View items from the Site Collection Administration Recycle Bin page
As a site collection administrator, you can use the Site Collection Administration Recycle Bin to view, delete, and restore items deleted by other users. If you do not see the Recycle Bin on your site, it could have been disabled by the server administrator.
-
On the site where you want to add an app, Click Settings

-
Click Recycle bin under Site Collection Administration.
Delete an item by using the Site Collection (Second-Stage) Recycle Bin page
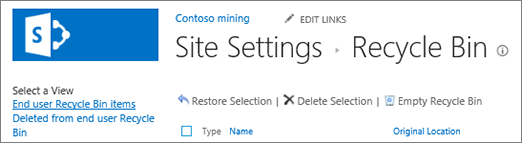
By default, items that users delete are sent to the Recycle Bin. As a site collection administrator, you can view those items in the End user Recycle Bin items view on the Site Collection Administration Recycle Bin page. When a user deletes an item from the Recycle Bin, it is sent to the Site Collection (Second-Stage) Recycle Bin. As a site collection administrator, you can view those items in the Deleted from end user Recycle Bin view.
When you delete an item from the Site Collection (Second-Stage) Recycle Bin, it is permanently deleted from the site.
-
On the site where you want to add an app, Click Settings
-
Click Recycle bin under Site Collection Administration.
-
Do one of the following:
-
To view items in the end user Recycle Bin, click the End user Recycle Bin items view.
-
To view items in the Site Collection Recycle Bin, click the Deleted from end user Recycle Bin view.
-
-
Select the check box next to the item you want to delete.
-
Click Delete Selection.
Restore an item by using the Site Collection (Second-Stage) Recycle Bin page
As a site collection administrator, users who delete an item in the Recycle Bin can contact you to restore the item back to its original location, as long as the item hasn't exceeded the original deleted date that the server administrator set. By default, items in the Recycle Bin are deleted automatically after 30 days.
-
On the site where you want to add an app, Click Settings
-
Click Recycle bin under Site Collection Administration.
-
Do one of the following:
-
To restore items in the end user Recycle Bin, click the End user Recycle Bin items view.
-
To restore items in the Site Collection Recycle Bin, click the Deleted from end user Recycle Bin view.
-
-
Select the check box next to the item you want to restore.
-
Click Restore Selection.
If you restore an item that was originally located in a deleted folder, the folder is recreated in its original location and the item is restored in that folder.
Put the Windows recycle bin back on your desktop
While the Windows recycle bin has nothing to do with SharePoint, it is important to have it handy for retrieving local files that you delete. Here's how to put it back on your desktop:
To put the Windows 10 Recycle bin back on your desktop:
-
Select the Start


-
Select Personalization > Themes > Desktop icon settings.
-
Select the Recycle Bin check box > Apply.
• To get to desktop icon settings in Windows 8.1, swipe in from the right edge of the screen, then select Search. Type desktop icons in the search box, and then select Show or hide common icons on the desktop.
• To get to desktop icon settings in Windows 7, select the Start button, type desktop icons in the search box, and then select Show or hide common icons on the desktop.


