
Note: This article has done its job, and will be retiring soon. To prevent "Page not found" woes, we're removing links we know about. If you've created links to this page, please remove them, and together we'll keep the web connected.
Word 2013 includes an easy-to-make kids' Valentine template—all you have to do is print, fold, cut, sign, seal, and deliver!
To download the template:
-
Open Word, and then click File > New.
-
Search for Valentine template to find a template called Valentines for kids. Click the template, and then click Create.
-
Follow the steps in this article.
The template is intended to be printed on both sides of the paper. For best results, use a paper stock that is heavier than plain printer paper, but light enough to fold easily.
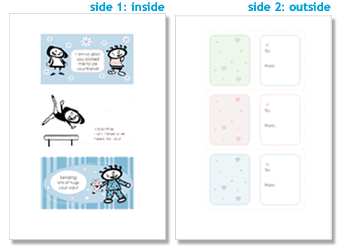
Step 1: Print the inside pages of the Valentines.
These are the first four pages of the template. To do this:
-
Load four pieces of paper in your printer. (Tip: If you are using card stock, you may want to feed the sheets into the printer one at a time.)
-
Click File > Print.
-
Under Settings, enter 1-4 in the Pages box.
-
Click Print.
Step 2: Print the outside pages of the Valentines.
You are now ready to print the outside of your Valentine cards. For this we will use the fifth page of the document and will print four copies of this page (one for each page of Valentine cards). To do this:
-
Flip the first four pages over and load them into your printer to print the outside of the cards.
Tip: Tip: Refer to your printer manual for the direction in which you should load sheets and for other loading and feeding recommendations, particularly for card stock. Many printers have special instructions for these types of products.
-
Click File > Print.
-
Next to Copies, select 4 .
-
Under Settings, enter 5 in the Pages box.
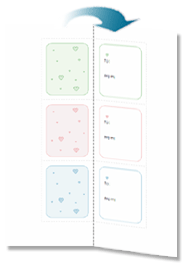
Step 3: Fold the Valentines.
-
Fold the page in half lengthwise so that the to and from sections are on the outside of the card (facing you), and the pictures and greetings are on the inside of the card.
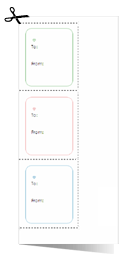
Step 4: Cut out the Valentines.
-
Cut along the outside of the Valentines.
Step 5: Sign, seal, and deliver!
Write names in the to and from section on the outside of each card. You can seal the cards closed with a sticker, place them in an envelope, or just use them as-is. Deliver your homemade Valentine cards to your classmates, friends, and family members to show how much you care!


