
If you have access to a server that is running InfoPath Forms Services, such as Microsoft Office Forms Server 2007 or Microsoft Office SharePoint Server 2007, you can use Microsoft Office InfoPath to design form templates that can be displayed and filled out in a mobile device browser.
In this article
-
Form controls and features that are not supported in mobile device browsers
Introduction to designing form templates for mobile devices
By using Office InfoPath 2007 together with InfoPath Forms Services, you can design a browser-compatible form template that can be filled out by using a personal digital assistant (PDA) or other mobile device.
Note: You can create a browser-compatible form template for most mobile devices, including PDAs, smartphones, and any device that supports a Web browser with HTML, cHTML, or xHTML. However, InfoPath Forms Services does not support mobile device browsers that use Wireless Action Protocol (WAP).
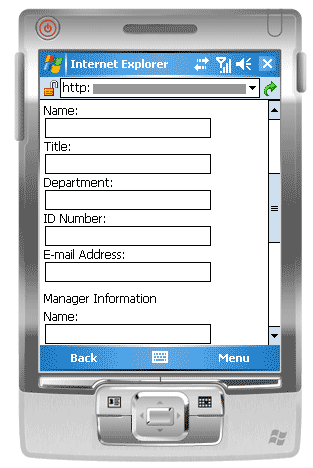
You can design a browser-compatible form template for users to fill out exclusively in a mobile device browser. For example, you might design such a template if your warehouse is Wi-Fi enabled and your company provides all warehouse employees with PDAs to track inventory.
If you want your form template to be accessible to all users, regardless of their display device, you can design one view exclusively for mobile users, a second view for a desktop browser, and a third view for people who have InfoPath installed on their computers. This technique lets you design a single form template that can be filled out by different sets of users, instead of creating separate forms for each form-filling scenario.
Find links to more information about creating dedicated views in the See Also section.
Since each mobile device displays a given Web page differently, the exact appearance of the form will vary depending on the device that is used to access it. When you design your form template in InfoPath, it helps to target a specific mobile device so that you can optimize your design to suit that particular device.
This article describes tips and procedures for designing, publishing, and testing your mobile-enabled form templates, as well as control and feature limitations for mobile form templates,
Form controls and features that are not supported in mobile device browsers
Mobile devices support many, but not all, of the controls that are supported in browser-compatible form templates.
Note: InfoPath will not warn you about a form control or a feature in your form template that is not supported in mobile device browsers.
Support for form controls
You can use the following table to determine whether InfoPath Forms Services supports a particular InfoPath control.
Since mobile device browsers do not support HTML tables, CSS (Cascading Style Sheets), and certain other browser technologies, some controls appear differently in a mobile device browser than they do in a desktop browser.
Furthermore, mobile device browsers completely ignore some controls; for example, a file attachment control.


|
InfoPath 2007 control |
Desktop browsers |
Mobile device browsers |
|
Text box |
|
|
|
Check box |
|
|
|
Button |
|
|
|
Expression box |
|
|
|
List box |
|
|
|
Drop-down list box |
|
|
|
Repeating section |
|
|
|
Hyperlink |
|
|
|
Option button 1 |
|
|
|
Optional section 2 |
|
|
|
Repeating table 3 |
|
|
|
File attachment control |
|
|
|
Date picker 4 |
|
|
|
Rich text box |
|
|
|
ActiveX control |
|
|
|
Bulleted list control |
|
|
|
Choice group |
|
|
|
Choice section |
|
|
|
Combo box |
|
|
|
Horizontal repeating table |
|
|
|
Horizontal region |
|
|
|
Ink picture control |
|
|
|
Master/detail control |
|
|
|
Multiple-selection list box |
|
|
|
Numbered list control |
|
|
|
Picture control |
|
|
|
Plain list control |
|
|
|
Repeating choice group |
|
|
|
Repeating recursive section |
|
|
|
Scrolling region |
|
|
|
Vertical label |
|
|
1Consider using a drop-down list box instead.
2Consider using multiple views instead.
3Consider using a repeating section instead.
4In mobile device browsers, the date picker appears as a text box with data validation.
Support for business logic
You can add business logic to your form template to help prevent data-entry errors and to automate specific actions in the form for the user. In particular, you can use data validation, conditional formatting, and rulesto make the form show validation messages, change formatting, or perform other tasks.
You can use the following table to determine whether or not a given browser supports a particular type of business logic.
|
InfoPath 2007 feature |
Desktop browsers |
Mobile device browsers |
|
Formulas 1 |
|
|
|
Data validation |
|
|
|
Rules |
|
|
|
Conditional formatting 2 |
|
|
|
User roles |
|
|
1Except xdXDocument:get-Role, Position, and Last functions.
2Mobile device browsers support some conditional formatting features; for example, you can hide or display controls depending upon conditions you define in the form. You cannot use conditional formatting, however, to change the appearance of a control based on conditions in the form. For example, you cannot use conditional formatting to change the color of text in a control.
For a detailed list of the features that desktop and mobile browsers support, see Web browser compatibility in InfoPath Forms Services.
General design advice
You can find a lot of guidance on the Internet about how to design a form that users will view on a mobile device. Here are some additional tips to think about as you design the form template:
-
When users fill out a form on a mobile device, they must click the Update button on the mobile device toolbar to trigger a calculation or some other other type of business logic. Each click of the button forces the mobile device to submit data to the server, a process called a postback. To make it easier on the user, consider adding a button to the form template that automates the postback. For example, suppose your form includes a Total field that totals the numbers in three other fields on the form. In that case, you might add a Show Total button next to the Total field, so that users remember to refresh the fields in the form.
-
Rather than insert all of the controls on a single view, consider a design that has multiple views, especially for the display of conditional controls. Multiple views on a form help prevent a single view from becoming too large or complex, and therefore difficult to use on a small screen.
-
If the form has multiple views, add buttons that help users to navigate between views.
-
Use list boxes wherever possible; it is difficult to type on a mobile device.
Design a form template for use on a mobile device
With some exceptions, designing and publishing a form template for a mobile device is the same as designing and publishing a form template for a browser on a desktop computer. The following sections discuss how to design, deploy, and test a mobile form template.
Step 1: Specify a compatibility setting for the form template
The first step is to specify that you want to design a browser-compatible form template.
-
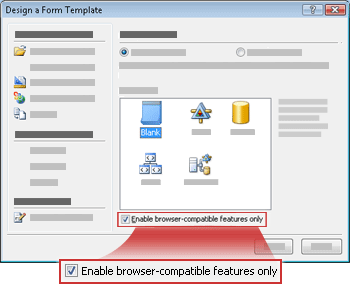
On the File menu, click Design a Form Template.
-
Under Design a new in the Design a Form template dialog box, click Form Template.
-
In the Based on gallery, do one of the following:
-
To define the data source as you design the form template, click Blank.
-
To use a Web service as the data source for the form template, click Web Service. This option lets you query or submit data to a Web service.
-
To use a Microsoft SQL Server database as the data source for the form template, click Database. This option lets you query data from a SQL Server database.
-
To use an XML document (.xml) file or an XML Schema (.xsd) file as the the data source, click XML or Schema.
-
To use information in a data connection file as the basis for the data source, click Connection Library.
-
-
To make your form template compatible with a server running InfoPath Forms Services, select the Enable browser-compatible features only check box, and then click OK.
A new form template opens in InfoPath, with the text, Compatibility: InfoPath and InfoPath Forms Services in the status bar. The purpose of the text is to inform you that either InfoPath or a Web browser can display the active form template.
-
Add controls, data validation, or any other features to the form template. As you design your form template, remember that mobile browsers do not support some of the controls that desktop browsers support.
Note: The Design Checker task pane will not warn you that a control or feature in your form template is not supported in mobile device browsers. To double-check support for a control or feature, see the Form controls and features that are not supported in mobile device browsers section later in this article.
Step 2: Specify a mobile device setting for the form template
After you create your browser-compatible form template, you must add an Update button to the toolbar of the form template, and then select a specific option in the Form Options dialog box to enable the form template for a mobile device browser.
-
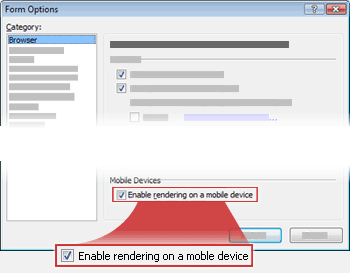
On the Tools menu, click Form Options.
-
In the Form Options dialog box, click the Browser category.
-
To add an Update button to the toolbar of the mobile device, under Include the following commands on the toolbars, in the Toolbars section, select the Update check box.
-
Under Mobile Devices, select the Enable rendering on a mobile device check box.
-
Click OK to return to the form template.
-
Save the form template to the location of your choice.
Step 3: Create a document library to store the mobile forms
The next two steps describe how to submit form data to a library on a server that is running InfoPath Forms Services.
Use the following steps to create the library.
-
Using a browser, open the SharePoint site where you want to store user forms.
-
Click View All Site Content, and then click Create on the All Site Content page.
In most cases, you can use the Site Actions

-
Under Libraries, click Document Library.
-
In the Name box, type a name for the new library.
The name will appear at the top of the library page, become part of the address for the library page, and appear in the navigational elements that help users to find and open the library.
-
In the Document Template section, in the Document Template list, click None, and then click Create.
Step 4: Specify submission options for the form template
Now, you must configure your form template so that users can submit form data to the document library you created in step 3. In addition, you will create a formula that assigns a unique file name to each form that is submitted to the library.
-
In InfoPath, open the browser-compatible form template that you created in step 2.
-
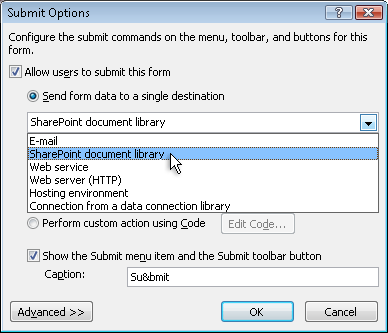
On the Tools menu, click Submit Options.
-
In the Submit Options dialog box, select the Allow users to submit this form check box.
-
In the Send form data to a single destination list, click SharePoint document library.
-
To add a new data connection, click Add. The Data Connection Wizard dialog box opens.
-
In the Document Library text box, type http://<ServerName>/<LibraryName>/Forms/AllItems.aspx, where <ServerName> is the name of the SharePoint server that is running InfoPath Forms Services, and <LibraryName> is the name of the library.
Note: If the document library is not located on the root site, you must insert the site name in the URL. For example, http://<ServerName>/<SiteName>/<LibraryName>/Forms/AllItems.aspx
-
Click the button

-
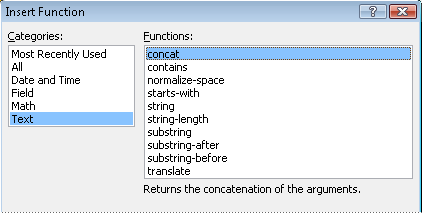
In the Insert Formula dialog box, click Insert Function. The Insert Function dialog box opens.
-
Click the Text category, click the concat function, and then click OK.
-
In the Insert Formula dialog box, click the first occurrence of the text "double-click to insert field" in the Formula box to highlight it, and then type 'form'. Include the single quotation marks.
-
Click the second occurrence of the text "double-click to insert field" in the Formula box to highlight it, and then click Insert Function.
-
Click the Date and Time category, click the now function, and then click OK.
The now function lets you automatically add the current date and time to the form name.
-
Delete the remaining "double-click to insert field" items in the Formula box.
-
Delete the extra space and the comma, so that the formula box contains the formula concat('form', now()), as shown in the following image.
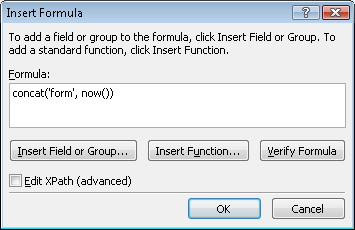
When users submit their form to the library, the form will be named according to this formula. Each submitted form will have a unique name.
-
To return to the Data Connection Wizard dialog box, click OK.
-
Click Next, and then click Finish.
-
To return to the form template, click OK.
-
On the Tools menu, click Form Options, and then click the Browser category.
-
Under Toolbars, select the Submit check box, adn then click OK.
-
Save your changes.
Step 5: Publish the form template to a server
To publish a form template that mobile devices can use, you must work with the administrator of the server that is running InfoPath Forms Services. That publication process can be divided into three distinct steps:
-
The form designer must publish an .xsn file to a shared location. The .xsn file contains information about the server where the form template will ultimately appear.
-
The farm administrator must upload the form template to the server and optionally verify that the form template is free from errors.
-
The farm administrator or site collection administrator must activate the form template to a site collection on the server, which makes the form template available to people using mobile devices.
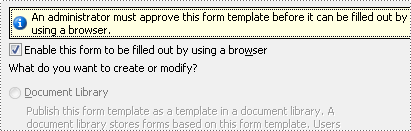
Prepare the form template for administrator approval
As is the case for all form templates that you design for mobile devices, this form template requires administrator approval. The following procedure walks you through the process of preparing the form template for administrator approval, by saving it to a shared location on your computer or network. The farm administrator for the server is responsible for actually deploying the form template, which involves uploading and activating the form template on the server.
-
On the File menu, click Publish.
-
In the Publishing Wizard, click To a SharePoint server with or without InfoPath Forms Services, and then click Next to open the next page of the wizard.
-
In the Enter the location of your SharePoint or InfoPath Forms Services site box, type the location of the SharePoint site where the forms will be stored, and then click Next to open the next page of the wizard.
-
Review the settings, and note that the form template requires aministrator approval.
Click Next to open the next page of the wizard.
-
In the Specify a location and file name for the form template box, click Browse.
-
In the Browse dialog box, browse to a location that the farm administrator can access, and then in the File name box, type the name of the form template and click Save.
-
Click Next to open the next page of the wizard.
-
If you want specific fields in the form template to show as columns in the document library, click the Add button, select the fields you want, and then click OK. Otherwise, click Next to open the next page of the wizard.
-
Verify that the information is correct, and then click Publish to save your form template (.xsn) file to the specified location.
-
Click Close.
-
At this point, you must ask a farm administrator to upload the form template to the server and then activate it to a site collection.
Step 6: Associate the form template with the document library
After a farm administrator uploads your form template to the server and activates it to a site collection, you must associate the form template with the library you created in step 3. When users create a new file in this library, a form based on the form template you created will open in their mobile device browser.
-
Using a browser, open the document library you created in step 3.
Tip: The path should be something like http://<SeverName>/sites/team/<LibraryName>/Forms/AllItems.aspx, where <ServerName> is the name of your SharePoint site, and <LibraryName> is the name of the library where the forms will be stored.
-
In the library, on the Settings menu

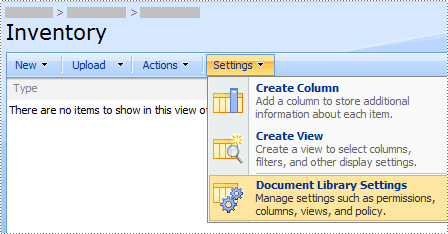
-
Under General Settings, click Advanced settings.
-
In the Content Types section, under Allow management of content types, click Yes.
-
Click OK to return to the Customize Library Name page.
-
Under Content Types, click Add from existing site content types.
-
Next to Select Content Types, click the name of the form template in the Available Site Content Types list.
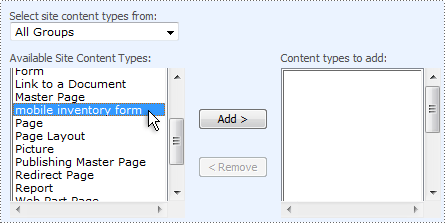
-
Cick Add.
-
Click OK to return to the Customize Library Name page.
-
In the Content Types section, click Document.
-
Under Settings, click Delete this content type, and then click OK.
-
Return to the document library, and click the New button to make sure that the appropriate form opens.
Note: By default, the form will open in InfoPath. If you want to force the form to open in a browser, go back to the advanced settings page for the document library. Next to Browser-enabled Documents, click Display as a Web page, and then click OK.
Step 7: Test the form template
Once your form template has been published to a server that is running InfoPath Forms Services, it is a good idea to make sure that it is working correctly. You should test your form by using the targeted mobile device under the same working and lighting conditions as your users.
If you do not have the actual physical device, you can use a device emulator to mimic the behavior of most mobile devices. Emulators are available on the Internet for a variety of devices and operating systems.
To learn more about testing mobile forms in device emulators, see Create, test, and debug mobile form templates.


