
Note: This article has done its job, and will be retiring soon. To prevent "Page not found" woes, we're removing links we know about. If you've created links to this page, please remove them, and together we'll keep the web connected.
The top link bar helps users of your site to get to other sites in the site collection by displaying a row of tabs at the top of every page in the site. The options available to you for configuring your top link bar will vary depending on whether the publishing features in Microsoft Office SharePoint Server 2007 are enabled for your site collection.

Note: To manage navigation for a SharePoint site, you must have the Full Control or Design permission level for the site. You have one of these permission levels if you can access the Sites Settings page for the site and you see the Navigation command under Look and Feel (on non-publishing sites, you will see the Quick Launch and Top link bar commands under Look and Feel instead of Navigation).
In this article
Learn how navigation options differ between a publishing site and a non-publishing site
Before you start to customize the navigation for your site, you need to determine whether or not the publishing features available with Office SharePoint Server 2007 are enabled for the sites in your site collection. It is important to know whether or not your site is a publishing site because the navigation customization options for a publishing site are more extensive than those available for a non-publishing site.
Determine what navigation customization options you have
Depending on which type of site you have, you will see different navigation options on the Site Settings page. Here's how you can quickly determine which type of site you are working with:
-
On the Site Actions menu, point to Site Settings. If necessary, click Modify All Site Settings.
-
Look at the list of links on the Site Settings page under Look and Feel.
-
If you see a link titled Navigation, then you are working with a publishing site and you can customize your site using the Site Navigation Settings page.
-
If you see links titled Top link bar and Quick Launch, then you are working with a non-publishing site and you have a more limited set of navigation configuration options available to you.
-
Configure inheritance for the top link bar
The options for configuring inheritance for the top link bar differ between publishing sites and non-publishing sites.
Configure inheritance for the top link bar on a non-publishing site
When you create a new site in a site collection for which the publishing features are not enabled, you can choose whether to include the site on the top link bar of the parent site and whether to use the top link bar from the parent site. This provides you with three different configuration options for your site:
-
Inherited and included in parent The site is included as a tab on the top link bar of the parent site and uses the same top link bar as the parent site. The top link bar cannot be customized at this level without first breaking the inheritance from the parent site.
-
Inherited not included in parent The site uses the same top link bar as the parent site but is not included as a tab on the top link bar of the parent site. The top link bar cannot be customized at this level without first breaking the inheritance from the parent site.
-
Unique The site is not included as a tab on the top link bar of the parent site and does not use the same top link bar as the parent site. The top link bar is customizable at this level and is completely separate from the parent site.
Note: If a site is renamed from the Title, Description, and Icon page, the site name is not updated on the top link bar. To change the name that appears on the top link bar, you must edit the top link bar.
By default, when you create a new site, the site appears on the top link bar of the parent site, and the new site inherits the top link bar of the parent site. To stop using the top link bar from the parent site, you can change the setting at any time and use a customized top link bar for your subsite.
-
On the home page for the site, click the Site Actions menu

On a site for which the Site Actions menu is customized, point to Site Settings, and then click the settings that you want to view.
-
In the Look and Feel column, click Top link bar.
-
Do one of the following:
-
To create custom links for the site, click Stop Inheriting Links.
-
To use the same links as the parent site, click Use Links from Parent.
-
Configure inheritance for the top link bar on a publishing site
When you create a new publishing site, you can choose whether or not to use the top link bar from the parent site. To configure additional inheritance options for the top link bar, you can use the Site Navigation Settings page.
-
Do one of the following:
-
On the Site Actions menu, click Site Settings.
-
On the Site Actions menu, point to Site Settings, and then click Modify All Site Settings.
-
-
In the Look and Feel column, click Navigation.
Note: The Navigation command appears under Look and Feel only if the publishing features are enabled for your site and you have the Full Control or Design permission level.
-
In the Global Navigation section, do one of the following:
-
To display the same top link bar as the parent site, click Display the same navigation items as the parent site.
-
To display a top link bar that is unique to the current site, click Display the navigation items below the current site
.
-
Add, edit, or remove a link from the top link bar
The steps you take to add, edit, or remove links from the top link bar differ depending on whether the publishing features are enabled for your site collection.
Add, edit, or remove links from the top link bar of a non-publishing site
If your site is using a unique top link bar (that is, it is a top-level site or it does not inherit its top link bar from a parent site), you can customize the links that appear on the top link bar for the site. You can also include links to other sites outside of your site collection.
-
On the home page for the site, click the Site Actions menu
On a site for which the Site Actions menu is customized, point to Site Settings, and then click the settings that you want to view.
-
In the Look and Feel column, click Top link bar.
-
Do one of the following:
-
To add a new link, click New Link. Type the URL and a description for the link.
-
To edit a link, click the Edit button beside the link that you want to edit

-
To remove a link, click the Edit button beside the link
Note: When you delete a link from the top link bar, any links contained under that link are also deleted.
-
-
Click OK.
Add, edit, or remove links from the top link bar of a publishing site
You can also use the Navigating Editing and Sorting section of the Site Navigation Settings page to add a new heading or link or to edit an existing heading or link in the top link bar.
-
Do one of the following:
-
On the Site Actions menu, click Site Settings.
-
On the Site Actions menu, point to Site Settings, and then click Modify All Site Settings.
-
-
In the Look and Feel column, click Navigation.
Note: The Navigation command appears under Look and Feel only if the publishing features are enabled for your site and you have the Full Control or Design permission level.
-
In the Navigation Editing and Sorting section, click Global Navigation to select the top link bar.
Note: If you do not see lists of links organized under the headings Global Navigation or Current Navigation, your site might inherit its Global Navigation from its parent site. In this case, you will be limited to adding or editing links in the Quick Launch unless you want to stop inheriting Global Navigation from the parent site.
-
Do one of the following:
-
If you want to edit a heading or link, select a heading or link, and then click Edit.
-
If you want to add a new heading, click Add Heading.
-
If you want to add new link, click Add Link.
Note: If you select a heading, the link will be added under that heading. If you select an item, the link will be added to the same level as the selected item.
-
If you want to remove a heading or a link, in the Navigation Editing and Sorting section, select the link or heading to remove, and then click Delete.
-
-
In the Web dialog box that appears when you add or edit an item, configure the following:
-
Title. Type the title of the navigation item as you want it to appear.
-
URL. Type the URL for the heading or link. A URL is required for links, but is optional for headings.
If you want to open the URL that you specify to confirm that it is the correct URL, select the Open link in new window check box. When you click OK, the URL will open in a new window.
-
Description. Type a description for the heading or link.
-
Audience. If you want to restrict visibility, enter an audience for the heading or link. Only the audiences you enter can see the link or heading (and everything under the heading). If you do not enter any audiences, all audiences can see the link.
-
-
Click OK.
Change the order of links on the top link bar
The steps you take to reorder links on the top link bar differ depending on whether the publishing features are enabled for your site collection.
Change the order of links on the top link bar of a non-publishing site
You can change the order in which the tabs are displayed on the top link bar. Any changes that you make to the order of items on the top link bar are reflected in any sites that inherit top link bar navigation from your site.
-
On the home page for the site, click the Site Actions menu
On a site for which the Site Actions menu is customized, point to Site Settings, and then click the settings that you want to view.
-
In the Look and Feel column, click Top link bar.
-
Click Change Order.
-
In the Link Order column, click options in the lists to change the order in which the links appear on the top link bar.
-
Click OK.
Change the order of links on the top link bar of a publishing site
-
Do one of the following:
-
On the Site Actions menu, click Site Settings.
-
On the Site Actions menu, point to Site Settings, and then click Modify All Site Settings.
-
-
In the Look and Feel column, click Navigation.
Note: The Navigation command appears under Look and Feel only if the publishing features are enabled for your site and you have the Full Control or Design permission level.
-
In the Navigation Editing and Sorting section, click the item you want to move, and then click Move Up or Move Down to move the item where you want it.
Note: If the Navigation Editing and Sorting section displays lists for both Global Navigation and Current Navigation, you need to select the items under Global Navigation to change the order of items on the top link bar.
-
Repeat step 3 to change the order of any additional items.
-
When you are finished reordering items, click OK.
Show or hide subsites and pages on the top link bar
If you are working on a site for which the publishing features are enabled, you have the option of showing or hiding pages and subsites on the top link bar.
-
Do one of the following:
-
On the Site Actions menu, click Site Settings.
-
On the Site Actions menu, point to Site Settings, and then click Modify All Site Settings.
-
-
In the Look and Feel column, click Navigation.
Note: The Navigation command appears under Look and Feel only if the publishing features are enabled for your site and you have the Full Control or Design permission level.
-
In the Navigation Editing and Sorting section, do one of the following:
-
If you want to show a page or subsite that is hidden, select the item, and then click Show.
-
If you want to hide a page or subsite that is currently visible, select the item, and then click Hide.
-
Display subsites on drop-down menus in the top link bar
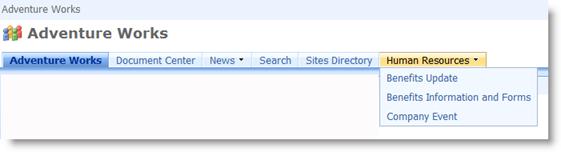
If you are working on a publishing site, you can specify whether you want subsites and pages of your site to be displayed automatically in the top link bar. In the top link bar, subsites and pages of the current site display as new tabs (this assumes the site is not inheriting its navigation from a parent site). If you choose to show subsites and/or pages for all of the sites in your site collection, subsites and pages underneath subsites of the top-level site display as links in drop-down menus from the relevant tabs in the top link bar.
If you decide to display navigation items for subsites or pages, your site may appear cluttered if your site has many subsites or pages. If the structure of your overall site collection is not going to be centrally planned or managed, you might want to configure your site so that subsites and pages do not automatically display.
-
Do one of the following:
-
On the Site Actions menu, click Site Settings.
-
On the Site Actions menu, point to Site Settings, and then click Modify All Site Settings.
-
-
In the Look and Feel column, click Navigation.
Note: The Navigation command appears under Look and Feel only if the publishing features are enabled for your site and you have the Full Control or Design permission level.
-
In the Subsites and Pages section, do one of the following:
-
To show links to subsites in the top link bar and Quick Launch, select the Show subsites check box.
-
To show links to pages in the top link bar and Quick Launch, select the Show pages check box.
-
To hide links to subsites in the top link bar and Quick Launch, clear the Show subsites check box.
-
To hide links to pages in the top link bar and Quick Launch, clear the Show pages check box.
Notes:
-
If you configure your site to show subsites and pages, but your site is set up to display the global navigation (top link bar) and current navigation (Quick Launch) for its parent site, you will not see links to these subsites and pages in the navigation for your current site unless the navigation for the parent site is also configured to display subsites and pages.
-
If you are configuring navigation for a top-level site, and you want pages or subsites underneath the subsites of the top-level site to appear on drop-down menus from the top link bar, you need to configure the top level site to show subsites and pages, and you also need to configure the individual subsites to show their subsites and pages.
-
If you do not want all of the subsites or pages to display, you can hide pages and subsites individually after you have configured them to display. For more information, see Show or hide items on the top link bar.
-
-


