
Note: This article has done its job, and will be retiring soon. To prevent "Page not found" woes, we're removing links we know about. If you've created links to this page, please remove them, and together we'll keep the web connected.
Word automates most of the work involved in creating an index and enables you to easily make updates or apply formatting changes. To create an index, you must first mark the entries you want to include, and then build the index.
Mark the entries
-
Select the text you want to use as an index entry.
-
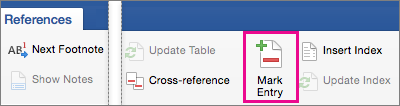
Click References > Mark Entry.
-
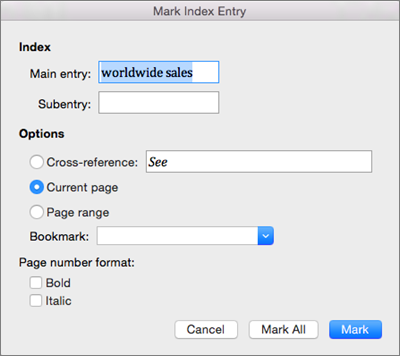
In the Mark Index Entry dialog box, you can edit the entry or add a second level in Subentry. If you need a third level, follow the subentry text with a colon.
-
To create a cross-reference to another entry, click Cross-reference under Options, and then type the text for the other entry in the box.
-
To format the page numbers that will appear in the index, under Page number format, select Bold or Italic .
-
Click Mark to mark the index entry. To mark this text everywhere it shows up in the document, click Mark All.
-
Click Close.
-
Repeat steps 1 - 7 until you've marked all of the entries you want in the index.
Create the index
After you mark the entries, you can insert the index into your document.
-
Click where you want to add the index.
-
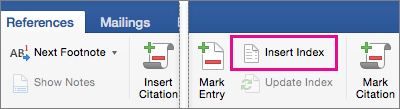
Click References > Insert Index.
-
In the Index dialog box, you can choose the format for text entries, page numbers, tabs, and other characters.
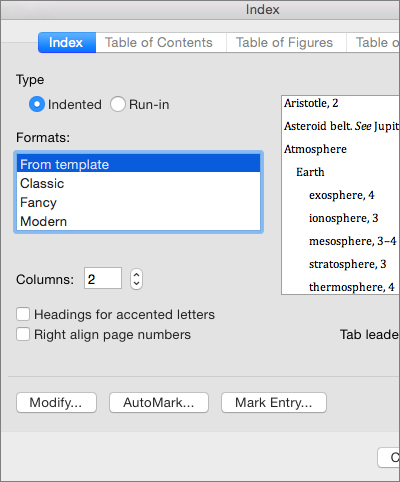
You can also change the overall look of the index by choosing one of the options under Formats. When you choose an option, you'll see a preview in the box to right.
-
Click OK.
Note: If you mark more entries after you create the index. you'll need to update the index to the new entries. Click References > Update Index.
Step 1: Mark the entries
You can create an index entry for a specific word, phrase, or symbol, or for a topic that spans a range of pages.
Mark index entries for words or phrases
-
Select the text that you want to use as an index entry.
-
On the Insert menu, click Index and Tables.
-
On the Index tab, click Mark Entry.
Tip: To go directly to the Mark Index Entry dialog box, press
-
Type or edit the text in the Main entry box.
Tips:
-
To create a subentry, specify the main index entry, and then type the subentry in the Subentry box.
-
To create a third-level entry, type the subentry text followed by a colon (:) and the text of the third-level entry.
-
-
Do one of the following:
To mark
Click
The index entry
Mark
The first occurrence of this text in each paragraph in the document that exactly matches the uppercase and lowercase letters in the entry
Mark All
Tip: To mark index entries for symbols such as @, in the Main entry box, immediately following the symbol, type ;# (semicolon followed by the number sign), and then click Mark. When you build the index, Word puts the symbols at the beginning of the index.
-
To mark additional index entries, select the text or click immediately after it, click in the Mark Index Entry dialog box, and then repeat steps 4 and 5.
Note: Word inserts each marked index entry as an XE (Index Entry) field in hidden text format. If you do not see the XE field, click Show/Hide


Mark index entries for text that spans a range of pages
-
Select the range of text that you want the index entry to refer to.
-
On the Insert menu, click Bookmark.
-
In the Bookmark name box, type a name, and then click Add.
Note: Do not include spaces in the bookmark name.
-
In the document, click at the beginning of the range of text that you selected.
-
On the Insert menu, click Index and Tables.
-
On the Index tab, click Mark Entry.
-
In the Main entry box, type the index entry for the marked text.
-
Under Options, click Page range.
-
In the Bookmark box, type or select the bookmark name that you typed in step 3.
-
Click Mark
-
Click Close.
Note: Word inserts each marked index entry as an XE (Index Entry) field in hidden text format. If you do not see the XE field, click Show/Hide
Step 2: Edit or delete index entries (optional)
If you change the index entries in the finished index, Word deletes your changes the next time that you rebuild the index. To permanently keep your formatting changes, format the index entry fields in the document.
Edit an index entry
-
Edit the text inside the quotation marks.
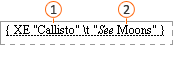
If you do not see the XE (Index Entry) fields, click Show/Hide


Delete an index entry
-
Select the whole index entry field, including the braces {}, and then press DELETE .
If you do not see the XE (Index Entry) fields, click Show/Hide
Step 3: Design and build the index
After you create the index entries, you can build the index in your document. An index typically appears at or near the end of a document. However, you can insert the index anywhere in the document.
Caution: To make sure that the document is paginated correctly, hide field codes and hidden text before you build your index. If the XE (Index Entry) fields are visible, on the Standard toolbar, click Show/Hide
Build an index by using one of the supplied index designs
-
Click in your document where you want to insert the finished index.
-
On the Insert menu, click Index and Tables, and then click the Index tab.
-
In the Formats box, click a design.
-
Select any other index options that you want.
Build an index by using a custom index design
-
Click in your document where you want to insert the finished index.
-
On the Insert menu, click Index and Tables, and then click the Index tab.
-
In the Formats box, click From template, and then click Modify.
-
Click a style in the Styles box, click Modify, and then apply any formatting that you want.
-
Select any other index options that you want.


