
Note: This article has done its job, and will be retiring soon. To prevent "Page not found" woes, we're removing links we know about. If you've created links to this page, please remove them, and together we'll keep the web connected.
A multilevel list (or outline list), like single-level ones, can be bulleted or numbered — but with the added bonus that you can mix numbers, letters, and bullets. You can create new styles for a multilevel list by customizing the style, color, and alignment of the bullets, letters, or numbers. Once you customize them, you can save those settings as a style and use it again and again.
Create a multilevel list
-
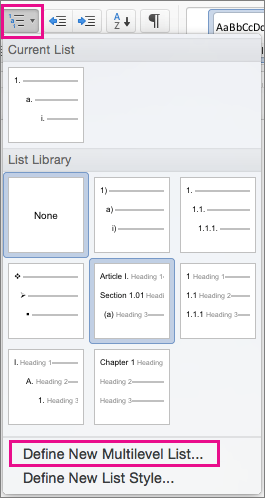
On the Home tab, in the Paragraph group, click Multilevel List
-
Click a list format.
-
Type the list, pressing RETURN after each item.
-
To move an outline numbered item to the appropriate numbering level, do one of the following:
To
Click anywhere in the item, and then do this
Demote the item to a lower numbering level
On the Home tab, under Paragraph, click Increase Indent

Tip: To increase the indent by using the keyboard, position the insertion point at the beginning of the list item, and then press TAB .
Promote the item to a higher numbering level
On the Home tab, under Paragraph, click Decrease Indent

Tip: To decrease the indent by using the keyboard, position the insertion point at the beginning of the list item, and then press SHIFT + TAB .

Create a new multilevel list style
-
Select the multilevel list you want to change the appearance of.
-
On the Home tab, click the arrow next to Multilevel List, and then click Define New Multilevel List.
-
Click the arrow in the lower left corner to expand the dialog box so you can see all the options.

-
Under Level, click the list level you want to modify. 1 is selected by default.
-
To append the bullets with a dash, parentheses, or another value, enter it in the Enter formatting for number field. For example, type (1) if you want to style the numbers with parentheses, or (A) to style the letters with parentheses.
-
To change the font size, style, and color, click Font and select the settings you want on the Font and Advanced tabs:
-
On the Font tab, change the bullet font, style, size, color, underline style, underline color, and effects.
-
On the Advanced tab, change the character spacing and advanced typography features.
-
-
To change the style, click the arrow next to Number style for this level and select numbers, letters, or another chronological format. In Start at, choose the number, letter, or bullet where you want to start the list. The default value for numbers is 1.
Note: To restart numbering after a specific level, select the Restart List After box (near the bottom of the dialog box) and choose a level in the list.
-
To enforce a legal style on the multilevel list, check the Legal Style Numbering box.
-
To display higher level numbers with each level, in Include level number from, specify which level numbers to include.
-
To change the number alignment, under Number Position, click Left, Centered, or Right. In Aligned at, specify a value for where to start the alignment (for example, 0.5").
-
Under Text Position, in the Indent at box, select where you want to indent the text. If you want to add a tab stop, enter the tab location in Add tab stop at.
-
When you've finished customizing formatting options for the levels in your multilist, give the list a name in ListNum field list name. This name will appear wherever you see the ListNum field.
-
In Follow number with, enter a value for what should follow each bullet by clicking Tab character, Space, or Nothing. If you selected Tab character, check Add tab stop at and enter a value.
-
To use an existing style in Word for each level in the list, choose a style under Link level to style.
-
In Apply changes to, choose where you would like to apply your changes by clicking Whole list, This point forward, or Selected text.
-
Click OK to save the style.
Create a multilevel list
-
On the Home tab, under Paragraph, click Multilevel List
-
Type the list, pressing RETURN after each item.
-
To move an outline numbered item to the appropriate numbering level, do one of the following:
To
Click anywhere in the item, and then do this
Demote the item to a lower numbering level
On the Home tab, under Paragraph, click Increase Indent
Tip: To increase the indent by using the keyboard, position the insertion point at the beginning of the list item, and then press TAB .
Promote the item to a higher numbering level
On the Home tab, under Paragraph, click Decrease Indent
Tip: To decrease the indent by using the keyboard, position the insertion point at the beginning of the list item, and then press SHIFT + TAB .
Create a new multilevel list style
-
Click the item in the list whose formatting you want to change.
Note: If you change the formatting for one item in an outline numbered list, that change affects all list items at that level.
-
On the Home tab, under Paragraph, click Multilevel List
-
Click the arrow in the lower left corner to expand the dialog box so you can see all the options.
-
Under Level, click the list level you want to modify. 1 is selected by default.
-
To append the bullets with a dash, parentheses, or another value, enter it in the Number format field. For example, type (1) if you want to style the numbers with parentheses, or (A) to style the letters with parentheses.
-
To change the font size, style, and color, click Font and select the settings you want on the Font and Advanced tabs:
-
On the Font tab, change the bullet font, style, size, color, underline style, underline color, and effects.
-
On the Advanced tab, change the character spacing and advanced typography features.
-
-
To change the style, click the arrow next to Number style and select numbers, letters, or another chronological format. In Start at, choose the number, letter, or bullet where you want to start the list. The default value for numbers is 1.
Note: To restart numbering after a specific level, select the Restart numbering after box (near the bottom of the dialog box) and choose a level in the list.
-
To enforce a legal style on the multilevel list, check the Legal style numbering box.
-
To display higher level numbers with each level, in Previous level number, specify which level numbers to include.
-
To change the number alignment, under Number position or Bullet position, click Left, Centered, or Right. In Aligned at, specify a value for where to start the alignment (for example, 0.5").
-
Under Text position, in the Indent at box, select where you want to indent the text. If you want to add a tab stop, enter the tab location in Add tab stop at.
-
When you've finished customizing formatting options for the levels in your multilist, give the list a name in ListNum field list name. This name will appear wherever you see the ListNum field.
-
In Follow number with, enter a value for what should follow each bullet by clicking Tab character, Space, or Nothing. If you selected Tab character, check Add tab stop at and enter a value.
-
To use an existing style in Word for each level in the list, choose a style under Link level to style.
-
In Apply changes to, choose where you would like to apply your changes by clicking Whole list, This point forward, or Current paragraph.
-
Click OK to save the style.


