
This article explains how to create and run an append query. You use an append query when you need to add new records to an existing table by using data from other sources.
If you need to change data in an existing set of records, such as updating the value of a field, you can use an update query. If you need to make a new table from a selection of data, or to merge two tables into one new table, you can use a make-table query. For more information about update queries or make-table queries, or for general information about other ways to add records to a database or change existing data, see the See Also section.
In this article
Overview
An append query selects records from one or more data sources and copies the selected records to an existing table.
For example, suppose that you acquire a database that contains a table of potential new customers, and that you already have a table in your existing database that stores that kind of data. You'd like to store the data in one place, so you decide to copy it from the new database into your existing table. To avoid entering the new data manually, you can use an append query to copy the records.
Benefits of using an append query
By using a query to copy data, you can:
-
Append multiple records in one pass If you copy data manually, you usually have to perform multiple copy/paste operations. By using a query, you select all the data at once, and then copy it.
-
Review your selection before you copy it You can view your selection in Datasheet view and can make adjustments to your selection as needed before you copy the data. This can be particularly handy if your query includes criteria or expressions, and you need several tries to get it just right. You cannot undo an append query. If you make a mistake, you must either restore your database from a backup or correct your error, either manually or by using a delete query.
-
Use criteria to refine your selection For example, you might want to only append records of customers who live in your city.
-
Append records when some of the fields in the data sources don't exist in the destination table For example, suppose that your existing customer table has eleven fields, and the new table that you want to copy from only has nine of those eleven fields. You can use an append query to copy the data from the nine fields that match and leave the other two fields blank.
Basic steps of an append query
The process of creating an append query follows these basic steps:
-
Create a select query You start by selecting the data that you want to copy. You can adjust your select query as needed, and run it as many times as you want to make sure you are selecting the data that you want to copy.
-
Convert the select query to an append query After your selection is ready, you change the query type to Append.
-
Choose the destination fields for each column in the append query In some cases, Access automatically chooses the destination fields for you. You can adjust the destination fields, or choose them if Access did not.
-
Preview and run the query to append the records Before you append the records, you can switch to Datasheet view for a preview of the appended records.
Important: You cannot undo an append query. Consider backing up your database or the destination table.
Create and run an append query
In this section
Step 1: Create a query to select the records to copy
-
Open the database that contains the records that you want to copy.
-
On the Create tab, in the Queries group, click Query Design.

-
Double-click the tables or queries that contain the records that you want to copy, and then click Close.
The tables or queries appear as one or more windows in the query designer. Each window lists the fields in a table or query. This figure shows a typical table in the query designer.
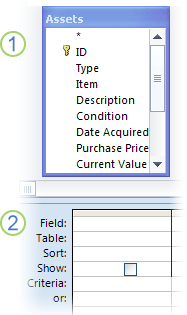
1. Assets table shown in the query designer
2. Query design grid
-
Double-click each field that you want to append. The selected fields appear in the Field row in the query design grid.
The data types of the fields in the source table must be compatible with the data types of the fields in the destination table. Text fields are compatible with most other types of fields. Number fields are only compatible with other number fields. For example, you can append numbers to a text field, but you cannot append text into a number field.
You can also use an expression as a field — such as =Date() to automatically return today's date — and you can use expressions with table or query fields in the design grid to customize the data that you select. For example, if your destination table has a field that stores a four-digit year and the source table has a regular date/time field, you might use the DatePart function with the source field to select only the year.
To quickly add all the fields in a table, double-click the asterisk (*) at the top of the list of table fields. This figure shows the design grid with all fields added.

-
Optionally, you can enter one or more criteria in the Criteria row of the design grid. The following table shows some example criteria and explains the effect they have on a query.
Criteria
Effect
> 234
Returns all numbers greater than 234. To find all numbers less than 234, use < 234.
>= "Callahan"
Returns all records from Callahan through the end of the alphabet.
Between #2/2/2017# And #12/1/2017#
Returns dates from 2-Feb-17 through 1-Dec-17 (ANSI-89). If your database uses the ANSI-92 wildcard characters, use single quotation marks (') instead of pound signs. Example: Between '2/2/2017' And '12/1/2017'.
Not "Germany"
Finds all records where the exact contents of the field are not exactly equal to "Germany." The criterion will return records that contain characters in addition to "Germany," such as "Germany (euro)" or "Europe (Germany)".
Not "T*"
Finds all records except those beginning with T. If your database uses the ANSI-92 wildcard character set, use the percent sign (%) instead of the asterisk (*).
Not "*t"
Finds all records that do not end with t. If your database uses the ANSI-92 wildcard character set, use the percent sign instead of the asterisk.
In(Canada,UK)
In a list, finds all records containing Canada or UK.
Like "[A-D]*"
In a Text field, finds all records that start with the letters A through D. If your database uses the ANSI-92 wildcard character set, use the percent sign instead of the asterisk.
Like "*ar*"
Finds all records that include the letter sequence "ar". If your database uses the ANSI-92 wildcard character set, use the percent sign instead of the asterisk.
Like "Maison Dewe?"
Finds all records that begin with "Maison" and that also contain a 5-letter second string in which the first 4 letters are "Dewe" and the last letter is unknown (indicated by a question mark). If your database uses the ANSI-92 wildcard character set, use the underscore (_) instead of the question mark.
#2/2/2017#
Finds all records for February 2, 2017. If your database uses the ANSI-92 wildcard character set, surround the date with single quotation marks instead of pound signs (#). Example: '2/2/2017'.
< Date() - 30
Returns all dates more than 30 days old.
Date()
Returns all records containing today's date.
Between Date() And DateAdd("M", 3, Date())
Returns all records between today's date and three months from today's date.
Is Null
Returns all records that contain a null (blank or undefined) value.
Is Not Null
Returns all records that contain a value.
""
Returns all records that contain a zero-length string. You use zero-length strings when you need to add a value to a required field, but you don't yet know what that value is. For example, a field may require a fax number, but some of your customers may not have fax machines. In that case, you enter a pair of double quotation marks with no space between them ("") instead of a number.
-
On the Query Design tab, in the Results group, click Run

-
Verify that the query returned the records that you want to copy. If you need to add or remove fields from the query, switch back to Design view and add fields as described in the preceding step, or select the fields that you don't want and press DELETE to remove them from the query.
Step 2: Convert the select query to an append query
-
On the Home tab, in the View group, click View, and then click Design View.
-
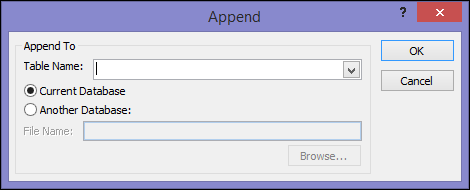
On the Query Design tab, in the Query Type group, click Append.
The Append dialog box appears.
-
Next, you specify whether to append records to a table in the current database, or to a table in a different database.
Do one of the following:
-
In the Append dialog box, click Current Database, select the destination table from the Table Name combo box, and then click OK.
-or-
-
In the Append dialog box, click Another Database.
-
In the File Name box, enter the location and name of the destination database.
-
In the Table Name combo box, enter the name of the destination table, and then click OK.
-
Step 3: Choose the destination fields
The way that you choose destination fields depends on how you created your select query in Step 1.
|
If you... |
Access... |
|---|---|
|
Added all the fields from your source table or query |
Adds all the fields in the destination table to the Append to row in the design grid |
|
Added individual fields to the query or used expressions, and the field names in the source and destination tables match |
Automatically adds the matching destination fields to the Append to row in the query |
|
Added individual fields or used expressions, and any of the names in the source and destination tables don't match |
Adds the matching fields, and leaves unmatched fields blank |
If Access leaves fields blank, you can click a cell in the Append to row and select a destination field.
This figure illustrates how you click a cell in the Append to row and select a destination field.
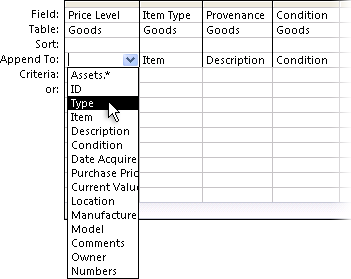
Note: If you leave the destination field blank, the query will not append data to that field.
Step 4: Preview and run the append query
-
To preview your changes, switch to Datasheet view.
Tip: To quickly switch views, right-click the tab at the top of the query, and then click the view that you want.
-
Return to Design view, and then click Run
Note: While running a query that returns a large amount of data you might get an error message indicating that you will not be able to undo the query. Try increasing the limit on the memory segment to 3MB to allow the query to go through.
Stop Disabled Mode from blocking a query
If you try to run an append query and it seems like nothing happens, check the Access status bar for the following message:
This action or event has been blocked by Disabled Mode.
To fix this, click Enable Content in the Message Bar to enable the query.
Note: When you enable the append query, you also enable all other database content.
If you don't see the Message Bar, it may be hidden. You can show it, unless it has also been disabled. If the Message Bar has been disabled, you can enable it.
See Also
Create and run an update query


