
Note: This article has done its job, and will be retiring soon. To prevent "Page not found" woes, we're removing links we know about. If you've created links to this page, please remove them, and together we'll keep the web connected.
A hanging layout affects the layout of all boxes below the selected box. Although you can use other hierarchy layouts to create an organization chart, hanging layouts are available only with organization chart layouts.
If you have an organization chart in your presentation, you can change the layout. If you don't have an org chart, here's how you can create one.
-
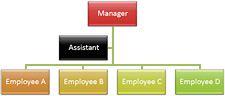
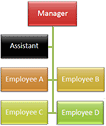
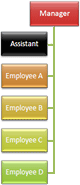
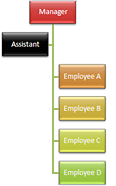
Click the box in the organization chart that you want to apply a hanging layout to. In the examples below we've selected the "Manager" box and the layout will apply to the boxes beneath that box.
-
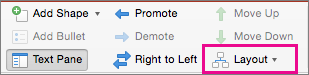
On the SmartArt Design tab, click Layout, and then do one of the following:
Notes:
-
If you do not see the SmartArt Design tab, make sure that you have selected a SmartArt graphic.
-
If the Layout button is not enabled it's likely that you have not clicked on a box in your chart. Make sure you've done step 1, above.
-
To center all of the boxes below the selected box, click Standard.
Note: The "Assistant" shape is a special case and is not affected by the hanging layout. Only the other boxes below the selected box ("Manager" in these examples) will be rearranged when you change the hanging layout.
-
To center the selected box above the boxes below it and arrange the boxes below it horizontally with two boxes in each row, click Both.
-
To arrange the selected box to the right of the boxes below it and left-align the boxes below it vertically, click Left Hanging.
-
To arrange the selected box to the left of the boxes below it and right-align the boxes below it vertically, click Right Hanging.
-


