

Try it!
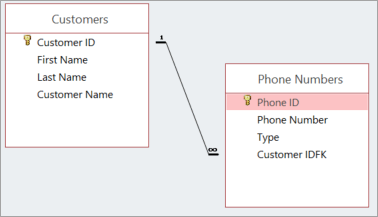
The Lookup Wizard establishes a relationship between tables. It creates a foreign key that refers back to the primary key of another.
Create a relationship with the Lookup Wizard
-
In Datasheet View, open the table that will look up data from another table. This is your child table.
-
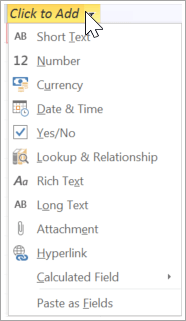
In the rightmost column, select Click to Add and then select Lookup & Relationship.
-
In the Lookup Wizard, select I want the lookup field to get the values from another table or query. Then, select Next.
-
Select the table that will provide the values for your lookup field. This is your parent table. Then, select Next.
-
To select the fields that you want to pull data from, set the sort order for the fields, and set the column width, follow the instructions on the page.
Tip: When you set the column width, to reduce visual clutter in the table, select Hide Key Column. It won’t affect the relationship or data syncing between the tables.
-
Select a field that uniquely identifies rows in the parent table.
-
Enter the name for your new lookup field, select Enable data integrity, and then select either Cascade Delete or Restrict Delete.
Tip: Name the field in a way that is reflective of the data, and note that it’s a foreign key field, for example, Customer IDFK.
-
Select Finish, and then select Save

You’ve created a relationship and a foreign key and specified data-syncing parameters between the two tables.
Change a relationship between tables
If you want to change the table relationship, first close the tables.
-
Select Database Tools > Relationships.
-
Select the relationship line between the two tables.
-
Select Design > Edit Relationships.
-
In the Edit Relationships dialog box, make your changes and then select OK.
-
To save your changes, select Save
Want more?


Need more help?
Want more options?
Explore subscription benefits, browse training courses, learn how to secure your device, and more.


Communities help you ask and answer questions, give feedback, and hear from experts with rich knowledge.


