
Mail merge is a great way to put your Access data to work. This video shows you how to create a typical form letter in Microsoft Word by starting with the Word Merge command in Access. Or if you prefer, check out the basic steps below the video.
Note: This video was recorded using Access 2013 but the same basic steps apply to Access 2010, Access 2016 and the subscription version of Access.

In the video
Here’s the general procedure for creating a Word mail merge from within Access:
-
Open the Access database that contains the addresses you want to merge with Word.
-
If the Navigation Pane is not open, press F11 to open it.
-
Select the table or query that contains the addresses. If the address fields are spread across multiple tables, create a simple select query that contains the fields you need, and select that query for the merge operation.
-
On the External Data tab, in the Export group, click Word Merge.
-
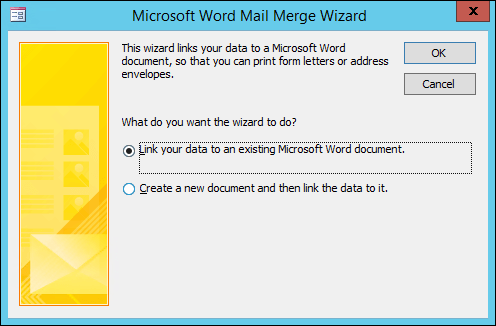
The Microsoft Word Mail Merge Wizard dialog box opens.
-
Choose whether you want the wizard to link your address data into an existing Word document, or to start with a new, blank document.
-
Click OK.
Word starts and displays the Mailings tab and the Mail Merge pane.
-
Work through the wizard steps by clicking the Next and Previous links at the bottom of the Mail Merge pane.
-
In Step 3 of the wizard, you will not need to select the recipient list. That was determined when you selected it in Access. However, you might want to fine-tune the list by clicking Edit recipient list. In the box that opens, you can remove individual recipients from the merge, apply filters, sort the list, and so on.
-
In Step 4 of the wizard, write the letter (unless you’re working with an existing document).
-
Place the cursor in the document where you want the address data to appear, and click Address block, Greeting line, or More items in the Mail Merge pane to insert the Access data into the document. In the boxes that appear, select the format you want, and click Match Fields to make sure the fields are matched up correctly.
-
In Step 5 of the wizard, click the Next (>>) and Previous (<<) buttons to preview how the merged data will look when you print the document.
-
In Step 6 of the wizard, click Print and select the print options you want.
-
Save and close the Word document.
Notes:
-
If you need to come back and adjust any of your merge settings after completing the wizard, all the operations are available on the Mailings tab in Word.
-
If you make design changes in the Access database, you may need to adjust some of the merge settings in Word to make the merge work correctly again.
-
The mail merge wizard is designed around working with mailing address data. However, you can use the mail merge feature to merge any kind of data with Word, such as inventory records, tasks, or whatever you store in Access.
-
For more detailed information about Word’s mail merge features, see these articles:


