
Note: This article has done its job, and will be retiring soon. To prevent "Page not found" woes, we're removing links we know about. If you've created links to this page, please remove them, and together we'll keep the web connected.
To type in a bi-directional or right-to-left (RTL) language (such as Arabic or Hebrew) in Office for Mac, you'll first need to do two things:
-
Add the language you want to your operating system.
-
Add an input source for that language.
After you've followed these steps to enable typing in a bi-directional language, you can also configure specific bi-directional features in Word.
Important: To ensure that you have access to all the bi-directional language features in Office for Mac, check that you have the latest updates installed before proceeding. Follow the instructions at Check for Office for Mac updates automatically, and click Check for Updates in step 3.
The Office for Mac user interface changes based on your operating system language preferences. Here's how to change the language of your operating system:
-
Click the Apple menu, and then click System Preferences.
-
Click Language & Region.
-
Click the + sign under Preferred Languages, select the bi-directional language you want from the list, and then click Add.
-
If you want to change the default language of your operating system to the new language, select Use [Language Name].
-
You can also make a language you've added the primary language by dragging it to the top of the list of preferred languages.
-
-
If the language you added can't be typed using your operating system's current keyboard preferences, a list of available input menus that will support the language you added will appear. You can choose to add a new input menu to support the new language you added now, or you can add it later in Keyboard Preferences.
If you didn't add an input source for a bi-directional language when you added the language to your operating system, you can still go back and add an input source that will support typing and editing text in that language.
-
Click the Apple menu, and then click System Preferences.
-
Click Language & Region, and then click Keyboard Preferences.
-
On the Input Sources tab, click the + sign, select the language and input source you want, and then click Add.
The Show Input menu in menu bar check box is automatically selected when you add a new input menu, which will allow you to easily switch between input sources.
Note: The bi-directional language features in Office for Mac work only with the keyboards included with the Mac operating system, not with keyboards downloaded from third parties on the Internet.
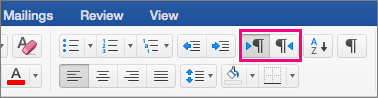
After you've added the language and input source to your operating system, restart Office. You’ll see the Left-to-right text direction and Right-to-left text direction button on the home tab of the ribbon, which can be used to easily switch between right-to-left and left-to-right as you’re typing or editing in different languages.
After you're set up to type in a bi-directional language, you can configure several more features in Word:
Set the document view to Right-to-Left
When you set a Word document's view to Right-to-left, both the page order in Print Layout view and the text direction in Outline view will be in a right-to-left direction.
-
On the Word menu, click Preferences.
-
In the Word Preferences dialog box, click View.

-
Under Show in Document, choose Right-to-left in the Document view list.

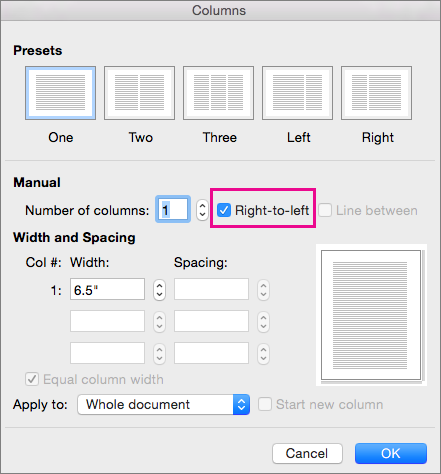
Set text in columns to flow from right to left
-
On the Layout tab, click Columns > More Columns.

-
Under Manual, select the Right-to-left check box.
Change cursor movement from logical to visual
When you change the mouse cursor movement to visual, it moves directly through the text ignoring the reading direction, rather than trying to move to the next character that the user would read.
-
On the Word menu, click Preferences.
-
In the Word Preferences dialog box, click Edit.

-
In Editing Options, under Cursor movement, choose Visual.


