
In Microsoft Word, you can adjust a table's size and column and row dimensions, either manually or automatically. You can also change the size of multiple columns or rows and modify the space between cells. To learn how to add a table to your document, see Insert a table.
In this article
Change column width
To change the column width, do one of the following:
-
To use your mouse, rest the cursor on right side of the column boundary you want to move until it becomes a resize cursor

-
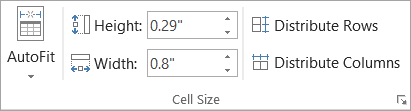
To change the width to a specific measurement, select a cell in the column that you want to resize. On the Layout tab, in the Cell Size group, click in the Table Column Width box, and then specify the options you want.
-
To make the columns in a table automatically fit the contents, select your table. On the Layout tab, in the Cell Size group, select AutoFit, and then select AutoFit Contents.
-
To use the ruler, select a cell in the table, and then drag the markers on the ruler. If you want to see the exact measurement of the column on the ruler, hold down ALT as you drag the marker.
Change row height
To change the row height, do one of the following:
-
To use your mouse, rest the pointer on the row boundary you want to move until it becomes a resize pointer

-
To set the row height to a specific measurement, select a cell in the row that you want to resize. On the Layout tab, in the Cell Size group, click in the Table Row Height box, and then specify the height you want.
-
To use the ruler, select a cell in the table, and then drag the markers on the ruler. If you want to see the exact measurement of row on the ruler, hold down ALT as you drag the marker.
Make multiple columns or rows the same size
-
Select the columns or rows you want to make the same size. You can press CTRL while you select to choose several sections that are not next to each other.
-
On the Layout tab, in the Cell Size group, select


|
TO SELECT |
DO THIS |
|---|---|
|
The entire table |
Rest the pointer over the table until the table move handle |
|
A row or rows |
Click to the left of the row. |
|
A column or columns |
Click the column's top gridline or border. |
|
A cell |
Click the left edge of the cell. |


Resize a column or table automatically with AutoFit
Automatically adjust your table or columns to fit the size of your content by using the AutoFit button.
-
Select your table.
-
On the Layout tab, in the Cell Size group, select AutoFit.
-
Do one of the following.
-
To adjust column width automatically, select AutoFit Contents.
-
To adjust table width automatically, select AutoFit Window.
Note: Row height automatically adjusts to the size of the content until you manually change it.
-
Turn off AutoFit
If you don’t want AutoFit to automatically adjust your table or column width, you can turn it off.
-
Select your table.
-
On the Layout tab, in the Cell Size group, select AutoFit.
-
Select Fixed Column Width.
Resize an entire table manually
-
Rest the cursor on the table until the table resize handle

-
Rest the cursor on the table resize handle until it becomes a double-headed arrow

-
Drag the table boundary until the table is the size you want.
Add or change the space inside the table
To add space inside your table, you can adjust cell margins or cell spacing.
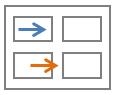
Cell margins are inside the table cell, like the blue arrow on the top of the graphic. Cell spacing is between the cells, like the orange arrow on the bottom.
-
Select the table.
-
On the Layout tab, in the Alignment group, select Cell Margins, and then in the Table Options dialog box.
-
Do one of the following:
-
Under Default cell margins, enter the measurement you want to adjust the Top, Bottom, Left, or Right margins.
-
Under Default cell spacing, select the Allow spacing between cells check box, and then enter the measurement you want.
-
Note: The settings that you choose are available only in the active table. Any new tables that you create will use the original default setting.


