
We have made major updates to improve the way Outlook for Windows connects to and updates shared calendars. These improvements are available for Outlook 365 customers with the latest Monthly Enterprise Channel, Current Channel, or Semi-Annual Enterprise Channel update.
Note: The updated Calendar sharing functionality will continue to receive incremental updates and fixes. Current Channel and Monthly Enterprise Channel are the first channels to include these updates. It takes longer for these updates to reach the Semi-Annual Enterprise Channel. Therefore, we strongly recommend that users sharing and opening shared calendars switch to either Current Channel or Monthly Enterprise Channel.
This article provides details about how to turn on and turn off these shared calendar improvements in Outlook for Windows.
Note: Shared Calendar improvements are now enabled by default in the most recent versions of Outlook, in all update channels for Microsoft 365 Apps. The Semi-Annual Enterprise Channel was the final update channel to enable the Shared calendar improvements by default (in version 2202, released on July 12, 2022).
For technical details about what is changing with calendar sharing in Exchange Online or other Outlook applications, see Calendar Sharing in Microsoft 365.
Calendars have already been shared with you
In order for you to benefit from the improvements, the setting must be enabled in Outlook for Windows and Outlook restarted. Then, calendars shared with you should automatically be upgraded to the new sharing platform in Microsoft 365.
Note: Granting full mailbox access does not count as sharing the calendar with a delegate. See next section.
Calendars have not yet been shared with you
In order for you to benefit from the improvements, the following three steps are required:
-
Ensure the updated Calendar sharing improvements are enabled, as described later in this article. Restart Outlook after enabling Turn on shared calendar improvements.
-
Someone else shares their primary or secondary calendar with you by following the steps described in Share an Outlook calendar with other people.
-
You accept the calendar sharing invitation that you receive in your Inbox folder, which automatically adds the shared calendar to your Outlook calendar list.
See details below on how to check if calendars shared with you have been upgraded.
Turn on shared calendar updates
You can enable the improvements for a single user in Outlook for Windows, or you can use a Group Policy to enable them for all or some users in your organization.
Enabling the shared calendar improvements does not impact your experience with your own calendars.
Enable for a single user
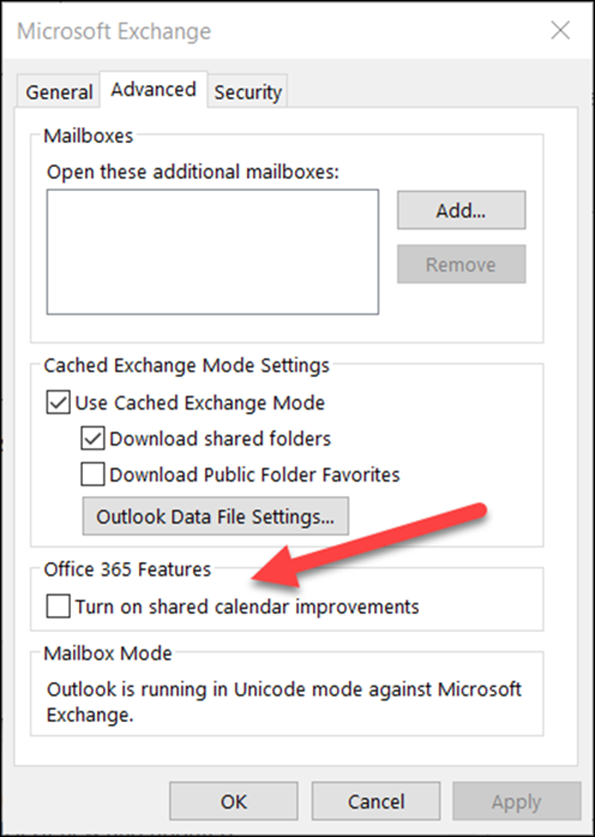
We have introduced a new option in the Exchange Account Settings dialog: Turn on shared calendar improvements.
Note: This option will only be available to people using Exchange Online. There are no changes to shared calendars when one person's calendar is hosted in Exchange on-premises.
-
In Outlook, select File >Account Settings >Account Settings. You will see a list of your email accounts.
-
Select the Microsoft Exchange account that you use to manage someone else's calendar and choose Change....
-
Choose More Settings, followed by the Advanced tab.
-
Select the checkbox next to: Turn on shared calendar improvements.
-
Close and restart Outlook.
Opting into these improvements do not impact your experience with your own calendars and you can go back at any time.
Enable using Group Policy
In addition to the new option, IT admins can use Group Policy to configure how Outlook connects to shared calendars.
We have introduced a new Group Policy setting: REST updates for calendars. This setting is available in the Group Policy Administrative Template files (ADMX/ADML).
-
Location: HKEY_CURRENT_USER\Software\Policies\Microsoft\Office\16.0\Outlook\Options\Calendar
-
DWORD: RestUpdatesForCalendar
Value: 1 if Enabled, 0 if Disabled
When this new policy is enabled:
The Turn on shared calendar improvements checkbox is enabled for all users. The UI checkbox is checked and disabled, so end users cannot turn off the improvements.
When this new policy is disabled:
The Turn on shared calendar improvements checkbox is disabled for all users. The UI checkbox is unchecked and disabled, so end users cannot turn on the improvements.
Confirm that your shared calendar is using the new improvements
In order to benefit from the improvements, the setting must be enabled in Outlook for Windows and your shared calendar must be upgraded to the new sharing platform in Microsoft 365.
You can check whether your shared calendar is upgraded using Outlook for Windows or using PowerShell.
Using Outlook for Windows
For any calendar on which you have Editor or Delegate permissions, Outlook for Windows will tell you if the calendar has been upgraded to the new sharing platform.
After the setting has been enabled and you have restarted Outlook, you can view the Calendar Properties dialog to check whether you are using the new improvements. If you have been upgraded, you will see “Type: Folder containing Calendar items (REST)”.
|
Upgraded to new sharing platform |
Not yet upgraded |
|---|---|
|
|
|

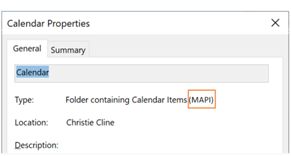
Remember that you will only see the REST or MAPI annotation if you have Editor or Delegate permissions to the calendar.
Some versions of Outlook will also show “(preview)” next to shared calendars that have been upgraded. We are phasing out this label, in favor of the Properties dialog.
Using PowerShell
To confirm whether the calendar is on the new sharing platform, you can check the ExtendedFolderFlags in the output of Get-MailboxCalendarFolder.
If the shared calendar is using the new sharing model, the ExtendedFolderFlags returns the following values for the user sharing the calendar and the user opening the shared calendar:
-
The user sharing the calendar on the new sharing platform: SharedOut
-
The user opening a shared calendar on the new sharing platform: SharedIn
Use the following cmdlet for the user sharing the calendar:
-
Get-MailboxCalendarFolder -Identity <user1>:\Calendar | FL
Use the following cmdlet for the user that is opening the shared calendar:
-
Get-MailboxCalendarFolder -Identity <user2>:\Calendar\<name of shared calendar>
For more information, see the Exchange PowerShell reference article on the Get-MailboxCalendarFolder cmdlet.
Is your shared calendar not yet upgraded?
If your shared calendar is not yet on the new sharing platform in Microsoft 365, you can upgrade the shared calendar manually. This requires that the shared calendar owner is hosted in Exchange Online, and they have specifically granted you permissions to their calendar. If these conditions are met, follow the instructions below to remove and re-add the shared calendar.
Remember that the shared calendar improvements are only available for calendars shared between people using Exchange Online.
-
Navigate to the Calendar module and find the shared calendar you want to upgrade.
-
Right-click on the shared calendar and select Delete Calendar.
-
Close and restart Outlook.
-
From the Home ribbon in the Calendar module: click the Add Calendar button, and then click Open Shared Calendar...
-
Enter the name of the person who has shared their calendar with you.
-
Click OK to close the dialog.
-
The shared calendar will reappear in your Calendar list and should now be upgraded.
Important: Immediately after adding the calendar, the calendar might appear empty. It takes a few minutes to setup the new shared calendar and sync over all the calendar events. This delay occurs only on the initial setup of the new shared calendar, and you will not see any more delays once the initial sync completes. In the case of very large calendars, it can take a few hours to sync over all the calendar events.
Turn off shared calendar updates
If you tried the shared calendar improvements, but they didn't work for you, please let us know through Outlook in-app support.
To turn off the shared calendar improvements, follow the same instructions as above, and unselect the checkbox next to: Turn on shared calendar improvements and restart Outlook.


