
You can create and share lists that help you track issues, assets, routines, contacts, inventory, and more. Start from a template, Excel file, or from scratch. If you're in Microsoft Teams, see Get started with Lists in Teams.
Create a list

-
From the Lists app in Microsoft 365, select +New list. (To get to the Lists app, at the top of any page, select the Microsoft 365 app launcher

From your SharePoint site home page or the Site contents page, select + New > List.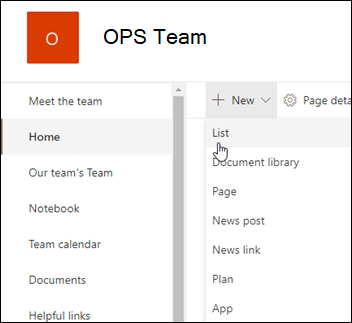
-
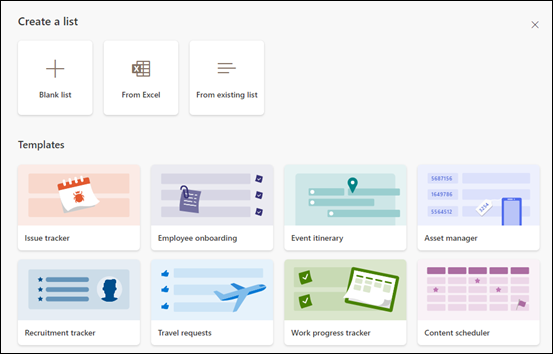
From the Create a list page, select one of the following options:
Notes:
-
Visual updates for lists are gradually rolling out worldwide, which means that your experience may differ from what's described in this article.
-
2,000 lists and libraries combined per site collection is the limit (including main site and any subsites) after which you will receive error: Sorry, something went wrong. The attempted operation is prohibited because it exceeds the list view threshold. See SharePoint limits.
-
Blank list: Choose to start a list from scratch. Add a list Name, Description (optional), and select whether you want the list to appear in the left site navigation. When you're finished selecting options, select Create.
-
From Excel: Choose this option to create a list based on an Excel spreadsheet.
-
From existing list: Choose this option to save time and create a new list based on the columns in another list. Your new list will start with all the same columns, but it won't include any of the data from the original list.
-
Templates: Select a template, for example Issue tracker, to see what columns the template contains and scroll through sample data to see what it looks like. If you find a template you like, select Use template. If you don't see any you want, select Back to get back to the Create a list page. Learn more about how to create a list from a template or about the lists templates in Microsoft 365.
-
-
When your list opens, add an item to your list by either selecting + New or Edit in grid view. (Grid view lets you add information freely to different rows or columns.)
To add different types of information to the list, select + Add column. To learn more, see Create a column in a list or library.
Tip: To change the name of your list, select its title, type a new name, and then select Save. Or from the Lists home page, on your list's tile, select Open actions (...), and then select Customize.
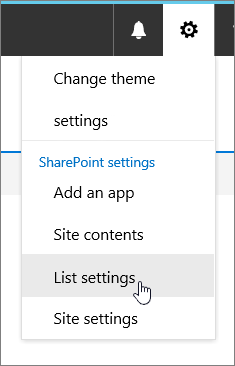
To change list properties, delete the list, add permissions, manage columns, and other updates, select Settings 
Create a list on a classic SharePoint or a SharePoint Server 2019 site
-
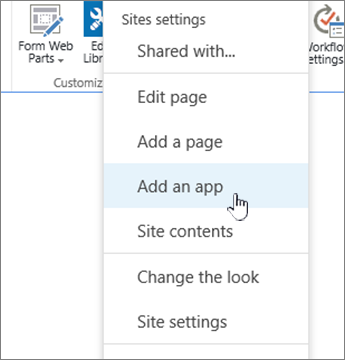
Select Settings
-
Select + New, and then select List.
-
Enter a Name for the list, and optionally, a Description.
The name appears at the top of the list and can appear in site navigation to help others find it.
-
Select Create.
-
When your list opens, to add room for more types of information to the list, select + or + Add column.
For more info about adding columns, see Create a column in a SharePoint list or library.
For info about creating a list based on an existing list, see Create a new SharePoint list based on the columns in another list.
To change properties, delete the list, add permissions, manage columns, and a number of other updates, select Settings
Create lists from other types of list templates
You can use SharePoint Server 2019 lists for more than a simple list. You can choose from list templates such as Links, Calendar, Survey, Issue Tracking, Announcements, and more.
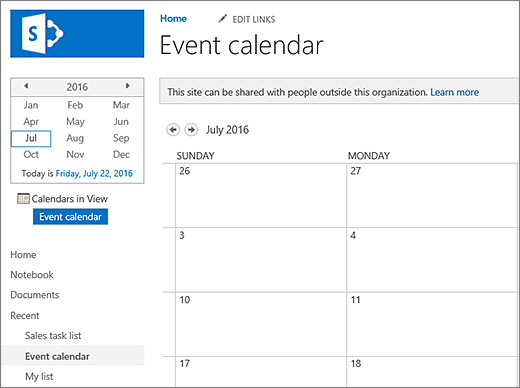
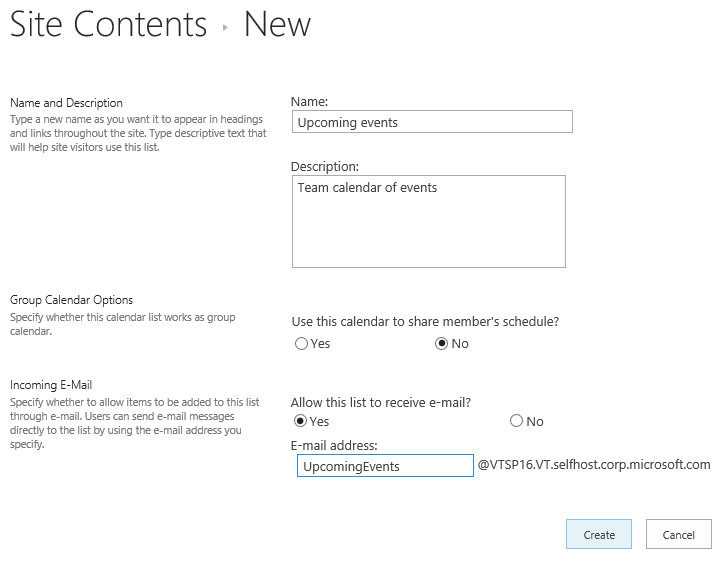
Calendar app example
-
In this example, we used calendar and chose the built-in calendar app for SharePoint. You may see other calendars that have been built within your company or offered by a third party.
-
Enter a Name for the app you chose, such as Event calendar, July tasks, or Company Contacts.
The name appears at the top of the list in most views, becomes part of the web address for the list page, and appears in site navigation to help users find the list. You can change the name of a list, but the web address will remain the same.
-
SharePoint returns you to the Site contents page. Find the app you just created in the Site contents list, and open it. SharePoint creates a default version of the app, calendar, task list, or whatever app you created.
-
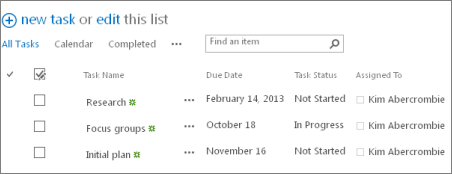
You can start entering data using +new task, edit this list, Add, or whatever way the specific app provides to add data.
Note: Some list-based apps only appear in the classic environment.
Depending on the type of app you choose, to change the app's settings, from the ribbon at the top of the page, select List Settings or the List tab. For more info about settings, see Edit list settings in SharePoint.
-
Select Settings
-
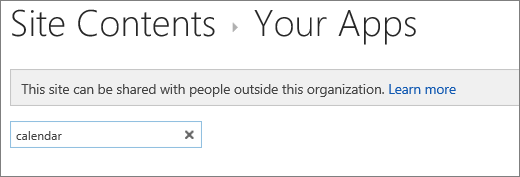
Enter the type of list template you want (custom, task, calendar, and so on) into the search box, and select Search

-
Select the List template app you want use.

-
Enter a Name (required).
The name appears at the top of the list in most views, becomes part of the web address for the list page, and appears in site navigation to help users find the list. You can change the name of a list, but the web address will remain the same.
To provide an optional Description and additional info, depending on the particular list app, select Advanced Options. Advanced Options.
-
Select OK.
-
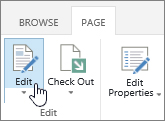
On the page that you want to add the list or library, select Page, and then select Edit. If you don't see the Page tab, select Settings

Note: If the Edit command is disabled or doesn’t appear, you may not have permission to edit the page.
-
Select the place on the page where you want the list or library to appear, select Insert, and then select App Part.
-
For the list or library, select the App Part, and then select Add. In Add apps, any lists you created should appear.
-
When you’re finished editing the page, select the Page tab, and then select Save. In some cases, you have the option to Save as Draft or Save and Publish.
Important: Some pages can't be edited, such as the Site Contents page.
Using the previous steps, here’s an example of a list that was added to a page.
-
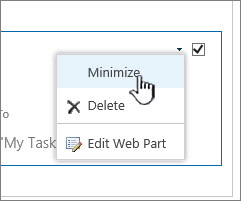
On the page where you want to minimize or restore the list or library, select Page, and then select Edit.
-
Point to the list or library, select the down arrow, and select Minimize or Restore depending on the current position of the list or library, and then select OK.
-
When you’re finished editing the page, select Save. In some cases, you have the option to Save as Draft or Save and Publish.
-
On the Lists Home page, tap New.
-
Under Create New, tap Blank List to start a list from scratch, or select an option under Templates.
-
Blank list starts a list from scratch.
-
Templates are pre-defined, purpose-based options that have columns already defined for you. Select one to see what it has and whether it is right for you. You may change the columns to fit your needs.
-
Start your blank list
-
Tap Blank List, then give it a Name and a Description.
-
Choose a color and an icon.
-
Choose whether to save it under My Lists or on a specific SharePoint site.
-
Tap Create.
A blank list opens with a standard “Title” column on the left.
-
To add a column, tap More, then tap Add New Column.
-
Choose the type of column data you want, then define the columns settings. Tap the check mark to save the column settings.
-
Repeat steps 5 and 6 until you’ve defined all your columns.
-
To add an item to your list, tap New, then enter the data for each column. Select the check mark to save your item (or tap the × to discard the item data without saving).
Start a template-based list
-
After you tap one of the templates, it will open so that you can see the columns and sample data it contains.
-
Scroll through the template to see if it's right for you.
As you scroll horizontally, the left-most column data stays in view, helping to keep the related data in context.
-
When you've found the template you want, tap Use This Template.
Your new list opens with all the predefined columns from the template.
-
To add a column, tap More, then tap Add New Column.
-
Choose the type of column data you want, then define the columns settings. Tap the check mark to save the column settings.
-
Repeat steps 4 and 5 until you’ve defined any additional columns you want.
-
To remove an existing column, tap the column heading, scroll to the bottom of the settings, and tap Delete Column.
-
To add an item to your list, tap New, then enter the data for each column. Select the check mark to save your item (or tap the × to discard the item data without saving).
-
On the Lists Home page, tap New.
-
Under Create New, tap Blank list to start a list from scratch, or select an option under Templates.
-
Blank list starts a list from scratch.
-
Templates are pre-defined, purpose-based options that have columns already defined for you. Select one to see what it has and whether it is right for you. You may change the columns to fit your needs.
-
Start your blank list
-
Tap Blank list, then give it a Name and a Description.
-
Choose a color and an icon.
-
Choose whether to save it under My lists or on a specific SharePoint site.
-
Tap Create.
A blank list opens with a standard “Title” column on the left.
-
To add a column, tap More, then tap Add column.
-
Choose the type of column data you want, then define the columns settings. Tap the check mark to save the column settings.
-
Repeat steps 5 and 6 until you’ve defined all your columns.
-
To add an item to your list, tap New, then enter the data for each column. Select the check mark to save your item (or tap the × to discard the item data without saving).
Start a template-based list
-
After you tap one of the templates, it will open so that you can see the columns and sample data it contains.
-
Scroll through the template to see if it's right for you.
As you scroll horizontally, the left-most column data stays in view, helping to keep the related data in context.
-
When you've found the template you want, tap Use this template.
Your new list opens with all the predefined columns from the template.
-
To add a column, tap More, then tap Add column.
-
Choose the type of column data you want, then define the columns settings. Tap the check mark to save the column settings.
-
Repeat steps 4 and 5 until you’ve defined any additional columns you want.
-
To remove an existing column, tap the column heading, scroll to the bottom of the settings, and tap Delete column.
-
To add an item to your list, tap New, then enter the data for each column. Select the check mark to save your item (or tap the × to discard the item data without saving).
Want to do the same with Libraries?
To create a library, see Create a document library.
Next steps with Lists
Columns Configure what type of info a list holds by adding and deleting columns. For more information, see Create a column in a list or library.
Views Change how a list is displayed by creating views. For more information, see Create, change, or delete a view of a list or library.
Folders Add a subfolder to a list. For more information, see Create a folder in a list.


