
In a print publication, if you've set a picture's wrapping style so that text flows around the picture, you may want to do some fine-tuning. For example, you might want the text to wrap more tightly around the picture. Or you might want text to flow very close to the picture on one side but not as closely on the other side.
Change the shape of the picture's outline
Every picture has an adjustable outline around it. To see the outline, click the picture. On the Format tab, click Wrap Text, and then click Edit Wrap Points.
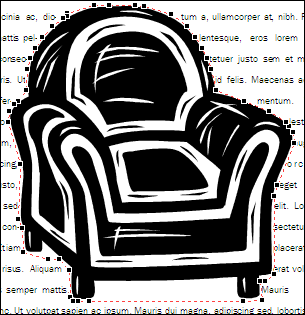
After you click Edit Wrap Points, you see a red dashed outline with square black handles (called wrap points) on it around the picture. You can change the shape of the outline by dragging the black handles.
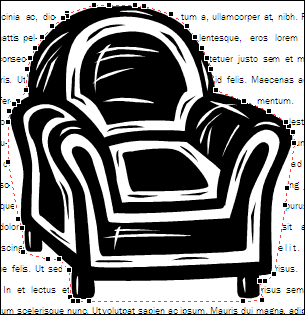
By dragging the handles away from the picture the way the handles have been dragged away from the arms of this chair, you increase the space between the text and picture. Dragging the handles closer to the picture has the opposite effect.
Note: You can actually change the shape of a picture's outline only when text wraps closely around the picture (that is, when the picture's wrapping style is set to Tight or Through). You can also edit wrap points when the wrapping style is set to Square or Top and Bottom, but this affects only the distance between the picture and text, not the shape of the text around the picture.
To change the shape of a picture's outline:
-
Click the picture.
-
On the Format tab, click Wrap Text, and then click Edit Wrap Points

-
It's easier to make adjustments to the outline when you see the picture up close. Press F9 to zoom in on the selected picture and its outline.
If your picture has only one wrap point handle on each corner
If the picture with an outline that you want to adjust is a photograph, it may have only four wrap point handles, one on each corner. You'll most likely need more handles to adjust the picture's outline the way you want. To add handles, position the mouse pointer over the handle that you want to move until the pointer becomes a

Notes:
-
If you change the picture's wrapping style after you adjust the handles on the outline, you may lose the adjustments that you made.
-
To delete a wrap point handle, hold down CTRL+SHIFT and click the handle.
Control the exact distance of the text from each side of a picture
If you set a picture's wrapping style to Square, you can control precisely how closely text wraps to the picture's top, bottom, and two sides. Here's how:
-
Right-click the picture, and then click Format Picture on the shortcut menu.
-
In the Format Picture dialog box, click the Layout tab.
-
Under Distance from text, clear the Automatic check box.
-
For Top, Bottom, Left, and Right, type the distances you want. Click OK.
Change the shape of the picture's outline
Every picture has an adjustable outline around it. To see the outline, click the picture. On the Arrange menu, point to Text Wrapping, and then click Edit Wrap Points.
After you click Edit Wrap Points, you see a red dashed outline with square black handles (called wrap points) on it around the picture. You can change the shape of the outline by dragging the black handles.
By dragging the handles away from the picture the way the handles have been dragged away from the arms of this chair, you increase the space between the text and picture. Dragging the handles closer to the picture has the opposite effect.
Note: You can actually change the shape of a picture's outline only when text wraps closely around the picture (that is, when the picture's wrapping style is set to Tight or Through). You can also edit wrap points when the wrapping style is set to Square or Top and Bottom. Dragging wrap points when using these wrapping styles, however, affects only the distance between the picture and text, not the shape of the text around the picture.
To change the shape of a picture's outline:
-
Click the picture.
-
On the Arrange menu, point to Text Wrapping, and then click Edit Wrap Points

-
It's easier to make adjustments to the outline when you see the picture up close. Press F9 to zoom in on the selected picture and its outline.
If your picture has only one wrap point handle on each corner
If the picture with an outline that you want to adjust is a photograph, it may have only four wrap point handles, one on each corner. You'll most likely need more handles to adjust the picture's outline the way you want. Here's how to add handles:
-
Hold down CTRL and then click the red outline where you want to add a handle.
-
Position the mouse pointer over the handle that you want to move until the pointer becomes a
-
Drag the pointer to change the outline of the picture.
-
Notes:
-
If you change the picture's wrapping style after you adjust the handles on the outline, you may lose the adjustments that you made.
-
To delete a wrap point handle, hold down CTRL+SHIFT and click the handle.
Control the exact distance of the text from each side of a picture
If you set a picture's wrapping style to Square, you can control precisely how closely text wraps to the picture's top, bottom, and two sides. Here's how:
-
Right-click the picture, and then click Format Picture on the shortcut menu.
-
In the Format Picture dialog box, click the Layout tab.
-
Under Distance from text, clear the Automatic check box.
-
For Top, Bottom, Left, and Right, type the distances you want. Click OK.


