
Every SharePoint list contains a set of list forms that you use to view, edit, or add items to a list. Each list form displays the columns from that list as fields on a page where users can view, add, or edit information.
Using Microsoft SharePoint Designer 2010, you can customize these forms so that they’re easier to use and more targeted toward your business solution. In addition, you can use Microsoft InfoPath 2010 to create and customize these forms.
This article describes Microsoft InfoPath 2010, some of the benefits to using InfoPath 2010, and how to customize a list from using InfoPath 2010 from within Microsoft SharePoint Designer 2010.
In this article
About Microsoft InfoPath 2010
InfoPath 2010 is a powerful form creation and information gathering program included in the Microsoft Office 2010 release. Using InfoPath 2010, you can create highly customized, sophisticated forms without writing any code. You can drag and drop fields onto the form, add instant form validation using a set of rules, and apply different themes or branding to the form.
Customizing a list form in InfoPath Designer 2010 is similar to the experience of customizing a list form in Microsoft SharePoint Designer 2010. Typically, you add and remove fields, add text, graphics, and server controls, and change the layout and look and feel of the form.
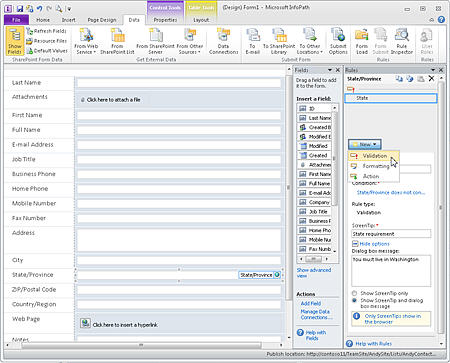
In InfoPath 2010, however, it is much easier to do these tasks using a rich set of templates, layouts, themes, and powerful rules management features. You also only need to edit one file, the InfoPath Form Template, or XSN, and this gets applied to all three of your list forms. (In SharePoint Designer 2010, if you want the same changes applied to all three list forms, you would have to customize the view, edit, and new form independently.)
How InfoPath 2010 works with SharePoint lists
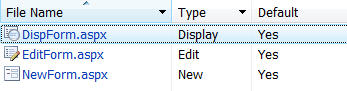
When you open a list in Microsoft SharePoint Designer 2010 and look at the available forms for that list, you see three forms: DispForm.aspx, EditForm.aspx, and NewForm.aspx
-
DispForm.aspx is used to display the properties of an item in the list.
-
EditForm.aspx is used to edit the item in the list.
-
NewForm.aspx is used to create new items in the list.
To customize these forms in Microsoft SharePoint Designer 2010, you open them individually and make changes to them or create new forms to replace them.
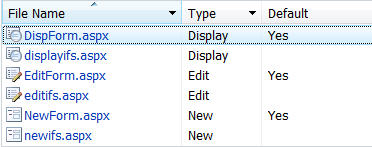
Alternatively, you can choose an option in Microsoft SharePoint Designer 2010 to customize these forms in InfoPath 2010. When you do this, you create and publish an InfoPath Form Template, or XSN file, which is used with a new set of list forms: displayifs.aspx, editifs.aspx, and newifs.aspx. The template and the new forms replace the default ASPX forms that you started with.
The next time you open your site in Microsoft SharePoint Designer 2010, you’ll notice the addition of the new forms on the summary page for the list.
NOTES
-
While it is possible to open the new forms in Microsoft SharePoint Designer 2010, you cannot customize the contents of the forms since they reside in an InfoPath Form Web Part. Use the InfoPath form template to update these files.
-
The InfoPath form template, or XSN file, doesn’t appear on the summary page in Microsoft SharePoint Designer 2010. To see this template, browse to the list forms in your site hierarchy (using the All Files link in the Navigation pane).
Preview of a list form before you customize it in InfoPath
Before you choose to customize a list form in InfoPath 2010, it can be helpful to know how different the form will look when you customize it in InfoPath.
The default edit form (EditForm.aspx) appears as follows in the browser.
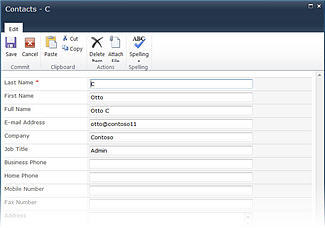
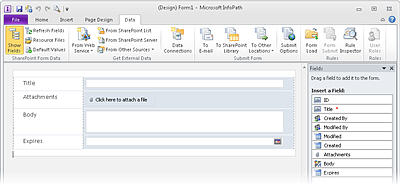
When you customize the form in InfoPath 2010, the new edit form (editifs.aspx with associated InfoPath template) appears as follows in the browser.
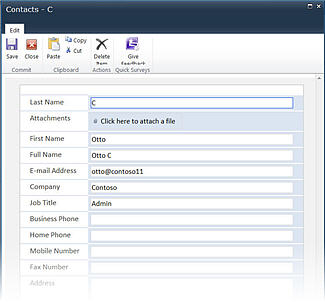
The new form uses a different color scheme and fonts and presents the Attachments field inline instead of in the head of the form. Again, this is just the default settings used in the new form. When you’re finished customizing the form, you can completely change the appearance and behavior of the form.
Customize a list form using InfoPath 2010
In Microsoft SharePoint Designer 2010, you have the option to customize list forms using InfoPath 2010. When you choose this option, InfoPath 2010 Designer opens with a new InfoPath form template (XSN), which you use to customize your list forms. When finished, you’ll publish the form to your SharePoint list and then, if necessary, return to Microsoft SharePoint Designer 2010.
-
Open your site in Microsoft SharePoint Designer 2010.
-
In the Navigation pane, click Lists and Libraries.
-
Open the list you want to customize.
-
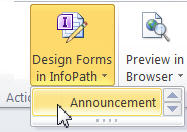
On the List Settings tab, in the Actions group, click Design Forms in InfoPath, and then choose the content type that you want to use for the list forms.
NOTE: Every SharePoint list can be configured to allow multiple content types, which will appear in this menu. You can create a custom list form for each content type. If, for example, your list has a Press Releases content type and an Industry News content type, you can create custom list forms for each. Keep in mind that you will only see your form if the content type you choose is the default for the list. -
InfoPath 2010 opens with a new InfoPath Form Template.
-
Use the form editing tools in InfoPath 2010 to customize the look and feel of your form and add the necessary rules based logic to the form. Learn more about using InfoPath 2010 in the See Also section.
-
When finished with your customization, publish the template to your SharePoint list. There are two ways you can do this:
-
If you’re finished working on your form, simply close the form and when prompted, choose Save and Publish.
-
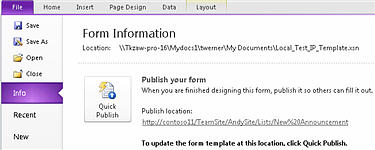
To publish the form and continue working in InfoPath, click the File tab, choose Info, and click Quick Publish.
-
-
Click OK to the publish confirmation message.
-
Close InfoPath 2010 and return to Microsoft SharePoint Designer 2010 if necessary.
To further customize your list forms, repeat the steps above.
Other ways to customize your list form
In addition to customizing your list forms using InfoPath 2010 from within to Microsoft SharePoint Designer 2010, you can use one of the following methods to customize these list forms.
Use the browse r to customize your list form in InfoPath 2010
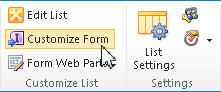
To customize your list form in the browser, just browse to your form and then on the List tab, in the Customize List group, choose Customize Form as shown here.
Us e InfoPath 2010 to create a new list form or customize and existing form
To create a new list form from within InfoPath 2010, click the File tab, choose New, and click SharePoint List. Specify the location of your site and then select an existing list or create a new one.
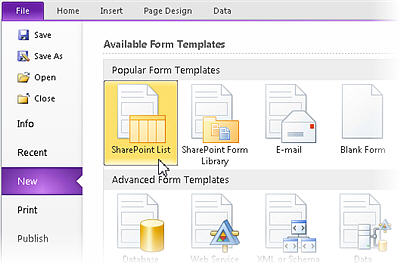
To customize a form you’ve already created, click the File tab, choose Recent, and select your form template in the Recent Form Templates list.
Next steps
As you spend time customizing your SharePoint list forms in InfoPath 2010, you may choose to upsize all of your forms to InfoPath 2010 or just those that require a high level of customization for your users or your business solution site.
In addition to list forms, you can use Microsoft InfoPath 2010 to create powerful workflow initiation forms, forms for form libraries, browser-based forms, offline forms with SharePoint Workspaces, and much more.
Learn more about the different uses of InfoPath 2010 in the See Also section.


