
Whether you want to create a booklet for an event or print out an ambitious book project, consider using the pre-built page settings for booklets that comes with Word. The Book Fold layout sets you up for printing your masterpiece automatically in the correct order, ready for folding and binding.
For best results, change the document layout before you start your writing project. That way there’s less clean-up work to do if tables or other objects in your document don’t fit quite right.
Create a booklet or book
-
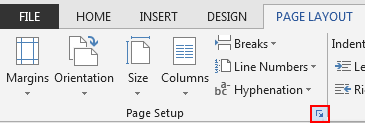
Go to Layout and select the Page Setup dialog launch icon at the bottom-right corner.
-
On the Margins tab, change the setting for Multiple pages to Book fold. The orientation automatically changes to Landscape.
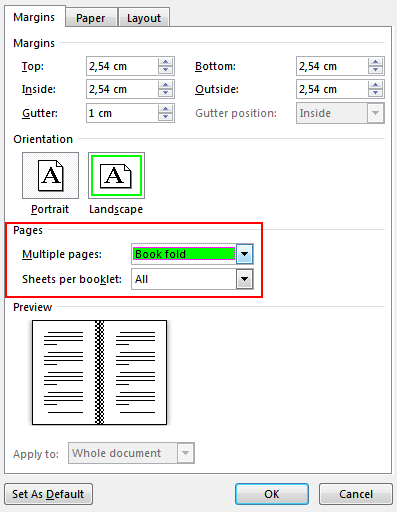
Tip: If you have a long document, you might want to split it into multiple booklets, which you can then bind into one book. Under Sheets per booklet, choose how many pages to print per booklet.
-
Select and increase the value of Gutter to reserve space on the inside fold for binding.
-
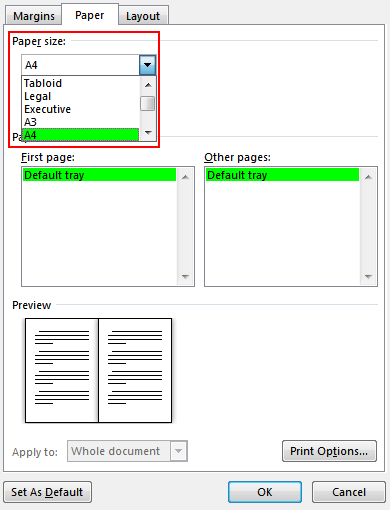
Go to the Paper tab and select the Paper size. The final size of the booklet is one half width of the paper size.
Tip: You can add embellishments to your booklet’s appearance. For example, to add borders to every page, on the Layout tab of the Page Setup window, select Borders.
-
Select OK. If your document already has content, the text is formatted automatically, However, you may need to manually adjust objects like images and tables.
Settings for printing booklets
When you are ready to print your booklet, check the print settings to make sure you print on both sides of the paper. Also, be ready to flip the papers correctly for the printing to work properly.
-
Go to File > Print.
-
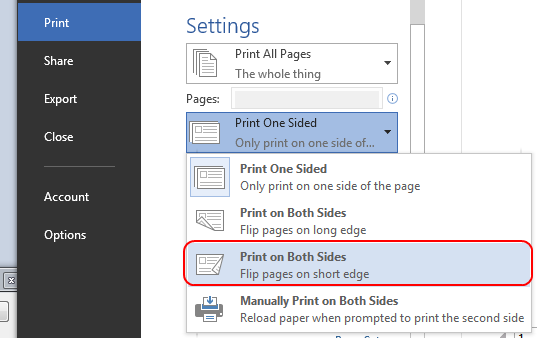
If your printer supports automatic printing on both sides, change Print One Sided to Print on Both Sides. Choose the option Flip pages on short edge to avoid printing the second side of each sheet upside down.
-
If your printer does not support automatic printing on both sides, select Manually Print on Both Sides. Then, when prompted, feed the pages back to the printer. To avoid pages from printing upside down, flip the sheets on the short edge of the paper according to your printer’s instructions.
Tip: For a professional touch, consider adding page numbers in the header or the footer. For more info, see Add page numbers.
See Also
Create a booklet using a Word template
Create a booklet or book
-
Go to Layout > Margins > Custom Margins.
-
Change the setting for Multiple pages to Book fold. The orientation automatically changes to Landscape.
Tip: If you have a long document, you might want to split it into multiple booklets, which you can then bind into one book. Under Sheets in booklet, choose how many pages to print per booklet.
-
To reserve space on the inside fold for binding, increase the width of the Gutter.
-
You can add many embellishments to your booklet’s appearance. For example, to add borders to every page, on the Layout tab of the Custom Margins window, select Borders.
-
Select OK.
If your document already has content, the text is formatted automatically, but you might need to adjust objects like images and tables manually.
-
Go to File > Page Setup and check the paper size. Keep in mind that the final size of the booklet is one half of the paper size. Make sure your printer is stocked with paper of the right size.
Settings for printing booklets
When you are ready to print your booklet, check the print settings to make sure you print on both sides of the paper. Also, be ready to flip the papers correctly for the printing to work as intended.
If your printer supports automatic printing on both sides, take these steps:
-
Select File > Print.
-
Under Two-sided, select Booklet.
Tip: For a professional touch, consider adding page numbers in the header or the footer. For more info, see Add page numbers.
Note: If your printer doesn't support automatic printing on both sides, you'll need to print pages manually.
See Also
Create a booklet using a Word template


