
A Send To connection specifies settings for a document repository or a records center. When you create a Send To connection, Content Organizer can submit documents to the specified location. A SharePoint admin typically creates and manages the connections that set up a records archive or a knowledge management center.
To learn more about Content Organizer, see Configure the Content Organizer to route documents.
In this article
Create a Send-To connection
When you create a Send To connection, Content Organizer can submit content to a designated document repository or a records center. To create a Send To connection, follow these steps.
-
Sign in to Microsoft 365 with your work or school account.
-
Go to the SharePoint admin center.
-
Select records management.
-
In the Send To Connections list select New Connection.
-
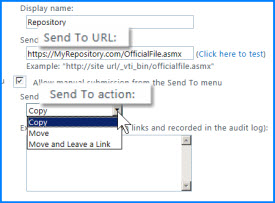
In the Display name text box, type a name for this connection. Content Organizer displays this name as an option for users.
-
In the Send to URL text box, enter the URL to the submission point of the destination site.
Tip: You can find the URL in the Submission Points section of the Content Organizer: Settings page of the destination repository.
-
(Optional) if you want users to be able to submit records to the repository directly, select Allow manual submission from the Send To menu. Then, SharePoint displays the connection as an option when users click Send To on the ribbon of a document library.
-
From the Send To action list, select one of the following values:
-
Copy Select this option to create a copy of the document and send the copy to the destination repository.
-
Move Select this option to move the document to the destination repository. Users will no longer be able to access the document from its original location.
-
Move and Leave a Link Select this option to move it to the destination repository and create a link to information about the document. When a user clicks this link, a page appears that displays the URL of the document and the document metadata.
-
-
In the Explanation dialog box, type any information that you want to add to the audit trail. The audit trail is created when a user sends a document by using this connection.
Note: If you selected Move and Leave a Link in the previous step, this explanation will also appear on the information page.
-
Click Add Connection to create the connection.
Edit a connection
To edit an existing connection to a document repository or a records center, follow these steps.
-
Sign in to Microsoft 365 with your work or school account.
-
Go to the SharePoint admin center.
-
Select records management.
-
From the Send To Connections list, select the connection that you want to change.
-
Edit any of the connection settings.
-
Click Update Connection.
Delete a connection
To delete an existing connection to a document repository or a records repository, follow these steps.
-
Sign in to Microsoft 365 with your work or school account.
-
Go to the SharePoint admin center.
-
Select records management.
-
From the Send To Connections list, select the connection that you want to delete.
-
Click Remove Connection.


