
Note: This article has done its job, and will be retiring soon. To prevent "Page not found" woes, we're removing links we know about. If you've created links to this page, please remove them, and together we'll keep the web connected.
You can customize and change fonts and character spacing (also known as kerning) on the Home tab in the Font group. This illustration shows the features available in the Font group:
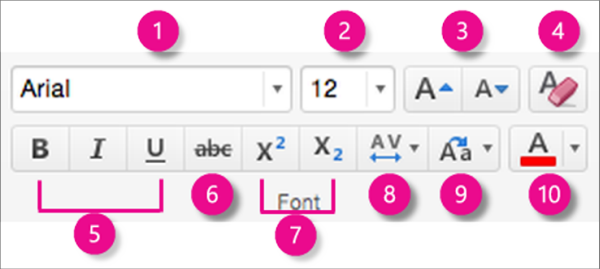
1. Font Style. Click the arrow to scroll through and select a style.
2. Font Size. Click the arrow to choose a font size. Or, select the number in the box, enter a new number, and press RETURN.
3. Increase or Decrease Font Size. Click Increase Font Size or Decrease Font Size to incrementally change the size of selected text.
4. Clear All Formatting. Click to return selected text to its default formatting.
5. Bold, Italic, and Underline. Click Bold, Italic, or Underline to apply to selected text.
6. Strikethrough. Click to make selected text appear crossed out.
7. Superscript and Subscript. Click to make selected text smaller and slightly above (superscript) or below (subscript) the normal line of type.
8. Character Spacing (kerning). Click the arrow to choose how tightly or loosely spaced your text appears. Click More Spacing for fine-tuned control over character spacing.
9. Change Case. Click the arrow to change casing of selected text. Choose from Sentence case, lowercase, UPPERCASE, Capitalize Each Word, and tOGGLE cASE.
10. Font Color. Click the arrow to select a font color. Click More Colors for advanced color options.
Note: To change the font formatting on all slides at once, or on certain slide layouts, you can Customize a slide master or a edit a slide layout.
Related information
Clear text formatting on a slide in PowerPoint for Mac
Work with bulleted and numbered lists in PowerPoint
Format text as superscript or subscript in PowerPoint for Mac


