
Using the Recording tab introduced in PowerPoint 2016, you can add a screenshot, screen recording, audio (such as background music), or video to a slide.
Tip: Don't see the Recording tab? Right-click any tab in PowerPoint and select Customize the Ribbon. On the right side of the dialog box you'll see a list of tabs. Make sure Recording is checked.
Open the slide where you want the screenshot to be inserted.
Click Recording tab > Screenshot button > (the gallery of windows opens)
Either select one of the windows shown (for a full-window clipping of that app) or select Screen Clipping to define the area on your screen that you want to capture.
-
You can record your computer screen and related audio, and then embed it into your PowerPoint slide―or you can save it as a separate file. See Record your screen in PowerPoint for directions.
-
Open the slide where you want to add the video.
-
Click Recording tab > Video > and then browse to the location on your computer or network where the video file is stored. Select the file and click Insert.
The video will "auto-play" That means that when viewers look at the presentation in Slide Show, and they arrive at the slide where the video is placed, the video immediately begins to play. The viewer doesn't need to click Play to start it. When the video finishes playing, the slide show automatically advances to the next slide.
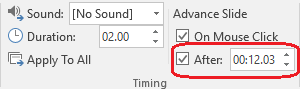
Important: If you insert a video this way, then subsequently trim the video, the trimming doesn't alter the auto-advance timing for the video. You must manually set the slide to advance at the appropriate time. (Select the video, click the Transitions tab of the ribbon, and at the far right end of the ribbon, adjust the Advance Slide > After setting to the amount of time that equals the length of the trimmed video.)
-
Click Insert tab > Video > Online Video and then select or specify the video you want to embed.
See Insert or link to a video on YouTube for complete instructions.
-
Open the slide where you want to add the audio file.
-
Click Recording tab > Audio > Audio on My PC > and then browse to the location on your computer or network where the audio file is stored. Select the file and click Insert.
The recording will "auto-play" That means that when viewers look at the presentation in Slide Show, and they arrive at the slide where the audio recording is placed, it immediately begins to play. The viewer doesn't need to click Play to start it. When the audio finishes playing, the slide show automatically advances to the next slide.
-
Open the slide where you want to add the audio.
-
Click Recording tab > Audio > Record Sound
-
In the Record Sound dialog box, click the Record button

The recording will "auto-play" That means that when viewers look at the presentation in Slide Show, and they arrive at the slide where the audio recording is placed, it immediately begins to play. The viewer doesn't need to click Play to start it. When the audio finishes playing, the slide show automatically advances to the next slide.


