
When you add a modern page to a site, you can add and customize web parts, which are the building blocks of your page. This article describes the Document Library web part, which allows you to display a document library.
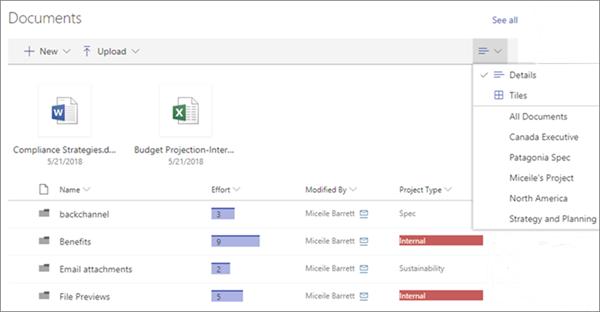
When you use the document library web part, you can choose to show a specific view of the library or even a folder within the library. Users with appropriate permissions can add, view or edit files directly from the web part. Users can also pin a document to the top of the library, download, delete and rename files, or can go the full document library by clicking See all. Additionally, files can be shown in a details view or tiles view, and column formatting and nested folders created in the source list are shown.
Note: Some functionality is introduced gradually to organizations that have opted in to the Targeted Release program. This means that you may not yet see this feature or it may look different than what is described in the help articles.
Add a document library to a page
-
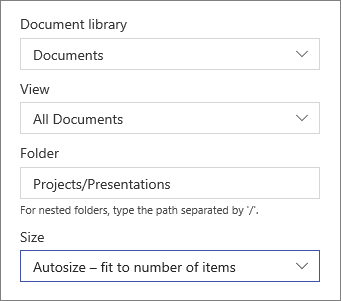
If you want a custom view of your library to appear on your page, create the view.
-
Go to the page where you want to add the library.
-
If your page is not already in edit mode, click Edit at the top right of the page.
Hover your mouse above or below an existing web part and you'll see a line with a circled +, like this:

-
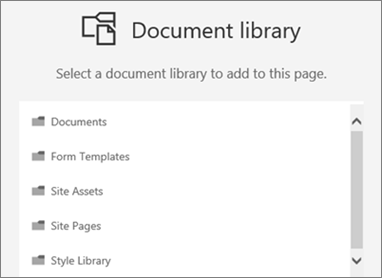
Click +, and then select Document Library from the list of web parts.
-
Select the document library you want to put on your page.
-
Click Edit web part

-
When you're done, click Apply.
-
When you're ready, click Publish at the top right of your page.
View documents in a list or as tiles
Users can click the right of the toolbar to change the view of the library from Details (a list view) to Tiles (to view files as icons).

Add new or upload documents
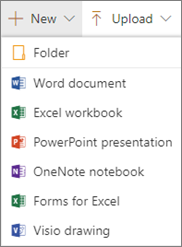
In the web part, users can add new folders and documents and/or upload files and folders. The easiest way to add files and folders is to drag them into the library from another location.
You can also add or upload documents by using the toolbar:
-
Click + New, and select Folder or a document type. Or, click + Upload, and select Files or Folder.
Download, Rename, Delete, and Pin to top
-
When a file is selected, you can take a number of actions, such as download the file, rename it, delete it, or pin it to the top of the library for easy access.

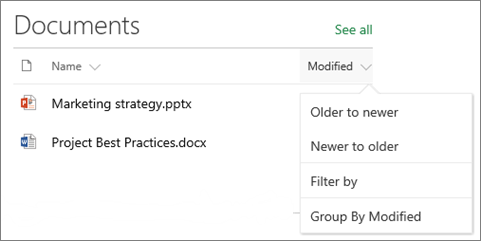
Sort, filter, or group items within the document library web part
In the web part, users can sort, filter, and group items. The actions taken in the web part do not affect the underlying library, and are viewable for the current session only.
-
Click the down arrow next to the title of the column you want to sort, filter, or group.
-
Select the action you want to take.
Add a document library to a page
-
If you want a custom view of your library to appear on your page, create the view.
-
Go to the page where you want to add the library.
-
If your page is not already in edit mode, click Edit at the top right of the page.
Hover your mouse above or below an existing web part and you'll see a line with a circled +, like this:
-
Click +, and then select Document Library from the list of web parts.
-
Select the document library you want to put on your page.
-
Click Edit web part
-
When you're done, click Apply.
-
When you're ready, click Publish at the top right of your page.
Add new or upload documents
In the web part, users can add new folders and documents and/or upload files and folders. The easiest way to add files and folders is to drag them into the library from another location.
You can also add or upload documents by using the toolbar:
-
Click + New, and select Folder or a document type. Or, click + Upload, and select Files or Folder.
Download, Rename, or Delete
-
When a file is selected, you can take a number of actions, such as download the file, rename it, or delete it.

Add a document library to a page
-
If you want a custom view of your library to appear on your page, create the view.
-
Go to the page where you want to add the library.
-
If your page is not already in edit mode, click Edit at the top right of the page.
Hover your mouse above or below an existing web part and you'll see a line with a circled +, like this:
-
Click +, and then select Document Library from the list of web parts.
-
Select the document library you want to put on your page.
-
Click Edit web part
-
When you're done, click Apply.
-
When you're ready, click Publish at the top right of your page.


