
Grouping gathers together like items or documents based on a column value. When you group a view, it only rearranges how the data is displayed; it doesn't add or remove content from the view.
You can choose to display just the grouping header, or expand the selection to show all the items or documents under a group heading.
There are two ways to group a view:
-
A quick grouping on one column,
-
or more flexible, persistent groupings created in a view.
Quick grouping in your SharePoint list or library
In SharePoint in Microsoft 365 and SharePoint Server 2019, you can group by a single column by selecting that column's header and then selecting Group by [column name].
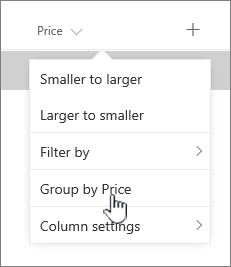
SharePoint preselects the column and then groups all data by differences in that column's data. To undo grouping, select the column header and then select Group by again.
If a column contains one of the following types of data, it can't be grouped
-
Multiple lines of text
-
Choice, where multiple values are allowed
-
Hyperlink
-
Image
Grouping documents or items in a view
When you create or edit a view, you can specify grouping on one or two columns. You can also combine grouping with filters or sorting, if you like.
If you don't need to create a new view, but rather just want to edit the existing view you're looking at, skip to step 3.
-
Select View options > Save view as.
-
Give the view a name, and select whether you want the view to be public—so that other users of this list or library can also see the view.
-
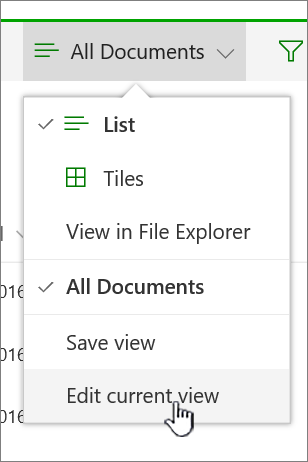
Select View options > Edit current view.
-
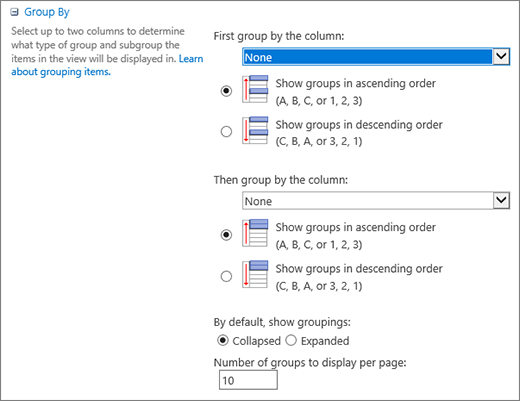
Scroll downward and expand Group By. In the Group By section, under First group by the column, open the list and choose a column name.
-
Click Show groups in ascending order or Show groups in descending order.
-
If you also want to group by another column, under Then group by the column, choose another column name. Then choose between ascending order and descending order.
-
Scroll to the top or bottom of the page and select OK.
Your list is shown with the grouping applied.
Note: When grouping by Managed Metadata fields, using more than one Managed Metadata field in the grouping is likely to have a performance impact on page loads for the library view where grouping is enabled. (For example: Column 1 and Column 2 are both Managed Metadata fields. You first group by Column 1, then by Column 2. This is likely to impact performance of the page).
Sorting, filtering, and grouping a view
You can combine grouping with sorting and filtering your data. It's best to pick the column you want to group by, and then set up filtering and sorting. When you set up grouping, you specify ascending or descending order, so there's no need to also create a sort on the same field. However, you may want to create a filter on your groups to narrow down the number of groups.
To learn how to sort a view, see Use sorting to modify a SharePoint view.
To learn how to filter a view, see Use filtering to modify a SharePoint view.
We're listening
Was this article helpful? If so, please let us know at the bottom of this page. If it wasn't helpful, let us know what was confusing or missing. Please include your SharePoint, OS, and browser versions you're using. We'll use your feedback to double-check the facts, add info, and update this article.
Grouping documents or items in a view
When you create or edit a view, you can specify grouping on one or two columns. You can also combine grouping with filters or sorting.
If you don't need to create a new view, but rather just want to edit the existing view you're looking at, skip to step 3.
-
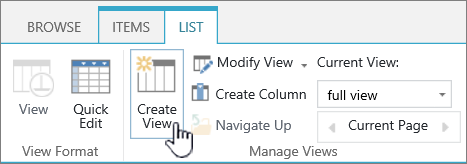
With the list or library opened, select the Library tab, and then select Create View.
-
Fill in the fields to describe the view you're creating.
-
Select the Library tab, and then select Modify View.

-
Scroll downward and expand Group By. In the Group By section, under First group by the column, open the list and choose a column name.
-
Click Show groups in ascending order or Show groups in descending order.
-
If you also want to group by another column, under Then group by the column, choose another column name. Then choose between ascending order and descending order.
-
Scroll to the top or bottom of the page and select OK.
Your list is shown with the grouping applied.
Note: When grouping by Managed Metadata fields, using more than one Managed Metadata field in the grouping is likely to have a performance impact on pages loads for the library view where grouping is enabled. (For example: Column 1 and Column 2 are both Managed Metadata fields. You first group by Column 1, then by Column 2. This is likely to impact performance of the page).
Sorting, filtering, and grouping
You can combine grouping with sorting and filtering your data. It's best to first pick the column you want to group by, and then set up filtering and sorting. When you set up grouping, you specify ascending or descending order, so there's no need to also create a sort on the same field. However, you may want to create a filter on your groups to narrow down the number of groups.
To learn how to sort a view, see Use sorting to modify a SharePoint view.
To learn how to filter a view, see Use filtering to modify a SharePoint view.
We're listening
Was this article helpful? If so, please let us know at the bottom of this page. If it wasn't helpful, let us know what was confusing or missing. Please include your SharePoint, operating, and browser versions you're using. We'll use your feedback to double-check the facts, add info, and update this article.


