
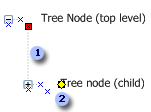
There are two tree node shapes on the Common Controls stencil: Tree node (top level) and Tree node (child). To build a tree structure, connect child shapes to top level shapes.
Tree node (top level)
There are three connection points 
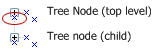
Connect a Tree node (child) shape to this connection point to create a sibling node.
Connect a Tree node (child) shape to this connection point to create a child node.

Connect a Small icons shape to this connection point to add an icon to the node.
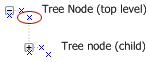
Tree node (child)
The Tree node (child) shape has extension lines that trace a path to the nodes they're connected to. Use the control handle 


Special features
-
To adjust the spacing between two nodes, select one of the shapes and drag the control handle.
-
To hide or show the branch lines, right-click the shape and click Show Branch Lines.
Note: If you don't see the branch lines in your drawing, try turning off the grid by clicking Grid on the View menu.
Right-click commands
-
Collapsed (+) indicates that there are nodes hidden under this one.
-
Expanded (-) indicates that all the nodes directly under this one are visible.
-
Non-expanded (no +/-) indicates that there are no nodes under this one.
-
Make Room for Icon leaves room to glue a Small icon shape to the connection point directly left of the node.
-
Show Branch Lines hides or shows the faint lines that connect the child shapes to the top-level shapes.
Notes:
-
If there isn't room for an icon or you don't see the connection point, right-click the shape and check the Make Room for Icon box.
-
If the tree node is Expanded (-), choose an Open folder for the node. If it's Collapsed (+), choose a Closed folder.
-


