
In SharePoint or the Microsoft Lists app, export list items shown in the current view to Excel so that you can work with the data in a workbook.
You can export to either:
-
Excel workbook The data has a one-way connection to the original list. Periodically refreshing the workbook pulls in changes that have been made in the list.
-
CSV (comma-separated values)file It can be opened in Notepad or Excel. The data is not connected to the original list. (On macOS, exporting to CSV is the only available option.)
Important:
-
The maximum number of rows you can export to a CSV file is 30,000.
-
You might have noticed ‘Export to CSV’ option enabled on document libraries for a brief period. The option was enabled unintentionally so we had to disable it. We would love to bring the capability to document libraries, and we are working on it but do not have any time estimate that can be shared.
-
Export to an Excel workbook
-
From the command bar of the list, select Export > Export to Excel.
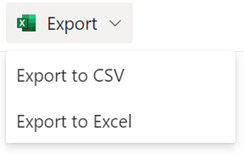
Important: The Export options are available only when list items are not selected.
Depending on your browser, you can save and open, or open the file directly.
Note: If you save the file, the default file name for the first copy is query.iqy, and it is placed in the default download folder for your browser. To change the name and location, use your browser's Save as.
-
If needed, select OK > Open after the file download begins.
-
If prompted and you trust the SharePoint site, in the Excel security page, select Enable.
-
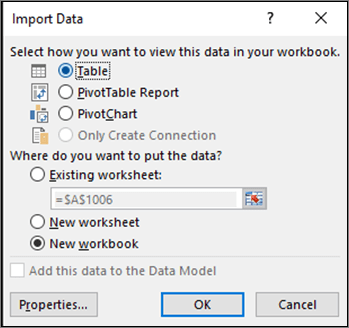
In the Excel Import Data dialog box, select the How you want to view this data and Where do you want to put the data options.
-
When done, select OK. The list should appear in Excel.

Excel creates an Excel table with a one-way data connection based on a web query file. To bring a fresh copy of the SharePoint list to Excel, select Refresh All on the Data tab. Changes made to Excel table will not be sent to the SharePoint list.
If your SharePoint list contains folders, the folder structure does not appear in the resulting Excel table. However, the Item Type and Path columns are added to the Excel table so you can filter and sort the data, based on its type and location or subfolder of the list.
Export to a CSV file
When exporting to CSV, you can export a maximum of 30,000 rows of data.
-
Open the list whose data you want to export.
-
From the command bar above the list, select Export > Export to CSV as the type of data output.
(On macOS, from the command bar above the list, simply select Export to CSV.)
Note: The Export option is available only when list items are not selected.
-
Select Open to open the file in Excel. Then you can save the file as an Excel workbook, which allows you to add format the data as you like.
Alternatively, select Save as to save the file in .csv format on your computer.
-
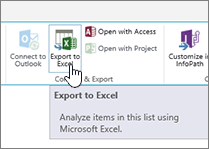
From the command bar of the SharePoint list, select Export to Excel
Important: Export to Excel is available only when list items are not selected.
The classic SharePoint experience shows a ribbon above the list, not a command bar. Select the List tab on the ribbon, and then select Export to Excel.
Depending on your browser, you can save and open, or open the file directly.
Note: If you save the file, the default file name for the first copy is query.iqy, and it is placed in the default download folder for your browser. To change the name and location, use your browser's Save as.
-
If needed, select OK > Open after the file download begins.
-
If prompted and you trust the SharePoint site, in the Excel security page, select Enable.
-
In the Excel Import Data dialog box, select the How you want to view this data and Where do you want to put the data options.
-
When done, select OK. The list should appear in Excel.
Excel creates an Excel table with a one-way data connection based on a web query file. To bring a fresh copy of the SharePoint list to Excel, select Refresh All on the Data tab. Changes made to the Excel table will not be sent to the SharePoint list.
If your SharePoint list contains folders, the folder structure does not appear in the resulting Excel table. However, the Item Type and Path columns are added to the Excel table so you can filter and sort the data, based on its type and location or subfolder of the list.
Additional resources
To export data from Excel to SharePoint, see:


