
When a text box or AutoShape contains more text than it can display, Publisher stores the extra text in overflow. You can move your text out of overflow and back into your publication by moving text into another text box, fitting text automatically, enlarging the text box, changing the text size, changing the margins within the text box, or deleting some of the text in the text box.
Move text from the overflow into another text box
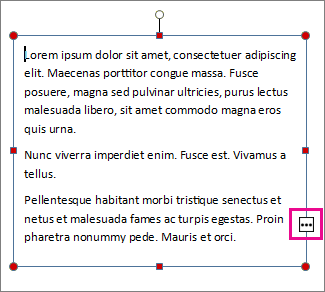
When a text box has too much text, a little box with ellipses appears in the lower right of the text box. You can link text boxes so that the overflow text flows from one box to another.
-
Create a new text box:
-
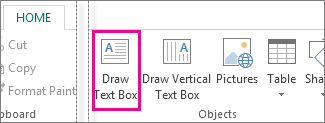
Click Home > Draw Text Box, and drag the cross shaped cursor to draw a box where you want text.
-
-
Click the overflow indicator and your cursor becomes a pitcher.

-
Move to the new text box and click.
The overflow text will appear in the new text box.
Now as you add text, words flow from one text box to another. If you run out of room in the second box you can link to another text box, and the text will flow through all three boxes.
Fit text automatically
-
Click anywhere in the text.
-
On the Text Box Tools Format tab, click Text Fit, and do one of the following:
-
To reduce the point size of text until there is no text in overflow, click Shrink Text on Overflow.
-
To shrink or expand text to fit in the text box when you resize the box, click Best Fit.
-
Make the text box or AutoShape larger
-
Click the object to select it.
-
Position the mouse pointer over one of the handles until you see the Resize pointer

-
Do one of the following:
-
To resize the object proportionally, select a corner handle, and hold down Shift, and then proceed to step 4.
-
To stretch the object, select a top, bottom, or side handle, and then proceed to step 4.
-
-
Hold down the mouse button and drag the handle to resize the object.
Change the text size
-
Do one of the following:
-
To change the text size for a single word, place the insertion point within that word.
-
To change the text size for several words or a few characters, highlight the text to select it.
-
-
On the Text Box Tools Format tab, enter a size in the Font Size box

Note: You can type font sizes that are different from those listed in the Font Size box, to a precision of 0.1 pt. For example, you can type a font size of 9.3 pt.
Change the margins within a text box or AutoShape
-
Right-click the text box.
-
On the menu, click Format text box. The Format Text Box dialog box appears.
-
Click the Text Box tab.
-
Under Text Box Margins, enter the settings for the left, right, top, and bottom margins.
Delete some of the text
-
Select the text.
-
Press Delete.
Move text from the overflow into another text box
-
If needed, create a new text box:
-
On the Objects toolbar, click Text Box

-
In your publication, click where you want one corner of the text to appear, and then drag diagonally until you have the box size you want.
-
-
Click in the text box with the overflow.
-
On the Connect Text Boxes toolbar, click Create Text Box Link

The mouse pointer changes to a pitcher
-
Click in the text box you want as the next in the story.
This text box is now connected to the first box and any text in the overflow now appears in the next box.
-
To connect more text boxes to the story, repeat steps 3 and 4.
Fit text automatically
-
Click anywhere in the text.
-
On the Format menu, point to AutoFit Text, and do one of the following:
-
To reduce the point size of text until there is no text in overflow, click Shrink Text on Overflow.
-
To shrink or expand text to fit in the text box when you resize the box, click Best Fit.
-
Make the text box or AutoShape larger
-
Click the object to select it.
-
Position the mouse pointer over one of the handles until you see the Resize pointer
-
Do one of the following:
-
To resize the object proportionally, select a corner handle, and hold down SHIFT, and then proceed to step 4.
-
To stretch the object, select a top, bottom, or side handle, and then proceed to step 4.
-
-
Hold down the mouse button and drag the handle to change the object.
Change the text size
-
Do one of the following:
-
To change the text size for a single word, place the insertion point within that word.
-
To change the text size for several words or a few characters, highlight the text to select it.
-
-
On the Formatting toolbar, enter a size in the Font Size box
Note: You can type font sizes that are different from those listed in the Font Size box, to a precision of 0.1 pt. For example, you can type a font size of 9.3 pt.
Change the margins within a text box or AutoShape
-
Right-click the text box or AutoShape.
-
On the shortcut menu, click Format <object type>.
-
Click the Text Box tab.
-
Under Text Box Margins, enter the settings for the left, right, top, and bottom margins.
Delete some of the text
-
Select the text.
-
Press Delete.


