
Note: This article has done its job, and will be retiring soon. To prevent "Page not found" woes, we're removing links we know about. If you've created links to this page, please remove them, and together we'll keep the web connected.
By default, lines that you draw in a document are blue, and shapes that you insert into a document have blue borders and a blue fill. You can change the default line color, shape border, or fill color of any lines and shapes that you insert into the current document or for all new documents.
Set default line and shape properties for the current document
You can set the default line and shape colors for every new line or shape that you insert into a document.
-
Select the line or shape in your document.
-
On the Shape Format tab, select the fill color, line color, or effects that you want. (The following screen shot shows the options that are available when you select a line.)
-
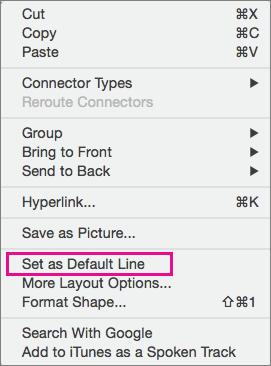
Control + Click the line or shape, and then click Set as Default Line or Set as Default Shape.

Set default line and shape properties for future documents
You can customize the Normal template and change the default line and shape colors for every line or shape that you insert into any new document. Changing the properties of any line or shape changes the properties for all lines or shapes, regardless of type.
Important: If you make extensive changes to your Normal template, we recommend that you periodically back up the file. To back up your Normal template, copy the file and rename it, or copy it to another location.
-
On the File menu, click Open.
-
In the dialog box that opens, browse to the folder /username/Library/Group Containers/UBF8T346G9.Office/User Content/Templates/, and then double-click Normal.dotm.
The Normal template opens.
Tip: If you are using Mac OS X 10.7 (Lion), the Library folder is hidden by default. To browse to the Library folder from the Open dialog box, press COMMAND + SHIFT + G, and in the Go to folder box, type ~/Library.
-
Click Insert > Shapes, and then choose a line or shape.
-
In the document, click and drag to draw a line or a shape.
-
On the Shape Format tab, select the fill color, line color, or effects that you want.
-
Control + Click the line or shape, and then click Set as Default Line or Set as Default Shape.
-
Delete the line or shape that you just inserted.
-
Save and close the Normal template.
Every time you create a new, blank document, the line or shape will have the properties that you just set.
See also
Set default line and shape properties for the current document
You can set the default line and shape colors for every new line or shape that you insert into a document.
-
Select the line or shape.
-
Click the Format tab, and then under Shape Styles, select the fill color, line color, or effects that you want.
-
Press CONTROL, click the line or shape, and then click Set as Default Line or Set as Default Shape.

Set default line and shape properties for future documents
You can customize the Normal template and change the default line and shape colors for every line or shape that you insert into any new document. Changing the properties of any line or shape changes the properties for all lines or shapes, regardless of type.
Important: If you make extensive changes to your Normal template, we recommend that you periodically back up the file. To back up your Normal template, copy the file and rename it, or move it to another location.
-
On the File menu, click Open.
-
In the Open dialog box, browse to the folder /Users/ username/Library/Application Support/Microsoft/Office/User Templates/, double-click Normal.dotm.
The Normal template opens.
Tip: If you are using Mac OS X 10.7 (Lion), the Library folder is hidden by default. To browse to the Library folder from the Open dialog box, press COMMAND + SHIFT + G, and in the Go to folder box, type ~/Library.
-
On the Home tab, under Insert, click Shape, and then choose a line or shape.
-
In the document, click and drag to draw a line or a shape.
-
Click the Format tab, and then under Shape Styles, select the fill color, line color, or effects that you want.
-
Press CONTROL, click the line or shape, and then click Set as Default Line or Set as Default Shape.
-
Delete the line or shape that you just inserted.
-
Save and close the Normal template.
Every time you create a new, blank document, the line or shape will have the properties that you just set.


