
You can set an Open Document Format (ODF) file as the default file template for a document library. This way, when someone creates a new file in the library, the file opens and saves as an ODF file. People can use a program of their choice to edit the new file.
You can also specify other settings or provide default content that appears in every new file, such as a preferred outline for a marketing campaign proposal or an official disclaimer in a page footer.
To set up multiple templates for a library, you need to create site content types and hook those up to the library, rather than use the default template for the library.
Note: You need Full Control permission to set up a template for a document library. You need Full Control permission for the site to set up site content types.
What do you want to do?
Learn about file templates in a document library
Where the file templates are stored in the library
When a document has a default file template, it's stored in the Forms folder of the library.
Open the library in File Explorer to see the Forms folder which contains the file template for the library. Make sure you're showing hidden files in File Explorer (In File Explorer, click View > Hidden items.)
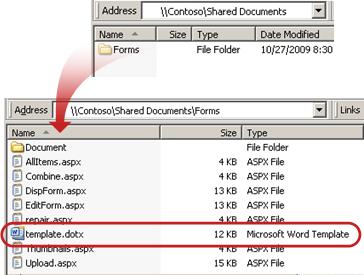
By default, a document library has a file template, called template.dotx, but you can change this file if you need to. To specify a different template, you need to first create it in a program that is compatible with SharePoint, such as Word, and then save it to the Forms folder of a library. Then, you specify the address of the custom template in the advanced library settings.
Using content types to set up document library templates
You don't necessarily need to use content types if all you want is a custom template for one library. In that case, you just change the default file template for an existing library. You should consider using site content types, though, if you want to reuse the same template in multiple libraries.
For existing libraries with multiple content types already enabled and templates specified for those content types, you need to customize the site content types for the library. That's because the library uses the templates that are specified by the content types, and not the default file template.
If you want to use multiple templates for the same library, you need to use content types. For new libraries, create the library (Settings > Add an App > Document Library) and then set up multiple custom templates for the library.
Create a document library
If you don't already have a document library, follow these instructions to create one.
-
On the site where you want to create the library, click Settings

-
Click Document Library and enter a name for the library.
Note: The library name is required and appears at the top of the library page, becomes part of the address for the library page, and appears in navigational elements that help users to find and open the library.
Create an ODF template
You can create an ODF file from any program that is compatible with ODF. To create an ODF template from a Microsoft Office program, create or open a file and then save the file as an OpenDocument file type. For example, with a file open in Word, click File > Save As, choose the location where you want to save to, and then set the Save as type to OpenDocument Text (*.odt).
Change the default file template for a document library
There are two ways you can change the default template:
-
If your document library has a default file template for a program compatible with SharePoint, then you can edit the default template.
-
For other programs, you cannot directly edit the default template, but you can copy a new template file to the Forms folder of the library to specify a custom template.
Edit the default file template
-
In the library where you want to edit the default template, click Library > Library Settings.
-
Under General Settings, click Advanced settings.
-
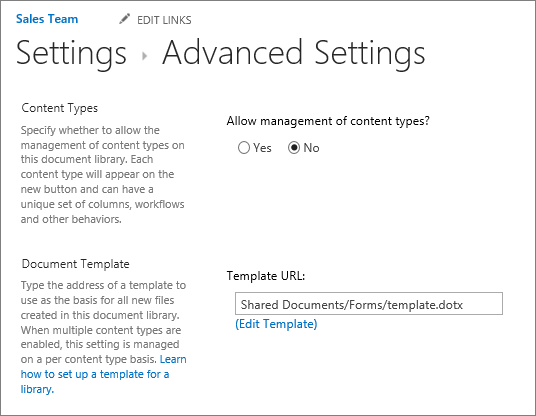
In the Document Template section, under the Template URL field, click Edit Template.
The template opens in an application that is compatible with SharePoint and that is associated with the file type of the current template. For example, Word opens if the default template is a Word template, or Excel opens if the default template is an Excel worksheet.
Note: If your site is a part of a Microsoft 365 subscription, you may be asked to enter your Microsoft 365 user name and password.
-
Make the changes that you want, and then save the template. Close the program if you no longer need it open, or switch to your site.
-
In your site, at the bottom of the Document Library Advanced Settings page, and click OK.
Specify a custom file template
-
Create and save your custom template in a program that is compatible with SharePoint. Make note of its location, and then switch to SharePoint.
-
Go to the library where you want to specify a custom template.
-
Click Library > Open with Explorer.
Important: If File Explorer doesn't open or you see an error message, you may have to add your site as a Trusted site in your browser settings. For more information, see the topic How to use the "Open with Explorer" command and how to troubleshoot issues with this option in SharePoint in Microsoft 365.
-
Open another File Explorer and browse to the custom template that you created.
-
Copy or drag your custom template to the Explorer window that's open to the site library where you want to specify the custom template.
-
Close File Explorer and return to the library on the site.
-
Click Library >Library Settings.
-
Under General Settings, click Advanced settings.
-
In the Document Template section, type the address of your custom template in the Template URL box. The location is the Web address of the template on the site, relative to the name of the site. For example, if your template is called ODT_Document.odt, and you add it to the Forms folder of the Shared Documents, document library, you would type the following:
Shared Documents/Forms/ODT_Document.odt
Note: If the settings in the Document Template box are not available, an administrator may have set up multiple content types. To see whether multiple content types are enabled, verify that Yes is selected under Allow management of content types? in the Content Types section immediately above the Document Templates section. If it is, you must edit the template for the content type.
Set up multiple custom templates for a library by using site content types
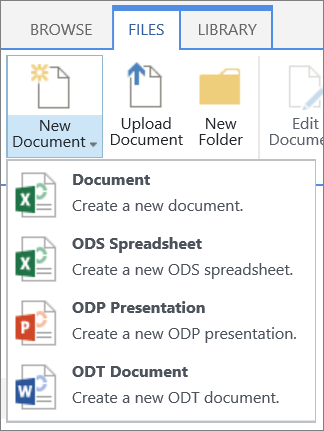
Most libraries can contain multiple content types. By defining multiple content types for a library, you can make it easy to build libraries that store different types of documents together in one place. For example, a library can contain both the documents and the graphics related to a project. In the library, the graphic files are listed with the columns of information assigned to the graphics content type and the documents are listed with the columns assigned to the document content type.
Site content types help make it easy to provide consistency across a site. As a site owner, you set up the content type with the characteristics that you want, such as a certain template, specific metadata, and so on. Then, you associate the site content type with the library so that when a user chooses an item from the New Document menu, they are using the content type that you defined.
To make sure that ODF documents have consistent content across a site and its subsites, you can associate an .odt, .ods, or .odp template with a site content type.
Create an ODF site content type
Repeat these steps for each site content type that you want to create.
Important: To create site content types for a site, you must have Full Control for that site. To create site content types for the top-level site in a site collection, you must be a site collection administrator.
-
Go to the site for which you want to create a site content type.
-
Click Settings

-
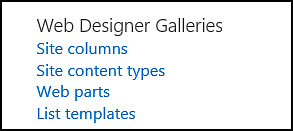
Under Web Designer Galleries, click Site content types.
The Site Content Types gallery shows all the existing site content types, grouped in categories. Use the Show Group list to filter the view of content types.
-
Click Create.
-
On the New Site Content Type page, provide a name (for example, ODT_Document) and a description for the new content type.
-
In the Parent Content Type section, under Select parent content type form, select Document Content Types, and then under Parent Content Type, choose Document.
-
In the Group section, select Document Content Types from the Existing group list.
-
Click OK.
The Site Content Type page opens. Your next step is to associate an ODF document template with the site content type you just created.
Associate an ODF document template with a site content type
After you create your ODF content type, you're ready to associate the ODF template you created with the site content type. If you don't have a template yet, see Create an ODF template.
-
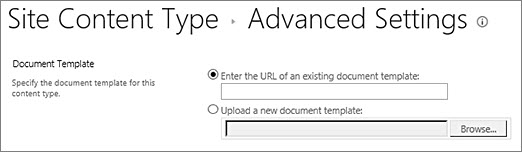
On the Site Content Type page, under Settings, click Advanced settings.
If you weren't already on the Site Content Type page, click Settings > Site Settings > Site content types to go there.
-
Enter the location of the template:
-
If the template is stored on your site, click Enter the URL of an existing document template, and then type the URL for the template that you want to use.
-
If the document template is stored on your local computer, click Upload a new document template, and then click Browse. In the Choose File dialog box, locate the file that you want to use, select it, and then click Open.
-
-
Under Update all content types inheriting from this type?, click Yes if you want to update all content types that inherit from this content type with the document template.
-
Click OK.
Turn on multiple content types in a library
Before you can add different kinds of content types to a library, you need to turn on support for multiple content types. You do this once for each library where you want to use content types.
Note: You can’t enable multiple content types in a wiki library.
-
In the library where you want to enable multiple content types, click Library > Library settings.
-
On the Settings page, under General Settings, click Advanced Settings.
-
On the Advanced Settings page, in the Content Types section, click Yes under Allow management of content types?.
The Template URL in the Document Template section will now be grayed to switch from using a default template for this library to using site content types.
-
Change any other settings that you want, and then click OK.
Add ODF content types to a library
The last step is to add the ODF content types to the library. You can add multiple content types to the library all at the same time.
-
In the library where you want to add the content type, click the Library > Library Settings.
-
On the Settings page, under Content Types, click Add from existing site content types.
-
In the Select Content Types section, in the Select Site content types from list, select Document Content Types.
-
In the Available Site Content Types list, click the names of the content type that you want, and then click Add to move the selected content type to the Content types to add list.
-
When you finish selecting all of the content types that you want to add, click OK.
More information about site content types and libraries
To learn more about content types and how they work with libraries, see the following links:


