
When you need to protect the privacy of an email message, encrypt it. Encrypting an email message in Outlook means it's converted from readable plain text into scrambled cipher text. Only the recipient who has the private key that matches the public key used to encrypt the message can decipher the message for reading. Any recipient without the corresponding private key, however, sees indecipherable text.
A digital signature on an e-mail message helps the recipient verify that you are the authentic sender and not an impostor. To use digital signatures, both the send and recipient must have a mail application that supports the S/MIME standard. Outlook supports the S/MIME standard.
Outlook supports two encryption options:
-
S/MIME encryption - To use S/MIME encryption, the sender and recipient must have a mail application that supports the S/MIME standard. Outlook supports the S/MIME standard.
-
Microsoft 365 Message Encryption (Information Rights Management) - To use Microsoft 365 Message Encryption, the sender must have Microsoft 365 Message Encryption, which is included in the Office 365 Enterprise E3 license.
Send an encrypted message
Encrypting with S/MIME
Before you start this procedure, you must first have added a certificate to the keychain on your computer. For information about how to request a digital certificate from a certification authority, see Mac Help. You must also have a copy of each recipient's certificate saved with the contacts' entries in Outlook. For information about how to add your contacts' certificates to Outlook, see Import, export, or remove a certificate for a contact.
If your recipient is listed on an LDAP directory service, such as the global address list (GAL) used by Microsoft Exchange Server, the recipient's certificate is published to the directory service and available to you together with other contact information.
If your recipient is listed on an LDAP directory service, the recipient's certificate is published to the directory service and available to you together with other contact information.
-
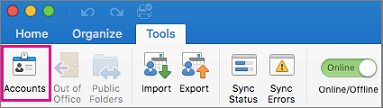
On the Tools menu, click Accounts.
-
Click the account that you want to send an encrypted message from, and select Advanced > Security.
-
In Certificate, select the certificate that you want to use. You'll only see those certificates that you've added to the keychain for your Mac OSX user account and those certificates that are valid for digital signing or encryption. To learn more about how to add certificates to a keychain, see Mac Help.
-
Click OK, and then close the Accounts dialog box.
-
If you are a Microsoft 365 subscriber, and on build 16.19.18110915 and higher,
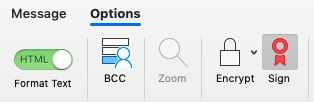
In an email message, choose Options, select Encrypt and pack Encrypt with S/MIME option from the drop-down.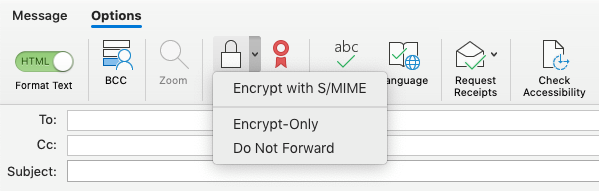
-
For Outlook for Mac 2019
In an email message, select Options > Security > Encrypt Message.
-
Finish composing your message, and then click Send.
Note: When you send an encrypted message, your recipient's certificate is used to encrypt his or her copy of the message. Your certificate is used to encrypt the copy that is saved to your Sent Items or Drafts folder in Outlook.
Encrypting with Microsoft 365 Message Encryption
-
If you are a Microsoft 365 subscriber, and on build 16.19.18110915 and higher,
In an email message, choose Options, select Encrypt and pick the encryption option that has the restrictions you'd like to enforce, such as Do Not Forward or Encrypt-Only.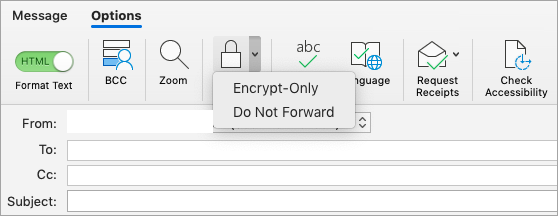
Note: Microsoft 365 Message Encryption is part of the Office 365 Enterprise E3 license. Additionally, the Encrypt-Only feature (the option under the Encrypt button) is only enabled for subscribers (Microsoft 365 Apps for enterprise users) that also use Exchange Online.
-
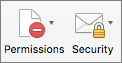
For Outlook for Mac 2019
In an email message, select Options > Permissionsand pick the encryption option that has the restrictions you'd like to enforce, such as Do Not Forward.Note: The Encrypt-Only feature is not enabled in these versions of Outlook for Mac.
Send a digitally signed message
Before you start this procedure, you must have added a certificate to the keychain on your computer. For information about how to request a digital certificate from a certification authority, see Mac Help.
-
On the Tools menu, click Accounts.
-
Click the account that you want to send a digitally signed message from, and select Advanced > Security.
-
In Certificate, select the certificate that you want to use. You'll only see those certificates that you've added to the keychain for your Mac OSX user account and those certificates that are valid for digital signing or encryption. To learn more about how to add certificates to a keychain, see Mac Help.
-
Do any of the following:
To make sure that your digitally signed messages can be opened by all recipients, even if they do not have an S/MIME mail application and can't verify the certificate, select Send digitally signed messages as clear text.
To allow your recipients to send encrypted messages to you, make sure that you've selected your signing and encryption certificates, and then select Include my certificates in signed messages.
-
Click OK, and then close the Accounts dialog box.
-
If you are a Microsoft 365 subscriber, and on build 16.19.18110402 and higher ,
In an email message, choose Options and select Sign.
For Outlook for Mac 2019
In an email message, select Options > Security > Digitally Sign Message.
-
Finish composing your message, and then click Send.
See Also
Secure messages by using a digital signature in Outlook for PC


