
If you want users to be able to insert pictures in a Microsoft Office InfoPath form, you can use a picture control in your form template. A picture control allows users to insert a picture into a designated area on the form. The picture data is then saved in the underlying form (.xml) file. The pictures that users insert into a picture control can be any type of picture that Windows Internet Explorer can display.
In this article
When to use a picture control
Use a picture control when you want to:
-
Add an blank spot on your form template where users can insert pictures, including photos, clip art, and drawings.
-
Add a permanent picture to your form template that can't be replaced or deleted, such as a corporate logo.
-
Add a temporary picture to your form template that can be deleted or replaced by the user, such as a placeholder photo.
-
Save picture data as encoded data in user form (.xml) files. InfoPath uses base64 encoding to encode and decode binary files, such as .gif or .jpg files.
-
Save picture data as a hyperlink reference in user form (.xml) files.
-
Display images on your form template that are retrieved from a database or other external data source.
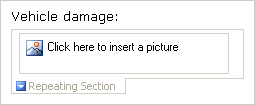
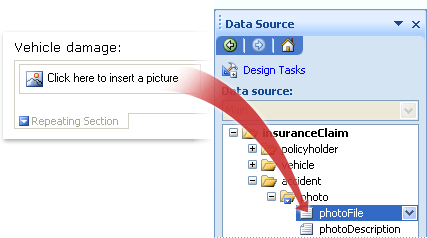
In the following illustration, a picture control is used on an insurance claim form template to collect photos of vehicle damage from policy holders. The form designer has placed the picture control inside a repeating section so that users can add as many photos as necessary to their forms.
When you add a picture control to your form template, InfoPath inserts an empty picture control by default. Users can add a picture to the empty picture control when they fill out forms that are based on your form template. If you want, you can specify a default picture instead of leaving the picture control empty. You can also specify whether users can browse through, delete, or replace pictures that you insert into a picture control.
Related controls
InfoPath includes controls that are similar to picture controls but that serve different purposes. To decide which of these controls works best on your form template, refer to the following list:
Ink picture control An ink picture control looks and acts like a picture control. However, an ink picture control allows users to create drawings or sketches with a tablet pen by using a Tablet PC and does not allow users to insert photos or other pictures. Both controls are capable of storing base64 encoded data in the underlying XML. However, a picture control can also store picture data as a hyperlink in the XML.
File attachment control If you want users to be able to attach documents, worksheets, presentations, and other files to their forms, you can use a file attachment control instead of a picture control.
Rich text box If your form template contains rich text box controls, and if you have enabled full rich-text formatting, users can add pictures inside those rich text boxes.
The user experience
Depending on the design of your form template, when you insert a picture control, users will see either a default picture (specified by you) or a picture icon and the hint text Click here to insert a picture. In the following example, users who are filling out an insurance claim form can click a picture control to insert photos of the vehicle. In this example, the form designer placed the picture control inside a repeating section in order to collect multiple photos from the user.

When users click in the picture control, they can browse for a picture by using the Insert Picture dialog box. When they insert a picture file, the picture control is resized automatically to accommodate that picture's dimensions.
Compatibility considerations
When you design a form template in InfoPath, you can choose to design a browser-compatible form template. When you design a browser-compatible form template, picture controls are unavailable in the Controls task pane because they cannot be displayed in a Web browser.
If you want users to be able to insert pictures in a browser-enabled form template, you can host InfoPath as a Microsoft ASP.NET form control on a Web page and write server-side code to insert the picture in the form template's XML as base64 encoded data. Alternatively, you can use a rich text box on your browser-compatible form template that enables users to insert linked images. This allows you to save the picture data as a hyperlink in the underlying XML.
Insert a picture control
The procedure for inserting a picture control differs slightly depending on whether you are designing a new, blank form template or basing the design of your form template on a database or other external data source.
The following illustration shows how an empty picture control looks when it is selected in design mode.
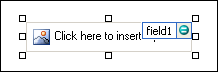
Controls can be bound or unbound. When a control is bound, it is connected to a field or group in the data source so that data entered into the control is saved in the underlying form (.xml) file. When a control is unbound, it is not connected to a field or group, and data entered into the control is not saved. When you select or move your pointer over a control, text and a binding icon appear in the upper-right corner of the control. The text indicates the group or field to which the control is bound in the data source. The icon indicates whether the control is correctly bound to that group or field. When the binding is correct, a green icon appears. If there's something wrong with the binding, you'll see a blue or red icon instead.
The data source for the form template consists of fields and groups that appear in a hierarchical view in the Data Source task pane. Picture controls are always bound to fields. In the following example, the picture control on the form template is bound to the photoFile field in the Data Source task pane.
Insert a picture control on a new, blank form template
When you design a new, blank form template, the Automatically create data source check box in the Controls task pane is selected by default. This enables InfoPath to automatically create fields and groups in the data source as you add controls to the form template. These fields and groups are represented by folder and file icons in the Data Source task pane.
-
On the form template, place the cursor where you want to insert the control.
-
If the Controls task pane is not visible, click More Controls on the Insert menu, or press ALT+I, C.
-
Under Insert controls, click Picture.
-
In the Insert Picture Control dialog box, do one of the following:
-
To save the picture data in the user's form, click Included in the form. When you select this option, InfoPath uses the Picture or File Attachment (base64)data type for the picture control, and the picture data is encoded in the underlying form (.xml) files. Including the picture in the form is a good choice if you want to keep the form and its data portable.
-
To display a picture that is linked to, but not saved with, the user's form, click As a link. When you select this option, InfoPath uses Hyperlink (anyURI) as the data type for the picture control, and the picture data is stored as a hyperlink in the underlying form (.xml) files. Linking to a picture is a good choice if you think that users will need to update the linked picture, or if you want to reduce the file size of the user's form.
Note: When viewing linked images on a form, users must have access to the location of the picture source file. Otherwise, the picture will not appear on the form.
-
-
By default, a picture control with Click here to insert a picture placeholder text is inserted on the form template.
-
If you chose to include the picture data in your users' forms in step 4, you can specify a background picture.
How?
-
Double-click the picture control on your form template.
-
Click the Data tab.
-
Under Binding on the Data tab, click Specify default picture, and then click Browse.
Note: This option is not available if you chose As a link earlier in this procedure.
-
In the Insert Picture dialog box, click the picture that you want.
-
-
To add a label to the control, type text above or to the left of the control, followed by a colon (:).
Insert a picture control on a form template that is based on an existing data source
If you base the design of your form template on an existing Extensible Markup Language (XML) file, database, or Web service, InfoPath derives the fields and groups in the Data Source task pane from that existing data source. In this scenario, you can insert a picture control by dragging a field from the Data Source task pane onto the form template or by inserting a picture control from the Controls task pane instead, as described in the following procedure:
-
On the form template, place the cursor where you want to insert the control.
-
If the Controls task pane is not visible, click More Controls on the Insert menu, or press ALT+I, C.
-
Under Insert controls, click Picture.
-
In the Insert Picture Control dialog box, do one of the following:
-
To save the picture data in the form, click Included in the form. When you select this option, you must bind the picture control to a field with a Picture or File Attachment (base64) data type.
-
To display a picture that is linked to, but not saved with, the form, click As a link. When you select this option, you must bind the picture control to a field with the Hyperlink (anyURI) data type.
-
-
In the Picture Binding dialog box, select the field in which you want to store the picture control data, and then click OK.
By default, a picture control with Click here to insert a picture placeholder text is inserted on the form template.
-
If you chose to include the picture data in your users' forms in step 4, you can specify a default picture that appears inside the control.
How?
-
Double-click the picture control on your form template.
-
Click the Data tab.
-
Under Binding, click Specify default picture, and then click Browse.
Note: This option is not available if you bound the picture control to a field with the Hyperlink (anyURI) data type earlier in this procedure.
-
In the Insert Picture dialog box, click the picture that you want.
-
-
To add a label to the control, type text above or to the left of the control, followed by a colon (:).
Layout tips
Use the following tips to help you refine the appearance, size, and other aspects of your picture control:
-
Using a layout table for arrangement purposes is always a good idea, no matter what type of control you happen to be working with.
-
Inserting a picture control inside a scrolling region can be useful when you want a fixed region on your form template that will scroll to accommodate large pictures.
-
To change the width of several picture controls at once, select the controls whose size you want to change, press ALT+ENTER, click the Size tab, and then in the Width box, type a new number.
-
To change the border or color of a picture control, select it on the form template, on the Format menu, click Borders and Shading, and then make the necessary adjustments.


