
You can add lines to connect shapes or use lines to point to pieces of information, and you can delete lines.
Notes:
-
For information about drawing shapes, see Draw or edit a freeform shape.
-
If you're having trouble deleting a horizontal line, see Delete lines or connectors below.
Draw a line with connection points
A connector is a line with connection points at each end that stays connected to the shapes you attach it to. Connectors can be straight 


Important: In Word and Outlook, connection points work only when the lines and the objects they are connecting are placed on a drawing canvas. To insert a drawing canvas, click the Insert tab, click Shapes, and then click New Drawing Canvas at the bottom of the menu.
To add a line that connects to other objects, follow these steps.
-
On the Insert tab, in the Illustrations group, click Shapes.

-
Under Lines, click the connector that you want to add.

Note: Under Lines, the elements highlighted in the illustration above are connectors. The last three styles listed (Curve, Freeform Shape, and Scribble) are not connectors. Rest your pointer over each style to see its name before clicking it.
-
To draw a line connecting shapes, on the first shape, rest your mouse pointer over the shape or object to which you want to attach the connector.
Connection dots will appear, indicating that your line can be connected to the shape. (The color and style of these dots vary among different versions of Office.)
Note: If no connection points appear, you've either chosen a line style that is not a connector, or you are not working on a drawing canvas (in Word or Outlook).
Click anywhere on the first shape, and then drag the cursor to a connection dot on the second connection object.
Note: When you rearrange shapes that are joined with connectors, the connectors remain attached to and move with the shapes. If you move either end of a connector, that end detaches from the shape, and you can then attach it to another connection site on the same shape or attach it to another shape. After the connector attaches to a connection site, the connector stays connected to the shapes no matter how you move each shape.
Draw a line without connection points
To add a line that is not connected to other objects, follow these steps.
-
On the Insert tab, in the Illustrations group, click Shapes.
-
Under Lines, click any line style you like.
-
Click one location in the document, hold and drag your pointer to a different location, and then release the mouse button.
Draw the same line or connector multiple times
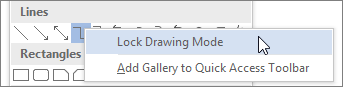
If you need to add the same line repeatedly, you can do so quickly by using Lock Drawing Mode.
-
On the Insert tab, in the Illustrations group, click Shapes.
-
Under Lines, right-click the line or connector that you want to add, and then click Lock Drawing Mode.
-
Click where you want to start the line or connector, and then drag the cursor to where you want the line or connector to end.
-
Repeat step 3 for each line or connector you want to add.
-
When you finish adding all of the lines or connectors, press ESC.
Add, edit, or remove an arrow or a shape on a line
-
Select the line you want to change.
To work with multiple lines, select the first line, and then press and hold Ctrl while you select the other lines. -
On the Format tab, click the arrow next to Shape Outline.

If you don't see the Format tab, make sure you selected the line. You might have to double-click the line. -
Point to Arrows, and then click the arrow style that you want.
To change the arrow type or size, or to change the type, width, or color of the line or arrow, click More Arrows, and then choose the options that you want.
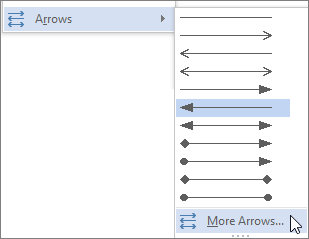
To remove an arrowhead, click the first style, Arrow Style 1 (no arrowheads).
Delete lines or connectors
-
Click the line, connector, or shape that you want to delete, and then press Delete.
If you want to delete multiple lines or connectors, select the first line, press and hold Ctrl while you select the other lines, and then press Delete.


