
Use crow’s foot notations to illustrate the relationship between entities in a crow’s foot diagram. Entities are connected by lines, and symbols at either end of the line describe the cardinality of the relationship between the entities.
Because they are widely used and utilize only four symbols, crow’s foot notation diagrams help you communicate complex relationships in an easy-to-use format.
Create the diagram and entities
-
In Visio, on the File menu, select New > Software, and then select Crow’s Foot Database Notation.
-
Choose either Metric Units or US Units, and select Create.
-
From the Crow’s Foot Database Notation stencil, drag an Entity shape onto the drawing page.
-
Drag another Entity shape onto the drawing page to create a second entity.
-
Drag a Relationship shape onto the drawing page to create the relationship line.
-
To connect the entities, drag the left end of the relationship line to the first entity, and glue it to an attribute, a connection point, or the entire entity. Drag the other end of the relationship line, and glue it to the second entity.
-
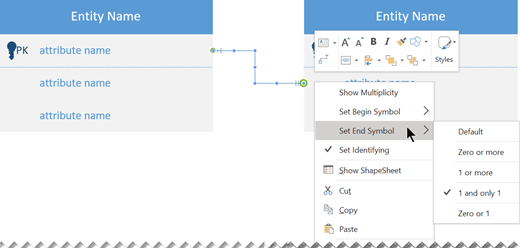
Set the cardinality symbols on both ends of the relationship line:
-
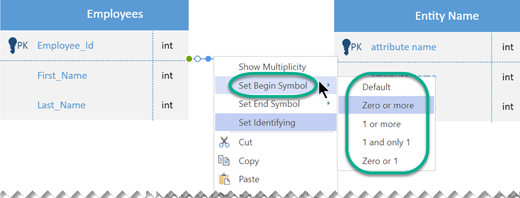
Right-click the relationship line, click Set Begin Symbol, and choose from the list. The default is Zero or more.
-
Right-click the relationship line again, click Set End Symbol, and choose from the list. The default is 1 and only 1.
-
You can adjust the width of an entity by selecting its border and then clicking and dragging its yellow handle. You can't manually adjust the height of an entity. The height is adjusted by the addition or subtraction of attributes:
-
To remove an unneeded attribute, select it and press Delete.
-
To add an attribute to an entity, drag an Attribute from the Shapes pane to the entity and then release the mouse key. Double-click the attribute name placeholder and enter a suitable name for the attribute.
Edit an entity's attributes
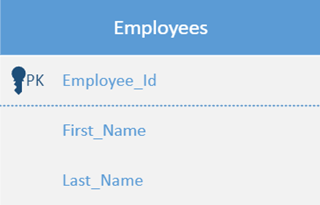
By default, the names of an entity's attributes are shown, but the type of each attribute is hidden from view.
You can change this setting for any entity:
-
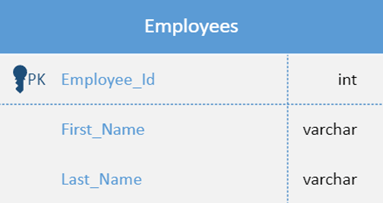
Right-click the entity and select Show Attribute Types.
-
To change the type, point at the type name and single-click twice. A gray box appears around the type name to indicate it's selected.
-
Enter the new type name. When you're done, press Esc (or click elsewhere on the entity) to save the change.
Change the appearance of the crow’s foot notation
-
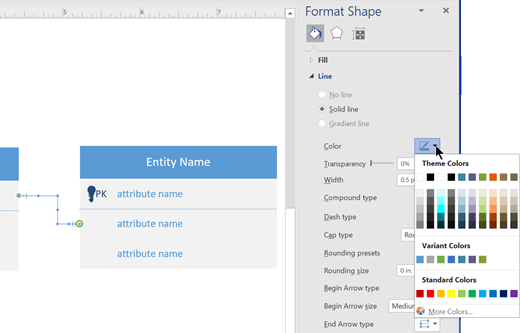
Right-click the relationship line, and click Format Shape.
-
Click Line in the right pane to expand the list.
-
To change the color of the relationship line, click the icon next to Color, and select a color.
-
Click Begin Arrow size or End Arrow size to change the size of the Begin and End symbols.

-
To add text, select the relationship line and type the text.
Note: Creating and editing crow's foot database notation diagrams on Visio for the web requires a Visio Plan 1 or Visio Plan 2 license, which is purchased separately from Microsoft 365. For more information, contact your Microsoft 365 admin. If your admin has turned on "self-service purchasing," you can buy a license for Visio yourself. For more details, see Self-service purchase FAQ.
Create the diagram and entities
-
Open Visio for the web and search for crow's foot.
-
Select the Crow's Foot Database Notation diagram.
-
In the dialog box, select either Metric Units or US Units.
-
Select Create.
-
The diagram opens. You should see the Shapes window next to the diagram. If you don’t see it, go to View > Task Panes and make sure that Shapes is selected. If you still don’t see it, click the Expand the Shapes window button on the left.
-
From the Crow’s Foot Database Notation stencil, drag an Entity shape onto the drawing page.
-
Drag another Entity shape onto the drawing page to create a second entity.
-
Drag a Relationship shape onto the drawing page to create the relationship line.
-
To connect the entities, drag the left end of the relationship line to the first entity, and glue it to an attribute, a connection point, or the entire entity. Drag the other end of the relationship line, and glue it to the second entity.
-
Set the cardinality symbols on both ends of the relationship line:
-
Right-click the relationship line, click Set Begin Symbol, and choose from the list. The default is Zero or more.
-
Right-click the relationship line again, click Set End Symbol, and choose from the list. The default is 1 and only 1.
-
You can adjust the width of an entity by selecting its border and then clicking and dragging its yellow handle. You can't manually adjust the height of an entity. The height is adjusted by the addition or subtraction of attributes:
-
To remove an unneeded attribute, select it and press Delete.
-
To add an attribute to an entity, drag an Attribute from the Shapes pane to the entity and then release the mouse key. Double-click the attribute name placeholder and enter a suitable name for the attribute.
Edit an entity's attributes
By default, the names of an entity's attributes are shown, but the type of each attribute is hidden from view.
You can change this setting for any entity:
-
Right-click the entity and select Show Attribute Types.
-
To change the type, point at the type name and single-click twice. A gray box appears around the type name to indicate it's selected.
-
Enter the new type name. When you're done, press Esc (or click elsewhere on the entity) to save the change.
Shapes available in crow's foot database notation
|
Shape |
Description |
|---|---|
|
Entity |
An object, a component of data. It can be uniquely identified by its attributes and therefore it's independent of any other entity in the schema. |
|
Entity With Attributes |
An object, a component of data. It can be uniquely identified by its attributes and therefore it's independent of any other entity in the schema. Includes a column for showing the data type of each attribute. |
|
Attribute |
A fact that describes an entity. Appears within the frame of the entity. |
|
Primary Key Attribute |
An attribute that uniquely identifies a particular entity. |
|
Primary Key Separator |
A horizontal line used to separate the primary key attribute from the other attributes of the entity. |
|
Relationship |
Indicates the association between two strong entities. Its name is a verb that briefly describes the association. After you glue the relationship to the entities, right-click it to set options such as whether it is an "Identifying" relationship, and to set the symbols at each end of the connecting line. |


Strong and weak entities
-
A strong entity has a primary key, meaning that it can be uniquely identified by its attributes alone.
-
A weak entity is an entity that can't be uniquely identified by its attributes alone. It is existence-dependent on its parent entity. It must use a foreign key in conjunction with its attributes to create a primary key. Typically, the foreign key is the primary key of a strong entity that the weak entity is related to.
The relationship between two strong entities is simply called a relationship.
The relationship between a strong entity and a weak entity is called a strong relationship.
Symbols in crow's foot notation
Crow's foot diagrams represent entities as boxes, and relationships as lines between the boxes. Different shapes at the ends of these lines represent the relative cardinality of the relationship.
Three symbols are used to represent cardinality:
|
A ring represents "zero" |
|
|
A dash represents "one" |
|
|
A crow's foot represents "many" or "infinite" |
|


These symbols are used in pairs to represent the four types of cardinality that an entity may have in a relationship. The inner element of the notation represents the minimum, and the outer element (closest to the entity) represents the maximum.
|
Description |
Symbol |
|---|---|
|
Ring and dash: Minimum zero, maximum one (optional) |
|
|
Dash and dash: Minimum one, maximum one (mandatory) |
|
|
Ring and crow's foot: Minimum zero, maximum many (optional) |
|
|
Dash and crow's foot: Minimum one, maximum many (mandatory) |
|


Tips for designing the diagram
-
Identify all the entities you need. Draw all of them in the diagram.
-
Determine which entities have relationships with each other, and connect them. (Not all entities will have relationships. Some may have multiple relationships.)
-
Each entity should appear only once in the diagram.
-
Look over the relationships you've drawn. Are there any redundant relationships? Are there any that are unnecessary or missing?


