
You can quickly draw P&IDs and PFDs by dragging process engineering equipment shapes onto your drawing page, connecting them with "smart" pipelines, and then dragging components, such as valves and instruments, onto the pipelines. To identify components in your diagram, you can create intelligent tags. You can add data to components in your diagrams and generate lists of equipment, pipelines, valves, and instruments. As you modify diagrams, you can easily generate new lists.
You can create:
-
Piping and instrumentation diagrams
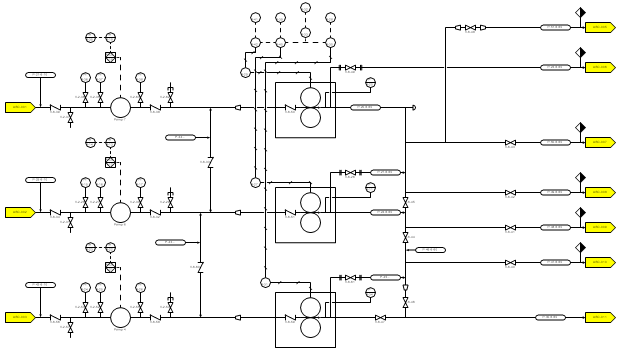
P&IDs show how industrial process equipment is interconnected by a system of pipelines. P&ID schematics also show the instruments and valves that monitor and control the flow of materials through the pipelines.
-
Process flow diagrams
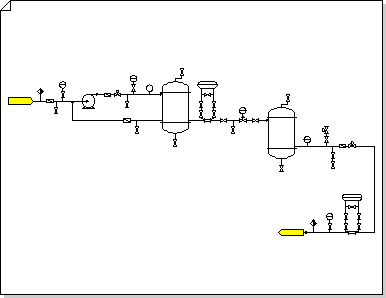
PFDs show how industrial process equipment is interconnected by a system of pipelines. A PFD is more conceptual than a P&ID, and usually includes more annotations that display data.
Create a piping and instrumentation diagram
-
In Visio, open any of the following templates:
-
Piping and Instrumentation Diagram
-
Process Flow Diagram
-
-
From any of the Equipment categories, drag equipment shapes onto the drawing page.
An intelligent tag number for each component appears on the diagram.
-
Use pipelines to connect major equipment.
-
Drag a pipeline shape from Pipelines onto your drawing page, and then position one of its endpoints on an equipment shape. You can connect a pipeline to any point on the outside of an equipment shape, even if the shape has no connection point there.
The endpoint of the pipeline turns green to indicate that it is connected (glued) to the equipment shape, and a connection point is created if one did not exist.
-
Drag the other endpoint to another equipment shape.
-
To change the appearance or show the flow direction of a pipeline, select the pipeline, and then select a style from the Line option on the ribbon (see Shape Styles group on the Home tab).
Styles control the thickness of the line, directional arrows, and other graphic symbols that indicate the type of pipe or instrument line.
Tip: You can also use the Connector

-
-
Add valve shapes.
-
From Valves and Fittings, drag valve shapes on top of pipelines. Release the mouse button when a green square appears, indicating that the valve is glued to the pipeline.
When a valve is added to the pipeline:
-
It automatically rotates to the same orientation as the pipeline.
-
It splits the pipeline into two identical pipelines, each of which is glued to the valve.
-
-
To delete a valve from a pipeline, select the valve and press DELETE.
When a valve is deleted, a single pipeline replaces the split pipeline.
-
-
From the Instruments category, drag instrument shapes onto the drawing page near the pipeline, valve, or equipment they monitor.
-
Reposition shapes in the diagram by dragging them.
-
You can now add data to components, or create and apply property sets. Follow these steps for more information:
Add data to components
-
On the Data tab, click Shape Data Window.
-
On the drawing page, select the shape to which you would like to add data.
-
Click in each shape data field, and type or select a value.
Create and apply property sets
-
Do one of the following:
-
To add the property set to shapes on a drawing, select the shapes.
-
To add the property set to shapes on a stencil, select the shapes on the stencil.
-
-
On the Data tab, click Shape Data Window.
-
Right-click on Shape Data Window and select Shape Data Sets.
-
Click Add, and then type a name for the shape data set.
-
Choose whether to create a new shape data set, a set based on the currently selected shape, or a set based on an existing shape data set, and then click OK.
-
To add or modify shape data, in the Shape Data Sets dialog box, select the shape data set and click Define.
-
In the Define Shape Data dialog box, make any necessary modifications.
-
Click OK.
-
-
Renumber components.
-
On the Process Engineering menu, click Renumber.
-
In the Renumber Components dialog box, under Apply to, select the option whether to renumber the components in the document, current page, or in the current selection.
-
In the Include tag formats list, clear the check boxes for the tag formats that you don't want to include in the renumbering.
Note: By default, all tag formats are selected.
-
Assign a starting value and an interval value for renumbering. You can assign a different start value and interval value to each tag format.
-
Click an item in the Include tag formats list to highlight it.
-
In the Starting value box, type or select the starting value for renumbering.
-
In the Interval box, type or select the increment used to renumber the components.
-
Repeat these steps for each tag format.
-
-
Click OK .
-
-
Generate lists or bills of materials of equipment, pipelines, valves, and instruments.
-
On the Review tab, click Shape Reports.
-
Follow these steps to create a custom report definition, or, skip to step c. to use an existing report definition.
The following steps create a report definition that filters out duplicate process engineering shapes and reports on process engineering components.
-
In the Report dialog box, click New.
-
In the Report Definition Wizard, choose an option you want to report on, and click Advanced.
-
In the Advanced dialog box, in the Property list, select PEComponentTag. In the Condition list, select Exists.In the Value list, select TRUE.
-
Click Add to put this condition in the defined criteria list, and then click OK.
-
In the Report Definition Wizard, click Next.
-
Select the <Displayed Text> check box to report on the component tag. Then select the check boxes for other data you want to report on, and then click Next.
-
To filter out duplicate process engineering shapes and report on components, click Subtotals.
-
In the Subtotals dialog box, in the Group by list, click <Displayed Text>, and then click Options.
-
In the Options dialog box, click Don't repeat identical values, and then click OK twice.
-
In the Report Definition Wizard, click Next, enter the information to save your report, and then click Finish.
-
In the Report dialog box, you can either run the report or click OK to save your definition and run it later.
Tip: To create a new report definition based on an existing one, in the Report dialog box, select the existing definition, and then click New. Save the modified report definition with a new name.
-
-
In the Report Definition list, click the name of the report definition you want to use.
The report definition determines which shapes are reported on and which shape data are included in your report.
-
Click Run, and then in the Run Report dialog box, click the report format you want, and then do one of the following:
-
If you are saving your report as a shape on the drawing, choose whether to save a copy of the report definition with the shape or link to a report definition.
-
If you are saving your report as a file (when you select HTML or XML as report format), type a name for the report.
-
-
To generate the report, click OK.
-
If you ran a custom report, when you return to the Report dialog box, click OK to save your definition.
-


