
In Skype for Business, your contacts are the online identities of the people you communicate with a lot. You can add them to your Contacts list so they’ll be just a click away. If your company has set up for it, you can add people who are outside of your company as well as coworkers. External contacts must also be Skype for Business users. For details about support for external contacts, see Add an external contact in Lync.
There are two methods for building your Contacts list from the Skype for Business main window: You can use search or, if search doesn’t bring up the results you expect (this can happen when the person you want to add is from outside of your company), you can use the Add a Contact icon.
Notes:
-
When you add a contact, you assign them to a contact group. For details about these groups, including how to create new ones, see Create a new group in Lync.
-
After you add a contact, you might want to change their privacy relationship. A privacy relationship is assigned by default and controls how much information that person can see about you via Skype for Business. For details, see Control access to your presence information in Lync.
-
This topic is about adding Skype for Business contacts, which you do in Skype for Business, on the computer or device you installed it on. If you found this topic while trying to add contacts in the Office 365 portal, note that you can add only Outlook Web App contacts from the portal, not Skype for Business contacts. For details, see People overview.
Add a contact by using search
Here’s the quick, no-frills way to add a contact:
-
In the Skype for Business main window, in the search box, type a name, email address, or phone number for the contact you want to add. While you type, the search results start appearing below the search box.
Note: If you’re trying to add someone outside your company and don’t see their name, try adding them by using the Add a Contact icon instead, as described in the next section. If you’re still not able to add an external contact, your account likely isn’t set up to support this. Contact your workplace technical support for details.
-
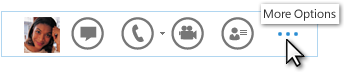
When you see the listing for the person you want to add, point at the picture (or picture display area), and then click the More Options button.
-
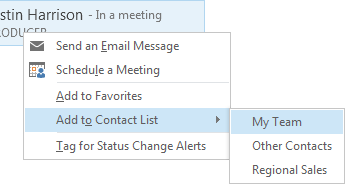
Point to Add to Contact List, and select a group for your new contact to belong to.
-
(Optional) To view or change the privacy relationship for your new contact, in the Contacts list, right-click the contact’s listing, click Change Privacy Relationship, and then note the selected relationship or select a new one.
Add a contact by using the Add a Contact icon
When the quick-and-simple approach outlined above isn’t appropriate, do the following:
-
In the Skype for Business main window, click the Add a Contact icon

-
Do one of the following:
-
To add an internal contact:
-
In the Add a Contact menu, click Add a Contact in my Organization.
-
Type the person’s name or email address in the search box.
-
Right-click the listing, click Add to Contacts List from the drop-down menu, and select a group to add the contact to.
-
(Optional) To view or change the privacy relationship for your new contact, in the Contacts list, right-click the contact’s listing, click Change Privacy Relationship, and then note the selected relationship or select a new one.
-
-
To add an external contact:
Note: If these steps don’t work for you, your account is probably not set up to support external contacts. Contact your workplace technical support for details.
-
In the Add a Contact menu, click Add a Contact Not in my Organization, and then click Skype for Business.
Important: Support for non-Skype for Business contacts isn’t included in Skype for Business for Office 365 operated by 21Vianet.
-
The Add Skype for Business Contact dialog box appears. In the IM Address box, type a correctly formatted IM address for your new contact. (You’ll know that the address is correctly formatted when you see a green check mark to the right of the address.)
-
Click the Add to contact group list, and select a group to add your new contact to.
-
Click the Set privacy relationship list, and select a privacy relationship for your new contact.
-
Click OK.


