The Outlook Social Connector connects you to the social and business networks that you use, including Microsoft SharePoint 2010 and Windows Live.
When you click an e-mail message or meeting, you see more information about the message sender and recipients or meeting organizer and attendees. The Outlook Social Connector enables a quick view of related Outlook content such as recent e-mail messages and joint meetings, shared documents from SharePoint sites, and status updates or activities from popular social network sites.
Updates appear in the People Pane, a section of the Reading Pane, or at the bottom of an open message or calendar item.
Note: Several social apps, including Facebook and LinkedIn have been removed from the Outlook Social Connector. For more information, see Facebook Connect is no longer available.

What do you want to do?
Connect to a social network
To connect the Outlook Social Connector to a social network, an add-in — also known as a provider — must be installed for each social network. If you are in an organization that uses Outlook 2010 and Microsoft SharePoint 2010, the Outlook Social Connector can automatically connect with your organization's SharePoint sites to display colleagues' activity items.
To install a social network provider, do the following:
-
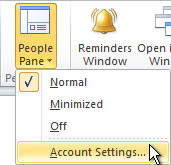
On the View tab, in the People Pane group, click People Pane, and then click Account Settings.

-
Under Social Network Accounts, click View social network providers available online.

A list of available providers appears. This list is updated with the latest social network providers.
-
Click the social network that you want to add.
-
Follow the instructions that appear.
Installation might include:
-
A user license agreement. Review the agreement, and then click Accept to continue.
-
The option to choose the installation folder on your computer for the provider.
-
A prompt to restart Outlook when the installation is complete.
Note: You can also find and download providers available by visiting the Outlook Social Connector provider list site.
After the network provider is installed, a list of available social network accountsappears.
-
In the network list, select the check box of the networks to which you want to connect.
If the list does not include a particular network, you might not have the network provider installed. See the steps above to install the provider.
-
Enter your login information for each network, and then click Connect.
After you connect the Outlook Social Connector to social networks, the People Pane displays information about your friends and colleagues who also belong to those networks.
Add colleagues to your networks
You can add a person to your social network colleague lists in Outlook. For many networks, you can see updates in Outlook only for people with whom you are a friend or colleague on that network.
To use Outlook to invite another person to be your friend or colleague on a social network, do the following:
-
In the People Pane, click Add

If you want to add a person as a colleague on a social network, but the network is not in the list of options, check the following:
-
Make sure that you have that network’s provider installed. See Connect to a social network to install.
-
Ask the person that you want to add whether he or she is a member of that social network.
Synchronize social network colleague contact information
Contact information for your colleagues on social networks is added to your Outlook contacts view in a folder matching the name of the social network. By default, contact information is automatically synchronized with the social networks daily. To turn contact synchronization off, or to be prompted before synchronization, do the following:
-
On the View tab, in the People Pane group, click People Pane, and then click Account Settings.
-
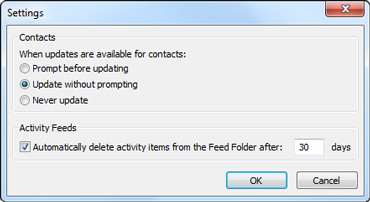
Click Settings.

-
Click Prompt before updating or Never update.
Change the appearance of the People Pane
You can resize the People Pane, or change the information it displays.
Display different information about a person
In the People Pane, each tab displays different information about the selected person. The default tabs include the following:
-
All Items All activities and messages from the selected person.
-
Activities All activities posted on the selected person's social network sites, such as alerts, comments, or messages.
-
Mail Recent e-mail messages that you have exchanged with the selected person.
-
Attachments Attachments that you have sent to or received from the selected person.
-
Calendar Meetings and appointments that include both you and the selected person.
-
Status Updates The most recent status updates that the selected person has posted.
To open any item in a tab list, click the item.
Display information about different people
If there are multiple recipients of the Outlook item that you have selected, for example, a meeting request, pictures of the other people appear in the title bar of the People Pane. Rest the pointer on a picture to see that person’s name. Click a picture to display the person’s social network information in the People Pane.
To see larger pictures of the other people, click People Pane view toggle 
Change the size of the People Pane
The People Pane size can be increased, decreased, or minimized. To change the size, use the pointer 
To minimize the People Pane, do one of the following:
-
Use the pointer to drag the top edge of the People Pane down to the bottom of the Outlook window.
-
Click the Collapse arrow

-
On the View tab, in the People Pane group, click People Pane, and then click Minimized.
Hide the Outlook Social Connector
To hide the Outlook Social Connector from all Outlook views, do the following:
-
On the View tab, in the People Pane group, click People Pane, and then click Off.
To return Outlook Social Connector to view, do the following:
-
On the View tab, in the People Pane group, click People Pane and then click Normal or Minimized.


